Acer TravelMate 8481 Скачать руководство пользователя страница 60


40

English

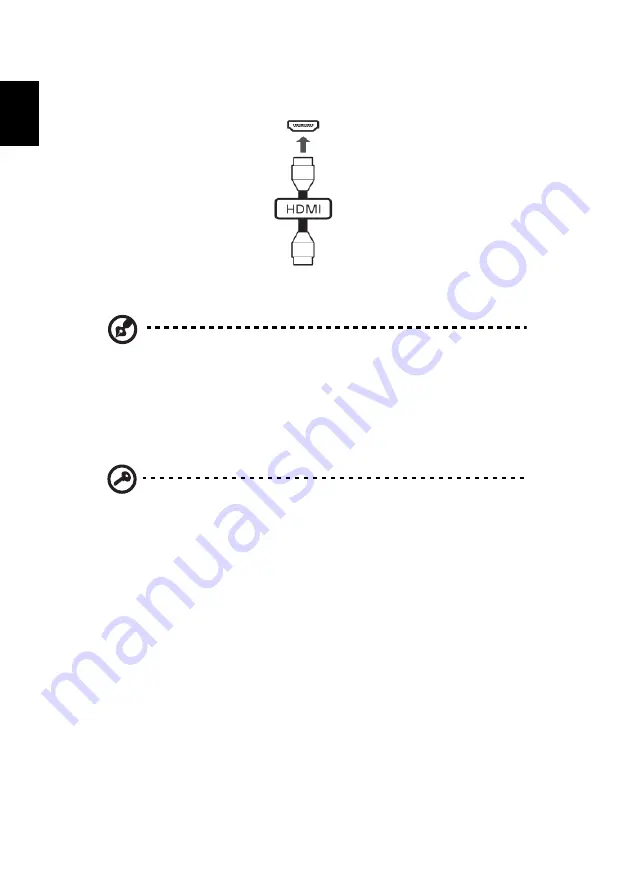
Use the HDMI port on your computer to connect with high-end audio and video 
equipment. Single cable implementation allows tidy setup and fast connection.

ExpressCard

Note

: Information in this section may not apply to your computer.

The ExpressCard is the newest version of the PC Card. It is a smaller and faster 
interface that further enhances the usability and expandability of your computer.

ExpressCards support a vast number of expansion options, including flash memory 
card adapters, TV-tuners, Bluetooth connectivity and IEEE 1394b adapters. 
ExpressCards support USB 2.0 and PCI Express applications.

Important

! There are two types, ExpressCard/54 and ExpressCard/

34 (54 mm and 34 mm), each with different functions. Not all 
ExpressCard slots will support both types. Please refer to your card’s 
manual for details on how to install and use the card, and its 
functions.

Содержание TravelMate 8481

Страница 1: ...TravelMate Series Generic User Guide...

Страница 2: ..._____ Serial number ___________________________________ Date of purchase ________________________________ Place of purchase ________________________________ 2011 All Rights Reserved TravelMate Series...

Страница 3: ...sconnecting power to the power supply unit Install the power supply unit before connecting the power cord to the AC power outlet Unplug the power cord before removing the power supply unit from the co...

Страница 4: ...performance of this product The system can be powered using a wide range of voltages 100 to 120 or 220 to 240 V AC The power cord included with the system meets the requirements for use in the countr...

Страница 5: ...d damage of internal components and to prevent battery leakage do not place the product on a vibrating surface Never use it under sporting exercising or any vibrating environment which will probably c...

Страница 6: ...When the operation time becomes noticeably shorter than normal buy a new battery Use only the approved batteries and recharge your battery only with the approved chargers designated for this device Us...

Страница 7: ...ervice station To prevent direct exposure to the laser beam do not try to open the enclosure CLASS 1 LASER PRODUCT CAUTION INVISIBLE LASER RADIATION WHEN OPEN AVOID EXPOSURE TO BEAM APPAREIL A LASER D...

Страница 8: ...it data files or messages this device requires a good quality connection to the network In some cases transmission of data files or messages may be delayed until such a connection is available Ensure...

Страница 9: ...air bags inflate with great force Do not place objects including installed or portable wireless equipment in the area over the air bag or in the air bag deployment area If in vehicle wireless equipmen...

Страница 10: ...w lamprecycle org ENERGY STAR Note Information in this section may not apply to your computer Acer s ENERGY STAR qualified products save your money by reducing energy cost and protecting the environme...

Страница 11: ...tenderness Pain swelling or throbbing Stiffness or tightness Coldness or weakness If you have these symptoms or any other recurring or persistent discomfort and or pain related to computer use consul...

Страница 12: ...ity and graphics clarity Eliminate glare and reflections by placing your display in such a way that the side faces the window or any light source minimizing room light by using drapes shades or blinds...

Страница 13: ...xiii English Note For more information please refer to Regulations and safety notices on page 50...

Страница 14: ...the TravelMate Generic User Guide This guide contains detailed information on such subjects as system utilities data recovery expansion options and troubleshooting In addition it contains warranty in...

Страница 15: ...re Do not spill water or any liquid on the computer Do not subject the computer to heavy shock or vibration Do not expose the computer to dust or dirt Never place objects on top of the computer Do not...

Страница 16: ...of used batteries according to local regulations Recycle if possible Cleaning and servicing When cleaning the computer follow these steps 1 Turn off the computer and remove the battery pack 2 Disconne...

Страница 17: ...care of your battery pack xvi Cleaning and servicing xvi Touchpad 1 Touchpad basics with two buttons 1 Using the keyboard 3 Lock keys and embedded numeric keypad 3 Hotkeys 4 Windows keys 5 Acer ProShi...

Страница 18: ...ebook PC with you 31 Disconnecting from the desktop 31 Moving around 31 Preparing the computer 31 What to bring to meetings 32 Taking the computer home 32 Preparing the computer 32 What to take with y...

Страница 19: ...call 47 Troubleshooting 48 Troubleshooting tips 48 Error messages 48 Regulations and safety notices 50 FCC statement 50 Modem notices 51 LCD pixel statement 52 Radio device regulatory notice 52 Genera...

Страница 20: ......

Страница 21: ...e Tapping on the touchpad is the same as clicking the left button Note Illustrations for reference only The exact configuration of your PC depends on the model purchased Note When using the touchpad k...

Страница 22: ...2 English Note By default vertical and horizontal scrolling is enabled on your touchpad It can be disabled under Mouse settings in Windows Control Panel...

Страница 23: ...are in uppercase Num Lock Fn F11 When Num Lock is on the embedded keypad is in numeric mode The keys function as a calculator complete with the arithmetic operators and Use this mode when you need to...

Страница 24: ...configuration Fn F4 Sleep Puts the computer in Sleep mode Fn F5 Display toggle Switches display output between the display screen external monitor if connected and both Fn F6 Display off Turns the dis...

Страница 25: ...s L Lock your computer if connected to a domain or switch users if not connected to a domain M Minimize all windows R Open the Run dialog box T Cycle through programs on the taskbar U Open Ease of Acc...

Страница 26: ...epending on your edition of Windows some shortcuts may not function as described Application key This key has the same effect as clicking the right mouse button it opens the application s context menu...

Страница 27: ...ssword Bio Protection TPM configuration BIOS Migration Boot sequence and device security Data Encryption Personal secure drive file and folder encryption Data Removal File shredder Remote Manageabilit...

Страница 28: ...Secure Disk The Personal Secure Disk PSD is a secure section of your hard disk where you can save files You can only get access to the PSD via password or fingerprint authentication Once setup is fin...

Страница 29: ...device You can also set the boot device order enable or disable ports and built in devices and import or export BIOS settings Credential Manager Here you can set and manage your credentials including...

Страница 30: ...mpletely removed from the hard disk The File Shredder overwrites the data to make recovering the data impossible Note You can also double click the File Shredder icon on the desktop to open this funct...

Страница 31: ...ity This module allows Acer Client Manager to control the functions of Acer ProShield from a remote station The flexibility of remote management allows efficient use of IT resources and timely impleme...

Страница 32: ...fications may vary Acer eRecovery Management consists of the following functions 1 Backup Create Factory Default Backup Backup Drivers and Applications Note Models that do not have an ODD will allow y...

Страница 33: ...tart All Programs Acer then click Acer eRecovery Management 2 To create recovery discs for the hard drive s entire original contents including Windows and all factory loaded software and drivers click...

Страница 34: ...n click Next You will be shown the backup progress on the screen The drive ejects each disc as it completes burning it 4 Remove the disc from the drive and mark it with a permanent marker Important Wr...

Страница 35: ...previous data Important This section only applies to computers without an optical drive 1 Click Start All Programs Acer then click Acer eRecovery Management 2 To create recovery backup for the hard d...

Страница 36: ...lug in the USB disk then click Next You will be shown the backup progress on the screen 4 Unplug the USB flash drive and mark it with a permanent marker Important Write a unique descriptive label on e...

Страница 37: ...lem may be solved by returning your system to a previous state when everything was working correctly For instructions see Returning to a previous system condition on page 18 3 Reset your system to its...

Страница 38: ...rosoft System Restore periodically takes snapshots of your system settings and saves them as restore points In most cases of hard to resolve software problems you can return to one of these restore po...

Страница 39: ...from the hard drive during startup on page 20 If you cannot run Windows and your original hard drive has been completely re formatted or you have installed a replacement hard drive see Recovering from...

Страница 40: ...ng Continuing the process will erase all files on your hard drive If it is not already enabled you must enable the F12 Boot Menu Press F2 when starting your computer Use the left or right arrow keys t...

Страница 41: ...problem may be solved by returning your system to a previous state when everything was working correctly For instructions see Returning to a previous system condition on page 22 3 Reset your system t...

Страница 42: ...periodically takes snapshots of your system settings and saves them as restore points In most cases of hard to resolve software problems you can return to one of these restore points to get your syste...

Страница 43: ...during startup on page 24 If you cannot run Windows and your original hard drive has been completely re formatted or you have installed a replacement hard drive see Recovering from your recovery backu...

Страница 44: ...computer Warning Continuing the process will erase all files on your hard drive If it is not already enabled you must enable the F12 Boot Menu Press F2 when starting your computer Use the left or rig...

Страница 45: ...proceed to the following screen Click the button and follow the onscreen instructions 1 Select the content you want to back up The less content you select the quicker the process will be but it will...

Страница 46: ...management scheme that supports the advanced configuration and power interface ACPI which allows for maximum power conservation and maximum performance at the same time Windows handles all power savi...

Страница 47: ...ra fully charged battery pack available as backup Contact your dealer for details on ordering a spare battery pack Maximizing the battery s life Like all other batteries your computer s battery will d...

Страница 48: ...of the battery is adversely affected by the following usage patterns Using the computer on constant AC power with the battery inserted If you want to use constant AC power you are advised to remove t...

Страница 49: ...y charged battery Checking the battery level The Windows power meter indicates the current battery level Rest the cursor over the battery power icon on the taskbar to see the battery s present charge...

Страница 50: ...Action The AC adapter and a power outlet are available 1 Plug the AC adapter into the computer and then connect to the mains power supply 2 Save all necessary files 3 Resume work Turn off the computer...

Страница 51: ...e from your office desk to a meeting room Preparing the computer Before moving the computer close and latch the display cover to place it in Sleep mode You can now safely take the computer anywhere yo...

Страница 52: ...and release the power button Taking the computer home When you are moving from your office to your home or vice versa Preparing the computer After disconnecting the computer from your desktop follow t...

Страница 53: ...me for significant periods of time you might also want to add an external keyboard monitor or mouse Traveling with the computer When you are moving within a larger distance for instance from your offi...

Страница 54: ...you need to show it to customs officials International Travelers Warranty passport Special considerations Follow the same special considerations as when traveling with the computer In addition these...

Страница 55: ...puter from unauthorized access Setting these passwords creates several different levels of protection for your computer and data Supervisor Password prevents unauthorized entry into the BIOS utility O...

Страница 56: ...s Enter When the User Password is set and the password on boot parameter is enabled a prompt appears at boot up Type the User Password and press Enter to use the computer If you enter the password inc...

Страница 57: ...read the following section Fax data modem Note Information in this section may not apply to your computer Your computer has a built in V 92 56 Kbps fax data modem Warning This modem port is not compa...

Страница 58: ...d network To use the network feature connect an Ethernet cable from the Ethernet RJ 45 port on the chassis of the computer to a network jack or hub on your network Universal Serial Bus USB The USB 2 0...

Страница 59: ...n for details High Definition Multimedia Interface Note Information in this section may not apply to your computer HDMI High Definition Multimedia Interface is an industry supported uncompressed all d...

Страница 60: ...further enhances the usability and expandability of your computer ExpressCards support a vast number of expansion options including flash memory card adapters TV tuners Bluetooth connectivity and IEEE...

Страница 61: ...e card operation 3 Push the card gently into the slot and release to pop out the card Then pull the card free from the slot Installing memory Note Information in this section may not apply to your com...

Страница 62: ...clicks into place 4 Replace the memory cover and secure it with the screw 5 Reinstall the battery pack and reconnect the AC adapter 6 Turn on the computer The computer automatically detects and recon...

Страница 63: ...sequence in the BIOS utility activate the BIOS utility then select Boot from the categories listed at the top of the screen Enable disk to disk recovery To enable disk to disk recovery hard disk reco...

Страница 64: ...aximum of five times including the first time after which the last region code set will remain permanent Recovering your hard disk does not reset the number of times the region code has been set Refer...

Страница 65: ...ystem automatically blanks the screen to save power Press any key to turn the display back on If pressing a key does not turn the display back on three things might be the cause The brightness level m...

Страница 66: ...al version the operating system and language you choose when you first turn on the system will be the only option for future recovery operations This recovery process helps you restore the C drive wit...

Страница 67: ...nefits from our support centers Place your proof of purchase in the flap located inside the front cover of the ITW passport If the country you are traveling in does not have an Acer authorized ITW ser...

Страница 68: ...ive an error message note the message and take the corrective action The following table lists the error messages in alphabetical order together with the recommended course of action Error messages Co...

Страница 69: ...e contact your dealer or an authorized service center for assistance Keyboard interface error Contact your dealer or an authorized service center Memory size mismatch Press F2 during POST to enter the...

Страница 70: ...ntenna Increase the separation between the device and receiver Connect the device into an outlet on a circuit different from that to which the receiver is connected Consult the dealer or an experience...

Страница 71: ...to give you an opportunity to maintain uninterrupted telephone service If this equipment should fail to operate properly disconnect the equipment from the phone line to determine if it is causing the...

Страница 72: ...Telecom s Telepermit requirements are dependent on the equipment PC associated with this device In order to operate within the limits for compliance with Telecom s specifications the associated equip...

Страница 73: ...ss frequency bands Some areas of France have a restricted frequency band The worst case maximum authorized power indoors is 10 mW for the entire 2 4 GHz band 2400 MHz 2483 5 MHz 100 mW for frequencies...

Страница 74: ...to follow the RF safety instructions on wireless option devices that are included in the user s manual of each RF option device 01 Ain Orientales 02 Aisne 03 Allier 05 Hautes Alpes 08 Ardennes 09 Arie...

Страница 75: ...erference to co channel Mobile Satellite systems 3 High power radar is allocated as the primary user of the 5 25 to 5 35 GHz and 5 65 to 5 85 GHz bands These radar stations can cause interference with...

Страница 76: ...uct to be used indoors for the frequency range of 5 15 GHz to 5 25 GHz to reduce the potential for harmful interference to co channel mobile satellite systems High power radar is allocated as the prim...

Отзывы: