


EN-7
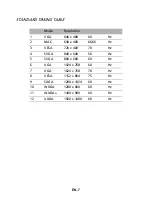
STANDARD TIMING TABLE
Mode
Resolution
1
VGA
640 x 480
60
Hz
2
MAC
640 x 480
66.66
Hz
3
VESA
720 x 400
70
Hz
4
SVGA
800 x 600
56
Hz
5
SVGA
800 x 600
60
Hz
6
XGA
1024 x 768
60
Hz
7
XGA
1024 x 768
70
Hz
8
VESA
1152 x 864
75
Hz
9
SXGA
1280 x 1024
60
Hz
10
WXGA
1280 x 800
60
Hz
11
WXGA+
1440 x 900
60
Hz
12
UXGA
1920 x 1080
60
Hz
Содержание S242HL
Страница 1: ...User Guide Acer LCD Monitor...