background image

Acer 

SERVICE GUIDE 

Page : 48/62 
Language :English 
Date : 2016-02-29 


Page 48/66 


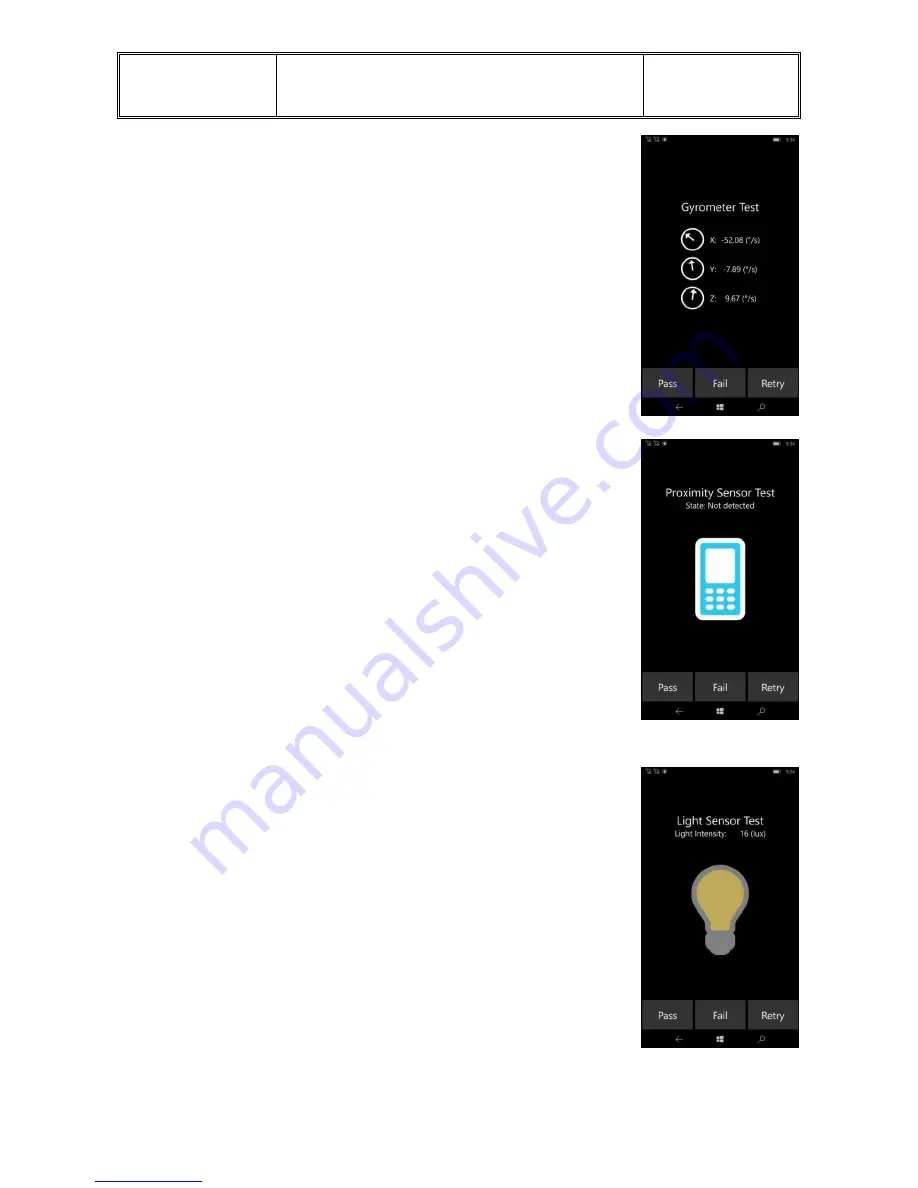
Tester observes if the gyro meter sensor returns values. 


Tester should rotate/spin/flip the device a little bit to 
see if value changes accordingly. 


Test feedback: 


Pass/Fail/Retry 


Proximity Sensor Test 


Tester observes if the proximity sensor returns values. 


Tester should touch where the proximity sensor is 
installed (near the front facing camera) to see if the 
state value changes accordingly. 


Test feedback: 


Pass/Fail/Retry 


Light Sensor Test 


Tester observes if the ambient light sensor returns values. 


Tester should try to change the luminance condition at 
where ambient light sensor is installed (near the front 
facing camera) to see if the value changes accordingly. 


Test feedback: 


Pass/Fail/Retry 


Speaker Test 


Содержание Jade Primo S58

Страница 1: ...Acer SERVICE GUIDE Page 1 62 Language English Date 2016 02 29 Page 1 66 Jade Primo S58 Service guide Category of technical document Instruction book version A Date 2016 03 02 Document No Jade Primo ...

Страница 2: ...e of Contents 1 GENERAL INFORMATION 3 2 QUICK SPEC 4 3 PHONE TOUR 7 4 SYSTEM BLOCK DIAGRAM 10 5 JADE PRIMO DOWNLOAD TOOL USER MANUAL 11 6 HOW TO READ WRITE CODE S N 13 7 DISASSEMBLE ASSEMBLE 17 8 ACER TEST APPLICATION SOP 39 9 EXPLODED VIEW 50 10 DEVICE LABEL 51 11 FRU LIST 62 ...

Страница 3: ... are not covered in this generic service guide In such case contact your regional offices or the responsible personnel channel to provide you with further technical details When ordering FRU parts Check the most up_to_date information available on your regional web or channel If for whatever reason a part number change is made it may not be noted in this printed service guide For Acer authorized s...

Страница 4: ...Acer SERVICE GUIDE Page 4 62 Language English Date 2016 02 29 Page 4 66 2 Quick Spec Following is a summary of the phone s main specifications ...

Страница 5: ...Acer SERVICE GUIDE Page 5 62 Language English Date 2016 02 29 Page 5 66 ...

Страница 6: ...Acer SERVICE GUIDE Page 6 62 Language English Date 2016 02 29 Page 6 66 ...

Страница 7: ...Acer SERVICE GUIDE Page 7 62 Language English Date 2016 02 29 Page 7 66 3 Phone Tour Front view ...

Страница 8: ...Acer SERVICE GUIDE Page 8 62 Language English Date 2016 02 29 Page 8 66 Rear view ...

Страница 9: ...Acer SERVICE GUIDE Page 9 62 Language English Date 2016 02 29 Page 9 66 Top view Bottom view Side View ...

Страница 10: ...Acer SERVICE GUIDE Page 10 62 Language English Date 2016 02 29 Page 10 66 4 System Block Diagram ...

Страница 11: ...ey till vibrate Acer Logo shows then release Power key long press Volume up key about 3 seconds then can enter FFU Flash mode 3 Connect to PC open Windows device manager can see JadePrimo detected and driver WinUsb Device successfully installed as pic Launch CSD_Acer_Download_Tool_22 08 Choose Windows Flash Page Please CHECK Flash FFU NOT BIN item Select ffu file for flash ...

Страница 12: ...e 12 62 Language English Date 2016 02 29 Page 12 66 If 1 device found shows as pic then click START to flash image Step1 4 process flashing flashing image may take 10 15 minutes Flash completed JadePrimo will auto boot to OS ...

Страница 13: ... List of support List of Support Models Project Model Windows Notice S58 S58 Windows Mobile 4 3 Set Factory Mode Device power off Enter FFU Mode press power key until show acer logo and shake Then release power key and press volume up key until enter ffu flash mode as following image appears on DUT s screen Using tool ToFactoryMode click switchmode bat if successful JadePrimo will boot to Factory ...

Страница 14: ...Diagnostic 9093 detected and driver successfully installed If DIAG Driver QualcommHS USB Diagnostic 9093 can t be seen on PC please install QUD WIN 1 1 Installer 10036 7 4 4 Read Code S N Value Launch Acer_Diag_Tool_v0 2_S58_WriteCodeSN click Read to get current S N If code S N been read successfully status will show PASS as pic 4 5 Write Code S N Value ...

Страница 15: ...ease turn off this program Reboot JadePrimo to Check Code SN Settings Extras Device Information Code SN 4 6 Set Shipping Mode 3 After Code S N been read or re written please set back to shipping mode 4 1 Power off via long press Power key 4 2 Enter FFU Flash mode Long press power key till vibrate Acer Logo shows then release Power key long press Volume up key about 3 seconds then can enter FFU Fla...

Страница 16: ...Acer SERVICE GUIDE Page 16 62 Language English Date 2016 02 29 Page 16 66 4 3 Using tool ToShippingMode click switchmode bat if successful JadePrimo will boot to Shipping OS ...

Страница 17: ...age 17 62 Language English Date 2016 02 29 Page 17 66 7 Disassemble Assemble 7 1 Tools 1 PIN Tool 2 Plastic Bar 3 Cross Screwdriver 4 Tweezers 7 2 Disassembly Steps 1 Remove the SIM 1 tray and SIM 2 SIM SD tray by PIN tool ...

Страница 18: ...Acer SERVICE GUIDE Page 18 62 Language English Date 2016 02 29 Page 18 66 2 Unscrew the one screw on the side ...

Страница 19: ...rt the Plastic bar into the gap of housing at the side of type c slot and slip along the housing carefully to open the all hooks between rear cover and front housing 4 As shown in the following figure step 1 is No 1 to No 2 step 2 is No 3 to No 4 and step 3 take off the back cover ...

Страница 20: ...SERVICE GUIDE Page 20 62 Language English Date 2016 02 29 Page 20 66 5 Unscrew the seven screws as shown in the following figure 6 First remove the Kapton from the P L sensor and take off the Camera Battery ...

Страница 21: ...Acer SERVICE GUIDE Page 21 62 Language English Date 2016 02 29 Page 21 66 TP LCM Sub PCB FPC RF cable P L sensor connector 7 Take off the Main PCB Main Camera and Front Camera ...

Страница 22: ...Acer SERVICE GUIDE Page 22 62 Language English Date 2016 02 29 Page 22 66 8 Take off the Speaker Box ...

Страница 23: ...Acer SERVICE GUIDE Page 23 62 Language English Date 2016 02 29 Page 23 66 9 Take off the Receiver P L Sensor RF Cable 10 Pull the twin adhesive with mylar and take off the battery ...

Страница 24: ...Acer SERVICE GUIDE Page 24 62 Language English Date 2016 02 29 Page 24 66 11 Take off the SUB PCB Mic Rubber ...

Страница 25: ...Acer SERVICE GUIDE Page 25 62 Language English Date 2016 02 29 Page 25 66 12 Disassembly steps are complete ...

Страница 26: ...Acer SERVICE GUIDE Page 26 62 Language English Date 2016 02 29 Page 26 66 ...

Страница 27: ...27 66 7 3 Assembly Steps 1 Receiver assemble the top side of the front cover slot and place the spring of receiver connector to down 2 Sensor FPC place in the front cover slot and paste it 3 MB Assembly Fix MB on Toaling hole 4 Take off the release paper of the Key FPC ...

Страница 28: ...Acer SERVICE GUIDE Page 28 62 Language English Date 2016 02 29 Page 28 66 5 Key FPC are placed by location pillar 6 Fasten four screws 7 P L Sensor connect the MB ...

Страница 29: ... GUIDE Page 29 62 Language English Date 2016 02 29 Page 29 66 8 LCM FPC connect the MB 9 Assemble Main Camera a Take off the release paper b Main Camera put in the MB slot and place the top side with the slot main ...

Страница 30: ...the MB while assembling the main camera the release paper needs to be removed 10 Assemble Front Camera a The adhesive is pated on the Front camera by fixture While assembling the front camera the release paper need to be removed b Front Camera put in the front cover slot and connect the MB ...

Страница 31: ... Date 2016 02 29 Page 31 66 11 Paste the conductive adhesive to connect the front camera and shielding 12 Assemble Front Mic rubber Put the Mic rubber in the slot of front cover 13 Assemble SUB PCBA FPC Rigid Flex a Take off adhesive release paper ...

Страница 32: ...Acer SERVICE GUIDE Page 32 62 Language English Date 2016 02 29 Page 32 66 b SUB PCBA is fixed by toaling hole and pasted by conductive adhesive c FPC connect the MB Pasted by the conductive adhesive ...

Страница 33: ...Acer SERVICE GUIDE Page 33 62 Language English Date 2016 02 29 Page 33 66 14 Assemble RF Cable a RF Cable connect the MB and SUB PCBA the cable put in the notch ...

Страница 34: ...Acer SERVICE GUIDE Page 34 62 Language English Date 2016 02 29 Page 34 66 b Add the Kapton to avoid the cable to shift and the position must be under the Key FPC ...

Страница 35: ...ge 35 66 15 Assembly Speaker Box Speaker Box is placed on the SUB PCBA and fixed by two slot from front cover fasten the three screw Caution The RF cable doesn t press by Speaker Box 16 Battery adhesive a b Assemble the battery to the top Battery connect the Main PCB ...

Страница 36: ...Acer SERVICE GUIDE Page 36 62 Language English Date 2016 02 29 Page 36 66 17 Assemble the rear cover ...

Страница 37: ...Acer SERVICE GUIDE Page 37 62 Language English Date 2016 02 29 Page 37 66 18 Insert Tray 19 Assembly steps are complete ...

Страница 38: ...Acer SERVICE GUIDE Page 38 62 Language English Date 2016 02 29 Page 38 66 ...

Страница 39: ...st There will be a page that lists all test items configured the tester may select to run the test item one by one manually Clear Test Result Use to clear the test result saved Supported test items Including Touch Display Brightness etc Information about test items is included in this document Log There will be a log generated after running test items this log will record the start time and end ti...

Страница 40: ... on the phone 2 Go to the Apps list 3 Tap Phone to start the phone app Figure 1 4 Tap the keypad icon Figure 2 5 Dial 2237386 to start the test application Figure 3 Follow the GUI guidance to run the test Figure 1 Figure 2 Figure 3 Figure 4 Figure 5 Figure 6 6 Phase selection page Figure 4 This page shows a tool function set ...

Страница 41: ...holder of the test item will change color to indicate the status of the test item Test item status Transparent for Not tested Green for Pass Red for Fail 8 Test item Figure 6 Usually a test item will be stopped at tester feedback page for tester to feedback the test result manually For some test items which result could be detected and determined automatically by program then such test items will ...

Страница 42: ...les area on screen when a finger touch is detected upon green tile it will erase the touched tile Tester must erase all green tiles to pass the test When all green tiles are erased the app will automatically proceed to next step Tester can press the Back button 3 times to fail this test item and proceed to next step Multi Points Put the number of fingers required on center rectangle area When requ...

Страница 43: ...ester taps on screen to step through the color test One color is displayed at a time in full screen Full screen color displayed in this sequence White Gray Black Red Green Blue Yellow Cyan Magenta Tester must step through all color display to enter the feedback page Tester can press the Back button 3 times to fail this test item Tester feedback Pass Fail Retry Brightness Test Tester observes if th...

Страница 44: ...back Pass Fail Retry Battery Test Tester checks if the listed battery status is correct Tester may plug in unplug power source to check if the battery status changes as expected Test feedback Pass Fail Retry SD Card Test Tester checks if SD card is present SD card must be inserted to device before running this test or press Retry to force detecting change of status Test feedback Pass Fail Retry ...

Страница 45: ... Tester checks if a Bluetooth device can be detected Tester must wait to see if at least one Bluetooth device is detected or until the Bluetooth device search times out Test feedback Pass Fail Retry GPS Test Tester checks if GPS satellite signal can be detected While the position is fixed the position data will be shown on screen Tester must wait to see if there is a GPS message shows up Test feed...

Страница 46: ...e time trigger an auto focus at that region Tester should press the shutter button to trigger picture shot to proceed to next page to review captured picture After reviewing captured picture tester should select the test result from the feedback section of the screen Test feedback Pass Fail Retry Front Camera Test Tester observes if camera preview capture function can work Tester should press the ...

Страница 47: ...the accelerometer sensor returns values Tester should change the heading of the device to check if the value changes accordingly For some devices that require to do sensor calibration there will be a warning shown on the screen Test feedback Pass Fail Retry Accelerometer Test Tester observes if the accelerometer sensor returns values Tester should move the phone towards different orientation to ch...

Страница 48: ...s if the proximity sensor returns values Tester should touch where the proximity sensor is installed near the front facing camera to see if the state value changes accordingly Test feedback Pass Fail Retry Light Sensor Test Tester observes if the ambient light sensor returns values Tester should try to change the luminance condition at where ambient light sensor is installed near the front facing ...

Страница 49: ... heard from an earpiece Tester should generate some sounds for recording and then check if the playback can work Since this test is for the earpiece and mic installed on the phone device confirm that a headset is removed not connected for this test Before playing please put your phone to the ear Test feedback Pass Fail Retry Headset Test Tester observes if audio recording headset mic and audio pla...

Страница 50: ...art Name 1 TP LCM Touch Panel include the LCD Module 2 Front Camera 3 Receiver 4 P L Sensor 5 Main Camera 6 Main Board 7 Front Cover Including the Thermal Module 8 Back Cover Including the Camera Lens Flash Lens Key Sim Tray Speaker Mesh 9 RF Cable 10 Key FPC 11 Battery 12 Sub Board 13 Speaker Box ...

Страница 51: ...Acer SERVICE GUIDE Page 51 62 Language English Date 2016 02 29 Page 51 66 10 Device Label ...

Страница 52: ...Acer SERVICE GUIDE Page 52 62 Language English Date 2016 02 29 Page 52 66 ...

Страница 53: ...Acer SERVICE GUIDE Page 53 62 Language English Date 2016 02 29 Page 53 66 ...

Страница 54: ...Acer SERVICE GUIDE Page 54 62 Language English Date 2016 02 29 Page 54 66 ...

Страница 55: ...Acer SERVICE GUIDE Page 55 62 Language English Date 2016 02 29 Page 55 66 ...

Страница 56: ...Acer SERVICE GUIDE Page 56 62 Language English Date 2016 02 29 Page 56 66 ...

Страница 57: ...Acer SERVICE GUIDE Page 57 62 Language English Date 2016 02 29 Page 57 66 ...

Страница 58: ...Acer SERVICE GUIDE Page 58 62 Language English Date 2016 02 29 Page 58 66 ...

Страница 59: ...Acer SERVICE GUIDE Page 59 62 Language English Date 2016 02 29 Page 59 66 ...

Страница 60: ...Acer SERVICE GUIDE Page 60 62 Language English Date 2016 02 29 Page 60 66 ...

Страница 61: ...Acer SERVICE GUIDE Page 61 62 Language English Date 2016 02 29 Page 61 66 ...

Страница 62: ...Acer SERVICE GUIDE Page 62 62 Language English Date 2016 02 29 Page 62 66 11 FRU LIST ...

Страница 63: ...Acer SERVICE GUIDE Page 63 62 Language English Date 2016 02 29 Page 63 66 ...

Страница 64: ...Acer SERVICE GUIDE Page 64 62 Language English Date 2016 02 29 Page 64 66 ...

Страница 65: ...Acer SERVICE GUIDE Page 65 62 Language English Date 2016 02 29 Page 65 66 ...

Страница 66: ...Acer SERVICE GUIDE Page 66 62 Language English Date 2016 02 29 Page 66 66 ...

Отзывы: