background image

17

English

X1340W/P1340W/X1340WH/P1340WG

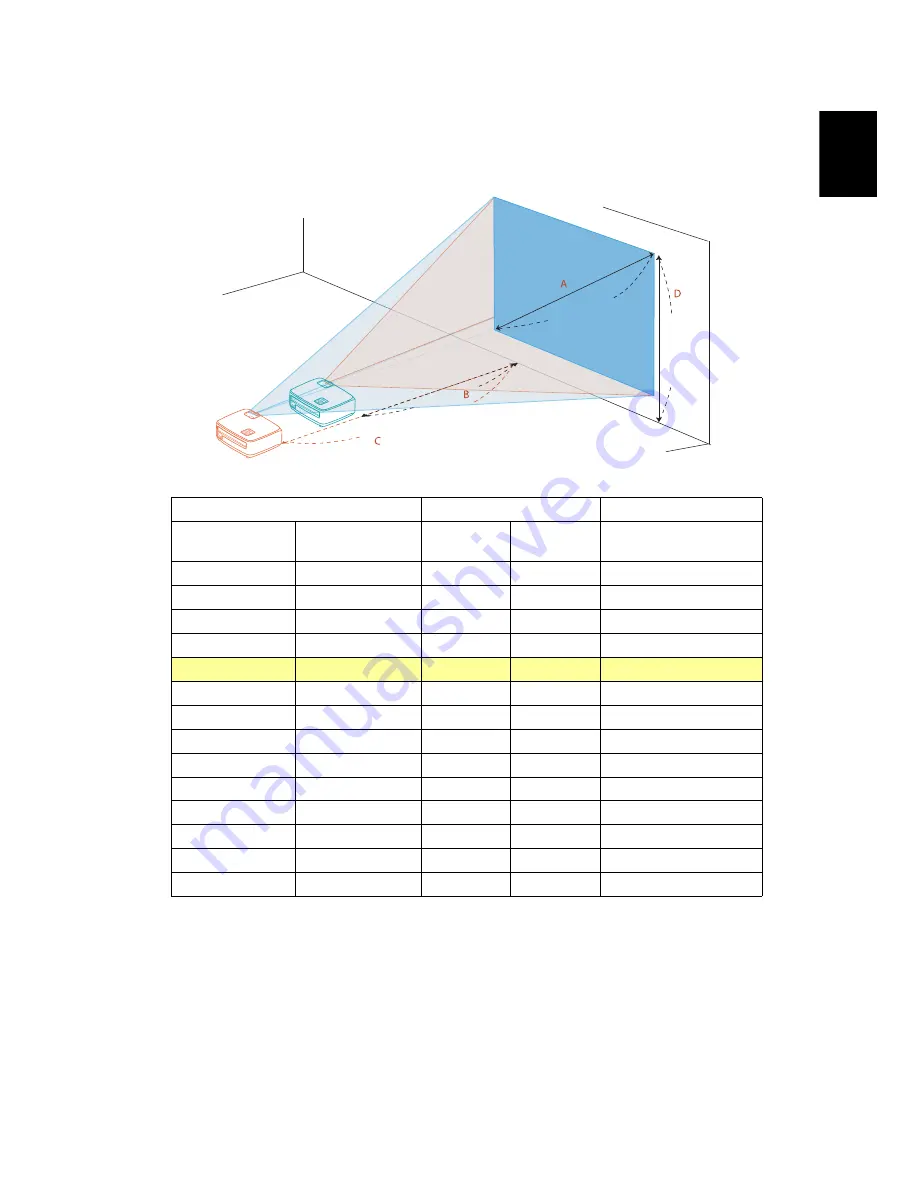
To obtain an image size of 70" set the projector at a distance between 2.3 m 
and 2.5 m from the screen and adjust the zoom level accordingly.

Desired Image Size

Distance (m)

Top (cm)

Diagonal (inch)

< A >

W (cm) x H (cm)

Max zoom

< B >

Min zoom

< C >

From base to top of 

image < D >

30

65 x 40

1.1

40

40

86 x 54

1.3

1.4

54

50

108 x 67

1.6

1.8

67

60

129 x 81

1.9

2.1

81

70

151 x 94

2.3

2.5

94

80

172 x 108

2.6

2.8

108

90

194 x 121

2.9

3.2

121

100

215 x 135

3.2

3.6

135

120

258 x 162

3.9

4.3

162

150

323 x 202

4.8

5.3

202

180

388 x 242

5.8

6.4

242

200

431 x 269

6.5

7.1

269

250

538 x 337

8.1

8.9

337

300

646 x 404

9.7

404

Zoom Ratio: 1.1 x

Desired distance

Height:

94 cm

From base 

to top of 

image

70"
Desired
image size

2.3 m

2.5 m

Содержание H6510BD

Страница 1: ...Acer Projector X111 X1140 X1140A X111P X1240 X1340W P1340W X1340WH P1340WG H6510BD P1500 Series User s Guide ...

Страница 2: ... or supplementary documents and publications This company makes no representations or warranties either expressed or implied with respect to the contents hereof and specifically disclaims the implied warranties of merchantability or fitness for a particular purpose Record the model number serial number purchase date and place of purchase information in the space provided below The serial number an...

Страница 3: ...wer outlet you plug the power cord into is easily accessible and located as close to the equipment operator as possible When you need to disconnect power to the equipment be sure to unplug the power cord from the electrical outlet Warnings Do not use this product near water Do not place this product on an unstable cart stand or table If the product falls it could be seriously damaged Slots and ope...

Страница 4: ... outlet strip or receptacle by plugging in too many devices The overall system load must not exceed 80 of the branch circuit rating If power strips are used the load should not exceed 80 of the power strip s input rating This product s AC adapter is equipped with a three wire grounded plug The plug only fits in a grounded power outlet Make sure the power outlet is properly grounded before insertin...

Страница 5: ...fety reasons do not use non compliant parts when adding or changing components Consult your reseller for purchase options Your device and its enhancements may contain small parts Keep them out of the reach of small children Additional safety information Do not look into the projector s lens when the lamp is on The bright light may hurt your eyes Turn on the projector first and then signal sources ...

Страница 6: ...re To temporarily turn off the lamp press HIDE on the remote control The lamp becomes extremely hot during operation Allow the projector to cool for approximately 45 minutes prior to removing the lamp assembly for replacement Do not operate lamps beyond the rated lamp life It could cause it to break on rare occasions Never replace the lamp assembly or any electronic components unless the projector...

Страница 7: ...n discarding To minimize pollution and ensure utmost protection of the global environment please recycle For more information on the Waste from Electrical and Electronics Equipment WEEE regulations visit http www acer group com public Sustainability sustainability01 htm Mercury advisory For projectors or electronic products containing an LCD CRT monitor or display Lamp s inside this product contai...

Страница 8: ...light may hurt your eyes To reduce the risk of fire or electric shock do not expose this product to rain or moisture Please do not open or disassemble the product as this may cause electric shock When changing the lamp please allow the projector to cool down and follow all changing instructions This product will detect the life of the lamp itself Please be sure to change the lamp when it shows war...

Страница 9: ...jector On Off 10 Turning On the Projector 10 Turning Off the Projector 11 Adjusting the Projected Image 12 Adjusting the Height of the Projected Image 12 How to Optimize Image Size and Distance 13 How to Get a Preferred Image Size by Adjusting Distance and Zoom 16 User Controls 19 Installation Menu 19 Acer Empowering Technology 20 Onscreen Display OSD Menus 23 Color 24 Image 27 Setting 31 Manageme...

Страница 10: ...Appendices 40 Troubleshooting 40 LED Alarm Definition Listing 44 Replacing the Lamp 45 Ceiling Mount Installation 46 Specifications 49 Compatibility Modes 52 Regulations and safety notices 56 ...

Страница 11: ...ast ratio Versatile display modes enable optimum performance in any situation NTSC PAL SECAM compatible and HDTV 720p 1080i 1080p supported Lower power consumption and economy ECO mode extends lamp life Dynamic Black ExtremeEco functions help decrease lamp power consumption and further extend lamp life Dynamic Black If turned on the projector dynamically adjusts the power consumption of the lamp a...

Страница 12: ...tems shown below Check to make sure you have them all Contact your dealer immediately if any thing is missing Projector Power cord VGA cable Security card User s guide CD ROM Remote control Quick start guide Battery x 2 Carrying case Optional Dust filter Optional ...

Страница 13: ... Description 1 Mini USB connector 7 HDMI connector 2 Monitor loop through output connector 8 Power socket 3 Analog RGB signal HDTV component video input connector 9 Tilt adjusting wheel 4 RS232 connector 10 Kensington lock port 5 S Video input connector Composite video input connector 11 Component video input connector 6 Audio input connector Audio output connector 1 5 6 4 3 2 7 X111 X1140 X1140A ...

Страница 14: ...ce 5 MENU Launches the Onscreen Display OSD menu returns to the previous step for the OSD menu operation or exits the OSD menu 6 Power key Refer to the Turning the Projector On Off section 7 TEMP Temp Indicator LED 8 SOURCE Chooses RGB component video S Video composite video HDMI or HDTV source 9 Four directional selection keys Selects items or makes adjustments to your selection 10 Empowering key...

Страница 15: ...our directional selection keys Selects items or makes adjustments to your selection 6 Keypad 0 9 Press 0 9 to input a password in the Setting Security OSD 7 VGA To change source to VGA This connection supports analog RGB YPbPr 480p 576p 720p 1080i 1080p and YCbCr 480i 576i 8 COMPONENT To change source to Component video This connector supports YPbPr 9 S VIDEO To change source to S Video 10 HDMI HD...

Страница 16: ... previous step for the OSD menu operation or exits the OSD menu 17 PgUp PgDn For computer mode only Use this button to select the next or previous page This function is only available when connected to a computer via a USB cable 18 VIDEO To change source to composite video 19 MUTE To turn on off the volume 20 WIRELESS LAN WiFi No function 21 Rewind Play Pause Stop Fast forward No function 22 SD US...

Страница 17: ...GA to component video HDTV adapter 8 USB cable 4 Composite video cable 9 3 RCA component cable 5 Audio cable RS232 RS232 R B G R B G HDTV adapter D Sub D Sub 7 8 D Sub D Sub 2 5 6 4 2 USB USB 1 R W 9 3 Y Y 5 5 R W DVD player Set top box HDTV receiver VGA RS232 Video S Video Output Display Speakers X111 X1140 X1140A X111P X1240 X1340W ...

Страница 18: ...HDTV adapter 8 USB cable 4 Composite video cable 9 3 RCA component cable 5 Audio cable 10 HDMI cable R B G D Sub HDTV adapter D Sub D Sub 8 D Sub 2 6 4 USB 1 R W 9 Y Y 5 5 USB 3 7 RS232 RS232 2 10 R B G R W 5 DVD player Set top box HDTV receiver VGA RS232 Video S Video Output Display Speakers P1340W X1340WH P1340WG ...

Страница 19: ...y mode is compatible with the projector Description Description 1 Power cord 7 RS232 cable 2 VGA cable 8 USB cable 4 Composite video cable 9 3 RCA component video cable 5 Audio cable 10 HDMI cable 6 S Video cable DVD player Set top box HDTV receiver VGA RS232 Video S Video Output Display Speakers H6510BD P1500 ...

Страница 20: ...mote control and the Power indicator LED will turn blue 3 Turn on your source computer notebook video player etc The projector will detect your source automatically If the screen displays No Signal please make sure the signal cables are securely connected If you connect to multiple sources at the same time use SOURCE on the control panel or remote control or the direct source key on the remote con...

Страница 21: ...process 3 Once the system has finished cooling the LED Power indicator will stop blinking and turn solid red to indicate standby mode 4 It is now safe to unplug the power cord Warning indicators Projector Overheated Lamp will automatically turn off soon This onscreen message indicates that the projector has overheated The lamp will automatically turn off the projector will automatically shut down ...

Страница 22: ...e image 1 Use the front Tilt adjusting wheel to raise the image to the desired height and angle 2 Use the rear Tilt adjusting wheel to fine tune the display angle To lower the image 1 Use the front Tilt adjusting wheel to lower the image to the desired height angle 2 Use the rear Tilt adjusting wheel to fine tune the display angle 1 2 Tilt adjusting wheel Tilt adjusting wheel ...

Страница 23: ...Diagonal inch B W cm x H cm From base to top of image cm C 1 24 49 x 37 40 26 54 x 40 44 1 5 36 74 x 55 61 40 81 x 60 67 2 48 98 x 74 81 53 108 x 81 89 2 5 60 123 x 92 101 66 134 x 101 111 3 72 147 x 110 121 79 161 x 121 133 3 5 84 172 x 129 142 93 188 x 141 155 4 96 196 x 147 162 106 215 x 161 177 4 5 108 221 x 165 182 119 242 x 181 200 5 120 245 x 184 202 132 269 x 202 222 6 144 294 x 221 243 15...

Страница 24: ... 5 42 91 x 57 57 46 100 x 63 63 2 56 121 x 76 76 62 133 x 83 83 2 5 70 152 x 95 95 77 167 x 104 104 3 84 182 x 114 114 93 200 x 125 125 3 5 98 212 x 133 133 108 233 x 146 146 4 113 242 x 152 152 124 267 x 167 167 4 5 127 273 x 170 170 139 300 x 188 188 5 141 303 x 189 189 155 333 x 208 208 6 169 364 x 227 227 186 400 x 250 250 7 197 424 x 265 265 217 467 x 292 292 8 225 485 x 303 303 248 533 x 333...

Страница 25: ... 56 59 59 130 x 73 77 2 61 133 x 75 79 79 174 x 98 103 2 5 76 167 x 94 98 98 217 x 122 128 3 91 200 x 113 118 118 261 x 147 154 3 5 106 233 x 131 138 137 304 x 171 180 4 121 267 x 150 158 157 348 x 196 205 4 5 136 300 x 169 177 177 391 x 220 231 5 152 333 x 188 197 196 435 x 245 257 6 182 400 x 225 236 236 522 x 293 308 7 212 467 x 263 276 275 609 x 342 360 8 242 533 x 300 315 314 696 x 391 411 9 ...

Страница 26: ...red Image Size Distance m Top cm Diagonal inch A W cm x H cm Max zoom B Min zoom C From base to top of image D 30 61 x 46 1 2 50 40 81 x 61 1 5 1 7 67 50 102 x 76 1 9 2 1 84 60 122 x 91 2 3 2 5 101 70 142 x 107 2 6 2 9 117 80 163 x 122 3 0 3 3 134 90 183 x 137 3 4 3 7 151 100 203 x 152 3 8 4 2 168 120 244 x 183 4 5 5 0 201 150 305 x 229 5 7 6 2 251 180 366 x 274 6 8 7 5 302 200 406 x 305 7 6 8 3 3...

Страница 27: ...rom base to top of image D 30 65 x 40 1 1 40 40 86 x 54 1 3 1 4 54 50 108 x 67 1 6 1 8 67 60 129 x 81 1 9 2 1 81 70 151 x 94 2 3 2 5 94 80 172 x 108 2 6 2 8 108 90 194 x 121 2 9 3 2 121 100 215 x 135 3 2 3 6 135 120 258 x 162 3 9 4 3 162 150 323 x 202 4 8 5 3 202 180 388 x 242 5 8 6 4 242 200 431 x 269 6 5 7 1 269 250 538 x 337 8 1 8 9 337 300 646 x 404 9 7 404 Zoom Ratio 1 1 x Desired distance He...

Страница 28: ... to top of image D 30 66 x 37 1 0 39 40 89 x 50 1 0 1 3 52 50 111 x 62 1 3 1 6 65 60 133 x 75 1 5 2 0 78 70 155 x 87 1 8 2 3 92 80 177 x 100 2 0 2 6 105 90 199 x 112 2 3 3 0 118 100 221 x 125 2 5 3 3 131 120 266 x 149 3 1 4 0 157 150 332 x 187 3 8 4 9 196 180 398 x 224 4 6 5 9 235 200 443 x 249 5 1 6 6 262 250 553 x 311 6 4 8 2 327 300 664 x 374 7 6 392 Zoom Ratio 1 3 x Desired distance Height 92 ...

Страница 29: ...uide to adjusting the calibration and alignment settings such as screen size and distance focus and more 4 The Installation menu includes the following options Projection method Keystone settings Language settings Reset to factory default functions Use the up and down arrow keys to select an option the left and right arrow keys to adjust selected option settings and the right arrow key to enter a ...

Страница 30: ... Acer ePower Management and Acer e3D Management Press repeatedly to cycle through these functions Acer eView Management Press to launch Acer eView Management Acer eView Management is for display mode selection Please refer to the Onscreen Display OSD Menus section for more details X1340W P1340W X1340WH H6510BD X111 X1140 X1140A X111P X1240 P1500 P1340WG ...

Страница 31: ...Please refer to the Onscreen Display OSD Menus section for more details Acer ePower Management Press to launch Acer ePower Management Acer ePower Management provides you one shortcut to save the lamp and projector s life Please refer to the Onscreen Display OSD Menus section for more details X111 X1140 X1140A X111P X1240 P1340W X1340WH H6510BD P1500 P1340WG ...

Страница 32: ... launch Acer e3D Management Acer e3D Management provides you one shortcut to adjust 3D settings Please refer to the Onscreen Display OSD Menus section for more details X111 X1140 X1140A X111P X1240 X1340W P1340W X1340WH P1340WG P1500 H6510BD ...

Страница 33: ... the main menu After selecting the desired main menu item press to enter a submenu for feature setting Use to select the desired item and adjust the settings by using Select the next item to be adjusted in the submenu and adjust as described above Press MENU on the control panel or remote control the screen will return to the main menu To exit the OSD menu press MENU on the control panel or remote...

Страница 34: ...eeting presentation with higher brightness Standard For common environment Movie H6510BD For brighter and general movie video photo playing Dark Cinema H6510BD For dark movie content Video X111 X1140 X1140A X111P X1240 X1340W P1340W X1340WH P1340WG P1500 For playing video in a bright environment Picture X1340W P1340W X1340WH For graphic picture X111 X1140 P1340WG X1140A X111P X1240 X1340W P1340W X...

Страница 35: ...ck and white in the image Press to decrease the contrast Press to increase the contrast Saturation Adjusts a video image from black and white to fully saturated colors Press to decrease the amount of color in the image Press to increase the amount of color in the image Tint Adjusts the color balance of red and green Press to increase the amount of green in the image Press to increase the amount of...

Страница 36: ...livers enhanced color saturation for bright true to life images This feature is On by default White Peaking Increases the brightness of whites that are near 100 Video sources only Film Mode Sets the image optimized to 24 frame True Film mode for more realistic cadence of film playback during motion sequences Noise Reduction Adjusts the level of noise reduction that helps to eliminate unwanted nois...

Страница 37: ...27 English Image X1140A X1240 X1340W P1340W X1340WH X111 X1140 X111P H6510BD P1500 P1340WG ...

Страница 38: ... can project from behind a translucent screen Projection Location X1140A X1240 X1340W P1340W X1340WH P1340WG Auto Automatically adjusts projection location of image Desktop Ceiling Turns the image upside down for ceiling mounted projection Aspect Ratio Use this function to choose your desired aspect ratio Auto Keeps the image with original width height ratio and maximizes the image to fit native h...

Страница 39: ...V Position Vertical Position Press to move the image down Press to move the image up Frequency Changes the projector s refresh rate to match the frequency of your computer s graphics card If you experience a vertical flickering bar in the projected image use this function to correct it Tracking Synchronizes the signal timing of the display with the graphics card If you experience an unstable or fl...

Страница 40: ...Note HDMI Color Range and HDMI Scan Info are only available when the input signal is HDMI HDMI Scan Info P1340W X1340WH P1340WG H6510BD P1500 Adjusts the overscan ratio of the HDMI image on screen Auto Automatically adjusts the overscan ratio by information from the player Underscan Always no overscan on the HDMI image Overscan Always keep overscan on the HDMI image ...

Страница 41: ...ect your desired startup screen If you change the setting it will take effect when you exit the OSD menu Acer The default startup screen of your Acer projector User Use the memorized picture from the Screen Capture function X1140A X111P X1240 X1340W P1340W X1340WH H6510BD P1500 X111 X1140 P1340WG ...

Страница 42: ...age appears stating that the screen capture is in progress When the screen capture is finished the message disappears and the original display is shown Closed Caption Selects a preferred closed captioning mode from CC1 CC2 CC3 CC4 CC1 displays captions in the primary language in your area Select Off to turn off the captioning feature This function is only available when a composite video or S Vide...

Страница 43: ...l request you to enter the password again The factory default setting of Timeout Min is Off Once the security function is enabled the projector will request you to enter password when switching on the projector Both User Password and Administrator Password can be accepted for this dialogue User Password Press to set up or change User Password Use the numerical keys on the remote control to set the...

Страница 44: ...inistrator password Enter the unique 6 digit Universal Password which is printed on the Security Card that came with your projector This unique password will be accepted by the projector no matter what the administrator password is If the Security Card is lost please contact your local Acer service center Lock User Startup Screen P1340W X1340WH P1340WG H6510BD P1500 This function is set to OFF by ...

Страница 45: ...ing process by pressing the power button twice Instant Resume Enables you to restart the projector immediately within 2 minutes after turning it off Auto Shutdown Minutes The projector will automatically shut down while there is no signal input detected after the time you set Lamp Hour Elapse Displays the lamp s elapsed operating time in hours Lamp Reminding Choose this function to show or hide wa...

Страница 46: ...Choose On to turn mute on Choose Off to turn mute off Power On Off Volume H6510BD P1500 Select this function to adjust the notification volume when turning the projector on off Alarm Volume P1340W X1340WH H6510BD P1500 Select this function to adjust the volume of any warning notifications X1140A X111P X1240 X1340W P1340W X1340WH H6510BD P1500 ...

Страница 47: ...d by DLP 3D technology On Select this item while using DLP 3D glasses quad buffer NVIDIA ATI graphics card and HQFS format file or DVD with corresponding SW player Off Turns off the 3D mode X111 X1140 P1340WG X1140A X111P X1240 X1340W P1340W X1340WH P1500 H6510BD ...

Страница 48: ...rrectly you can select a 3D format that suits the 3D content you are viewing and obtain the best result 3D Sync Invert If you see a discrete or overlapping image while wearing DLP 3D glasses you may need to execute Invert to get best match of left right image sequence to get the correct image for DLP 3D 3D Warning Message Choose On to display the 3D warning message Signal source type Supported tim...

Страница 49: ...opic Player Trial http www 3dtv at Downloads Index_en aspx DDD TriDef Media Player Trial http www tridef com download TriDef 3 D Experience 4 0 2 html Note 3D Sync Invert and 3D Format are only available when 3D is enabled and 2D to 3D is disabled Note 2D to 3D is only available through HDMI port Language Language Sets a language for the OSD menus Use to select your preferred language X111 X1140 P...

Страница 50: ...age For PC Windows 95 98 2000 XP Win7 Vista Press RESYNC on the control panel or remote control For an incorrectly displayed image Open My Computer Control Panel and then double click the Display icon Select the Settings tab Verify that your display resolution setting is lower than or equal to 1600 x 1200 or 1920 x 1080 Click the Advanced Properties button If the problem still appears change the m...

Страница 51: ...nd select Video Mirroring On 5 Image is unstable or flickering Use Tracking to correct it Refer to the Image section for more information Change the display color setting on your computer 6 Image has vertical flickering bar Use Frequency to make an adjustment Refer to the Image section for more information Check and reconfigure the display mode of your graphics card to make it compatible with the ...

Страница 52: ...tone X1140A X1240 X1340W P1340W X1340WH P1340WG or Image Keystone X111 X1140 X111P H6510BD P1500 to make adjustments 11 Image is reversed Select Image Projection Mode X1140A X1240 X1340W P1340W X1340WH P1340WG Image Projection Location X1140A X1240 X1340W P1340W X1340WH P1340WG on the OSD and adjust the projection direction Condition Solution 1 The projector stops responding to all controls If pos...

Страница 53: ...before it is used Please also check the dust filters if they are installed If the dust filter is clogged with dust please clean it Replace the lamp the lamp is about to reach its maximum lifetime Prepare to replace it soon Fan Fail Lamp will automatically turn off soon Projector Overheated Lamp will automatically turn off soon Lamp is approaching the end of its useful life in full power operation ...

Страница 54: ...ed Blue Red Red Standby Power cord plugged in V Power on V Lamp retry Quick flashing Turning off Cooling state Quick flashing Turning off Cooling completed V Error Thermal failure V V Error Fan lock failure V Quick flashing Error Lamp breakdown V V Error Color wheel failure V Quick flashing ...

Страница 55: ...p Turn the projector off by pressing POWER Allow the projector at least 45 minutes to cool down Disconnect the power cord 1 Use a screwdriver to remove the screw from the cover Illustration 1 2 Push up and remove the cover 3 Remove the lamp protection film Illustration 2 4 Remove the screw that secures the lamp module Illustration 3 5 Disconnect the lamp connector from the projector Lift the handl...

Страница 56: ...cure the mount base Note Screws are not included Please obtain the appropriate screws for your type of ceiling 2 Secure the ceiling rod using the appropriate type of cylinder screws 2 0 m m 1 3 m m 8 4 mm 130 mm 4 9 9 m m Short Rod Screw Type A 50 mm length 8 mm diameter Ceiling Mount Base Attach to ceiling Long Rod Extension Rod Allen Key For tighten loosen Tightening Screw Medium Rod Large Cylin...

Страница 57: ...ket and the projector to allow for proper heat distribution Use two washers for extra support if deemed necessary 4 Attach the ceiling bracket to the ceiling rod Smaller Washer Large Washer Projector Bracket Supports projector and allows for adjustments Screw Type B Spacer For heat dissipation Screw Type A 50 mm length 8 mm diameter Large Cylinder Cap Allen Key For tighten loosen Tightening Screw ...

Страница 58: ...model is listed in the table below 3 mm diameter screws are enclosed in the screw pack Models Screw Type B Washer Type Diameter mm Length mm Large Small X111 X1140 X1140A X111P X1240 X1340W P1340W X1340WH P1340WG H6510BD P1500 3 25 V V 30 Allen Key Tightening Screw Allen Key Tightening Screw 110 05 mm 81 5 mm 55 mm ...

Страница 59: ...efer to the Compatibility Modes section for more information Video compatibility NTSC 3 58 4 43 PAL M N PAL 60 SECAM HDTV 720p 1080i 1080p EDTV 480p 576p SDTV 480i 576i Aspect ratio X111 X1140 X1140A X111P X1240 Auto 4 3 native 16 9 X1340W P1340W X1340WH P1340WG H6510BD P1500 Auto 4 3 16 9 Full Letter Box Displayable colors 1 07 billion colors Projection lens X111 X1140 X1140A X111P X1240 X1340W P...

Страница 60: ...0 V input frequency 50 60 Hz Power consumption typical X111 X1140 X1140A X111P X1240 X1340W P1340W X1340WH P1340WG 240 W H6510BD P1500 270 W Operating temperature 0ºC to 40ºC 32ºF to 104ºF I O connectors X111 X1140 Power socket x 1 USB x 1 Type mini B VGA input x 1 Composite video x 1 S Video x 1 RS232 x 1 X1140A X111P X1240 X1340W Power socket x 1 USB x 1 Type mini B VGA input x 2 VGA output x 1 ...

Страница 61: ... 1 3 5 mm audio jack output x 1 VGA output x 1 HDMI v1 4 input x 2 Component video input x 1 P1500 Power socket x 1 USB x 1 Type mini B VGA input x 1 Composite video x 1 S Video x 1 RS232 x 1 3 5 mm audio jack input x 1 3 5 mm audio jack output x 1 VGA output x 1 HDMI v1 4 input x 1 Standard package contents AC power cord x 1 VGA cable x 1 Remote control x 1 Battery x 2 for the remote control User...

Страница 62: ...88 85 53 67 120 77 43 XGA 1024 x 768 60 48 36 70 56 48 75 60 02 85 68 68 120 98 96 SXGA 1152 x 864 70 63 85 75 67 50 85 77 10 1280 x 1024 60 63 98 72 76 97 75 79 98 85 91 15 QuadVGA 1280 x 960 60 60 00 1280 x 960 75 75 00 SXGA 1400 x 1050 60 65 32 UXGA 1600 x 1200 60 75 00 PowerBook G4 640 x 480 60 31 50 640 x 480 66 6 67 35 00 800 x 600 60 37 88 1024 x 768 60 48 36 1024 x 768 75 60 241 1152 x 870...

Страница 63: ...59 95 74 04 Mode Resolution V Frequency Hz H Frequency KHz VGA_60 640 x 480 59 94 31 469 VGA_72 72 809 37 861 VGA_75 75 37 5 VGA_85 85 008 43 269 VGA_120 119 518 61 91 SVGA_56 800 x 600 56 25 35 156 SVGA_60 60 317 37 879 SVGA_72 72 188 48 077 SVGA_75 75 46 875 SVGA_85 85 061 53 674 SVGA_120 119 854 77 425 XGA_60 1024 x 768 60 004 48 363 XGA_70 70 069 56 476 XGA_75 75 029 60 023 XGA_120 119 804 98 ...

Страница 64: ...0 x 800 59 81 49 702 WXGA_120 1280 x 800 119 909 101 563 WXGA _60 1440 x 900 59 887 55 935 1680x1050_60 1680 x 1050 59 954 65 29 acer_16 9 1366 x 768 59 79 47 712 1920 x 1080_RB 1920 x1080 60 66 587 1920 x 1080_EIA 1920 x1080 60 67 5 acer_timing 1024 x 600 60 37 5 1920 x 1200 RB 1920 x 1200 59 95 74 038 Mode Resolution V Frequency Hz H Frequency KHz 480i 720 x 480 1440 x 480 60 15 73 480p 720 x 48...

Страница 65: ... 720 60 00 45 00 720p 1280 x 720 50 00 37 50 1080i 1920 x 1080 60 00 33 75 1080i 1920 x 1080 50 00 28 13 1080p 1920 x 1080 60 00 67 5 1080p 1920 x 1080 50 00 56 26 1080p 1920 x 1080 24 00 27 00 1080p 1920 x 1080 23 98 26 97 Mode V Frequency Hz H Frequency KHz fsc MHz NTSC 15 73 60 3 58 PAL 15 63 50 4 43 SECAM 15 63 50 4 25 or 4 41 PAL M 15 73 60 3 58 PAL N 15 63 50 3 58 PAL 60 15 73 60 4 43 NTSC4 ...

Страница 66: ...e into an outlet on a circuit different from that to which the receiver is connected Consult the dealer or an experienced radio television technician for help Notice Shielded cables All connections to other computing devices must be made using shielded cables to maintain compliance with FCC regulations Notice Peripheral devices Only peripherals input output devices terminals printers etc certified...

Страница 67: ...mplies with the radio frequency and safety standards of any country or region in which it has been approved for wireless use Depending on configurations this product may or may not contain wireless radio devices such as wireless LAN and or Bluetooth modules Canada Low power license exempt radio communication devices RSS 210 a Common information Operation is subject to the following two conditions ...

Страница 68: ... must be used in strict accordance with the regulations and constraints in the country of use For further information please contact a local office in the country of use Please see http ec europa eu enterprise rtte implem htm for the latest country list ...

Страница 69: ...1110 X1340WH D220D EV W50H P1340WG M320PF PE W30L H6510BD E141D HE 803J H1P1117 P1500 M342 PE 833 Q1P1301 series To which this declaration refers conforms to the relevant standard or other standardizing documents EN 55022 2006 A1 2007 Class B EN 55024 2010 EN 61000 3 2 2006 A1 2009 A2 2009 Class A EN61000 3 3 2008 EN 60950 1 2006 A11 2009 A1 2010 A12 2011 EN 50581 2012 We hereby declare above prod...

Страница 70: ...ause harmful interference and 2 this device must accept any interference received including interference that may cause undesired operation The following local Manufacturer Importer is responsible for this declaration Product DLP Projector Model Number QSV1106 QSV1107 QNX1108 QWX1109 QWX1110 H1P1117 Q1P1301 series Name of Responsible Party Acer America Corporation Address of Responsible Party 333 ...

Отзывы: