Acer Extensa 900 Series Скачать руководство пользователя страница 11

System Board

1-11

4.

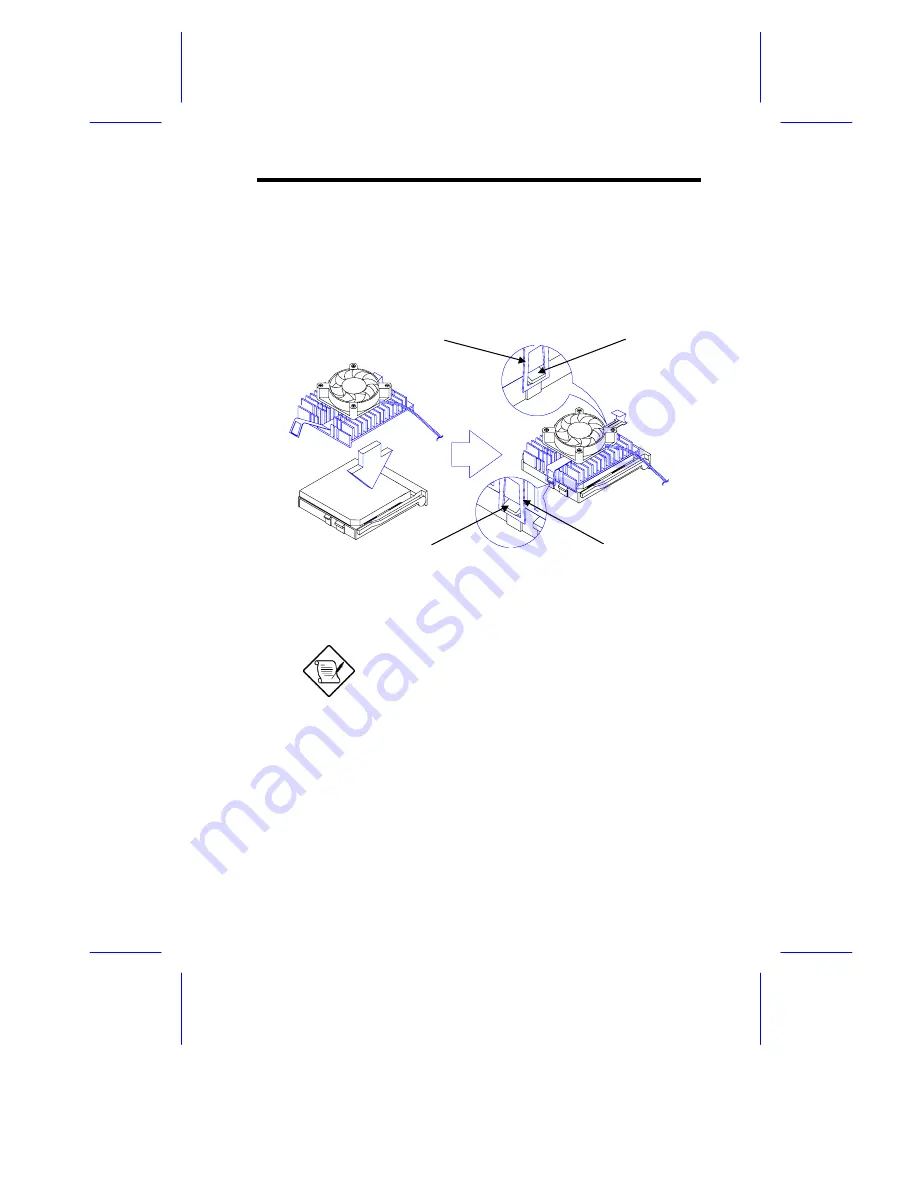
Place the CPU heat sink and fan over the CPU.

5.

Link the front heat sink hook to the holding tab on the front edge
of the CPU socket, then the rear hook to the rear holding tab.
This locks the heat sink and fan to the CPU socket.

Figure 1-6

Installing the CPU Heat Sink and Fan

To remove the heat sink and fan, simply
press the upper part of the rear hook inward.

6.

Attach the CPU fan cables to the connectors on the board.

7.

Change the settings of jumper JP1 for the correct CPU voltage
and jumpers JP4, JP5, and JP7 for the CPU frequency.  Refer to
Table 1-1 for the jumper settings.

Holding Tab (rear)

Heat Sink Hook (rear)

Heat Sink Hook (front)

Holding Tab (front)

Содержание Extensa 900 Series

Страница 1: ...ckets support both EDO and fast page mode SIMMs A second level cache socket is available for a 256 KB or 512 KB synchronous SRAM module A 50 pin Fast SCSI II interface with 10 MB s transfer rate and a...

Страница 2: ...hree EISA and four PCI expansion slots 256 KB Flash ROM for system BIOS RTC chip that contains clock calendar plus 128 bytes CMOS RAM with battery backup 50 pin Fast SCSI II and 68 pin Wide SCSI inter...

Страница 3: ...mouse connector 3 PCI slots 4 Keyboard controller 5 EISA slots 6 Video RAM 7 Video RAM upgrade socket 8 CPU voltage regulator 9 Buzzer 10 CPU socket 11 CPU voltage regulator 12 Cache module socket 13...

Страница 4: ...Locations Figure 1 2 shows the jumper locations on the system board The blackened pin on a jumper represents pin 1 Figure 1 2 Jumper Locations Jumpers are prefixed JP Connectors are prefixed CN FA1 to...

Страница 5: ...rsion JP8 1 2 2 3 Acer Generic Password Security JP9 1 2 2 3 Enabled Bypass PC Sound Source JP10 1 2 2 3 Buzzer Speaker Front Panel Reset JP11 1 2 2 3 Enabled Disabled CPU Type JP17 JP18 JP19 1 2 2 3...

Страница 6: ...igh byte terminator OFF Core Bus Freq JP4 JP5 JP7 JP4 JP5 JP7 2 3 2 3 1 2 1 2 1 2 2 3 2 3 1 2 2 3 2 3 2 3 2 3 1 2 2 3 3 4 1 2 1 2 3 4 2 3 1 2 3 4 2 3 2 3 3 4 Bus Freq Core Freq Ratio 50 MHz 75 MHz 3 2...

Страница 7: ...wer connector for 300 watt SPS CN5 Parallel port connector CN6 Diskette drive connector CN7 IDE drives connector CN8 Remote diagnostic module RDM connector CN9 Remote diagnostic module RDM connector C...

Страница 8: ...component from its packaging unless you are ready to install it 2 Wear a wrist grounding strap before handling electronic components Wrist grounding straps are available at most electronic component s...

Страница 9: ...oard These components save you the trouble of buying a video board and save one bus slot for another expansion board The daughter board carries an external video port To install simply plug in the dau...

Страница 10: ...llation Follow these steps to install a Pentium CPU 1 Pull up the socket lever 2 Insert the CPU making sure that the pin 1 of the CPU connects to pin 1 of the socket Be careful not to bend any pins 3...

Страница 11: ...CPU socket Figure 1 6 Installing the CPU Heat Sink and Fan To remove the heat sink and fan simply press the upper part of the rear hook inward 6 Attach the CPU fan cables to the connectors on the boar...

Страница 12: ...may combine different types of SIMMs for a particular memory configuration as long as the SIMMs in each bank are of the same type Always install SIMMs in pairs For example for a total memory of 16 MB...

Страница 13: ...6 MB 16 MB 8 MB 8 MB 48 MB 16 MB 16 MB 8 MB 8 MB 4 MB 4 MB 56 MB 8 MB 8 MB 8 MB 8 MB 16 MB 16 MB 64 MB 4 MB 4 MB 8 MB 8 MB 32 MB 32 MB 88 MB 16 MB 16 MB 16 MB 16 MB 16 MB 16 MB 96 MB 32 MB 32 MB 8 MB...

Страница 14: ...M fits only in one direction If you slip in a SIMM but would not completely fit you may have inserted it the wrong way Reverse the orientation of the SIMM 2 Gently push the SIMM to a vertical position...

Страница 15: ...SIMM Follow these steps to remove a SIMM 1 Press the holding clips on both sides of the SIMM outward to release it 2 Push the SIMM downward to a 45o angle 3 Pull the SIMM out of the socket Figure 1 8...

Страница 16: ...atch the value stored in CMOS 2 Press during the power on self test POST routine to run Setup During POST a message indicating a wrong memory configuration appears 3 Press twice to exit Setup and rebo...

Страница 17: ...s pipeline burst cache module The cache module socket supports either a 256 KB or 512 KB 3 3V cache module Follow these steps to install a cache module 1 Position the cache module on top of the socket...

Страница 18: ...able to 1 MB Follow these steps to upgrade the video memory 1 Locate the video DRAM upgrade socket labeled U44 on the system board See Figure 1 1 2 Gently insert a 514260ASL 256K x 16 70ns SOJ chip in...

Страница 19: ...s SCSI devices 1 10 1 Using the SCSI Feature Follow these steps to use the SCSI feature 1 Install a SCSI device in the system and connect it to the SCSI interface on the system board See Figure 1 1 fo...

Страница 20: ...e to system failure Refer to the RDM user s manual for more information 1 11 2 ASM Pro The ASM Pro is a server management tool based on the Simple Network Management Protocol SNMP It detects server pr...

Страница 21: ...Error Messages Software error messages are returned by your operating system or application These messages typically occur after you boot the operating system or when you run your application If you r...

Страница 22: ...n Setup and select the proper drive type Diskette Drive B Type Mismatch Run Setup and select the proper drive type Equipment Configuration Error Modify DRAM configuration to agree with one of the opti...

Страница 23: ...echnical assistance Onboard Serial Port 1 Conflict Run Setup and disable the port Onboard Serial Port 2 Conflict Run Setup and disable the port Onboard Parallel Port Conflict Run Setup and disable the...

Страница 24: ...s a major cause of power on error messages especially for a new system 2 Remove the system cover following the directions in the housing installation manual Check that the jumpers on the system board...

Отзывы: