background image


10

English

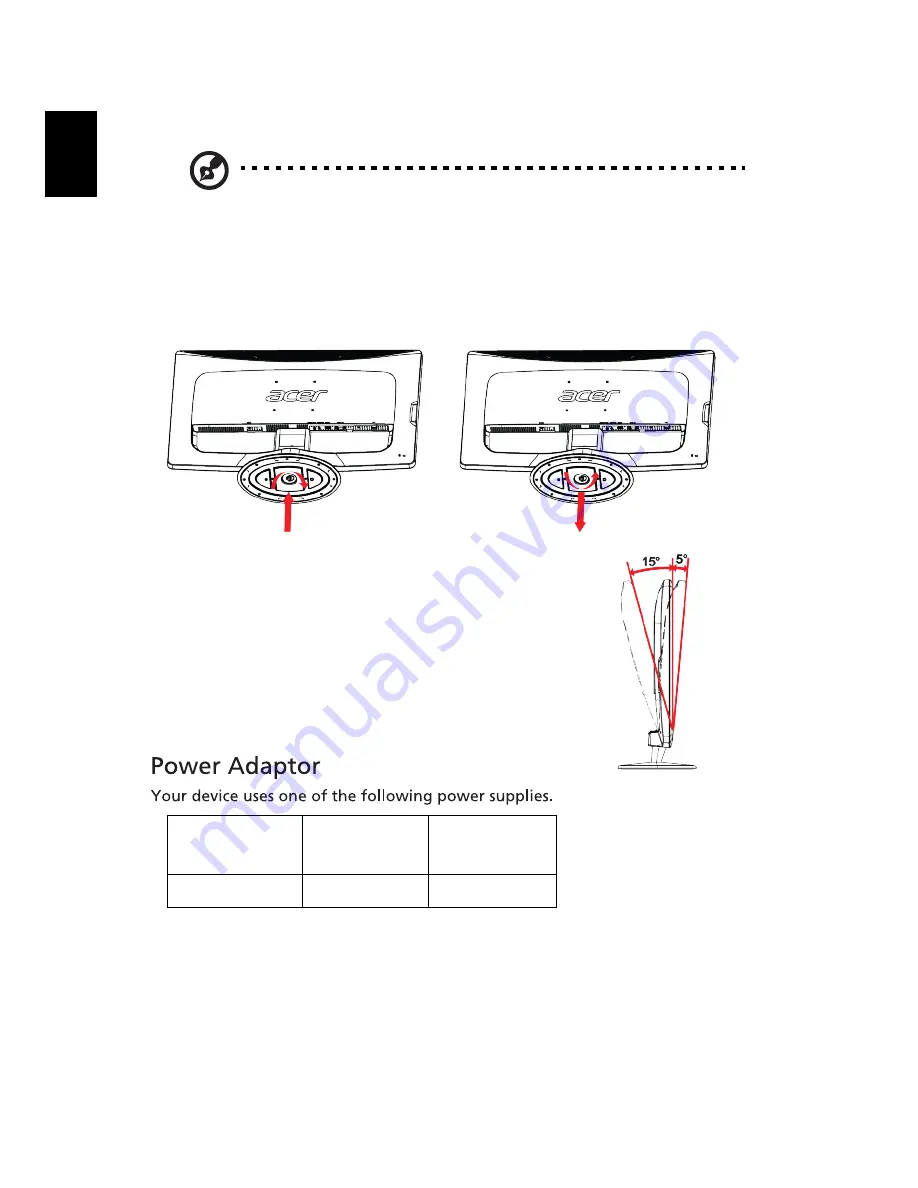
Attaching / Removing the base

Note: Remove the monitor and monitor base from its packaging. 
Carefully place the monitor face-down on a stable surface — use a 
cloth to avoid scratching the screen.

To install, align the base with the stand and push the base towards the top of 
the monitor. Tighten the screw clockwise. 
Reverse the steps to remove.

Adjusting the screen position

In order to optimize the best viewing position, 
you can adjust the tilt of the monitor by using 
both of your hands to hold the edges of the 
monitor as shown in the figure.
The monitor can be adjusted to 15 degrees up or 
5 degrees down as indicated by the arrow.

Connecting the power cord

Check first to make sure that the power cord you use is the correct type 
required for your area.

This monitor has a universal power supply that allows operation in either 
100/120V AC or 220/240 V AC voltage area. No user-adjustment is required.

Plug one end of the power cord to the AC inlet and plug the other end to a 
proper AC outlet.

Object/ 

Part No. 

Manufacturer/ 

Trademark 

Type/ 

Model 

Power Adaptor 

DELTA 

ADP-40PH BB 


Содержание DW271HL

Страница 1: ...Acer DW271HL LCD Monitor User Guide ...

Страница 2: ...__________________ Serial number ___________________________________ Date of purchase ________________________________ Place of purchase ________________________________ 2012 All Rights Reserved Acer DW271HL LCD Monitor User Guide ...

Страница 3: ...ing Removing the base 10 Adjusting the screen position 10 Setting up 12 Overview 13 Hardware Requirements 17 WiView Management 18 WiView Web Management 21 Connector pin assignment 25 15 pin color display signal cable 25 19 pin color display signal cable 25 Standard Standard timing table timing table 26 2 Troubleshooting 27 VGA HDMI mode 27 WiView mode 28 Shortcut menu 14 Contents ...

Страница 4: ...isplayed for hours In this case the screen is recovered slowly by changing the image or turning off the power switch for a few hours Caution for accessibility Be sure that the power outlet you plug the power cord into is easily accessible and located as close to the equipment operator as possible When you need to disconnect power to the equipment be sure to unplug the power cord from the electrica...

Страница 5: ... Avoid turning up the volume to block out noisy surroundings Turn the volume down if you can t hear people speaking near you Product servicing Do not attempt to service this product yourself as opening or removing covers may expose you to dangerous voltage points or other risks Refer all servicing to qualified service personnel Unplug this product from the wall outlet and refer servicing to qualif...

Страница 6: ...complain of eyestrain and headaches after prolonged use Users are also at risk of physical injury after long hours of working in front of a computer Long work periods bad posture poor work habits stress inadequate working conditions personal health and other factors greatly increase the risk of physical injury Incorrect computer usage may lead to carpal tunnel syndrome tendonitis tenosynovitis or ...

Страница 7: ...rs wearing incorrect glasses or contact lenses glare excessive room lighting poorly focused screens very small typefaces and low contrast displays could stress your eyes The following sections provide suggestions on how to reduce eyestrain Eyes Rest your eyes frequently Give your eyes regular breaks by looking away from the monitor and focusing on a distant point Blink frequently to keep your eyes...

Страница 8: ...d periods of time Developing good work habits Develop the following work habits to make your computer use more relaxing and productive Take short breaks regularly and often Perform some stretching exercises Breathe fresh air as often as possible Exercise regularly and maintain a healthy body Warning We do not recommend using the computer on a couch or bed If this is unavoidable work for only short...

Страница 9: ... and remove the contents Save the packing materials in case you will need to ship or transport the monitor in the future LCD monitor AC power cord D Sub cable User Guide Quick Guide HDMI Cabel Optional Optional Power adaptor Audio cable optional ...

Страница 10: ... the tilt of the monitor by using both of your hands to hold the edges of the monitor as shown in the figure The monitor can be adjusted to 15 degrees up or 5 degrees down as indicated by the arrow Connecting the power cord Check first to make sure that the power cord you use is the correct type required for your area This monitor has a universal power supply that allows operation in either 100 12...

Страница 11: ...e with care when transporting the monitor Refrain from giving shock or scratch to the screen as screen is fragile Cleaning your monitor Always unplug the monitor before cleaning Use a soft cloth to wipe the screen and cabinet front and sides Power saving The monitor will be switched into power saving mode by the control signal from the display controller as indicated by the amber color power LED S...

Страница 12: ...e power adaptor and power cord to the monitor then to a properly grounded AC outlet 5 Turn on the monitor first then the computer This sequence is very important 6 If the monitor does not function properly please refer to the troubleshooting section to diagnose the problem Note Steps 2 and 3 are optional 1 Attach the base 2 Connect external speakers optional 3 Connect the power adaptor and power c...

Страница 13: ... Supports high definition digital video connections 5 VGA in Connects to a PC 6 Reset button Recovers WiView settings 7 Kensington lock slot Connects to a Kensington compatible security lock 8 Connects to a keyboard or mouse on WiView mode 9 10 Shortcutbuttons Onscreen control buttons Switches between Source key WiView mode and PC mode Power button Turns the device on and off USB port ...

Страница 14: ...e onscreen menu Volume up down Press to adjust the volume Input Select from different video sources that may be connected to your monitor VGA or HDMI A Cable Not Connected message will appear if either VGA or HDMI input is selected but the cables are not connected A No Signal message will appear if the video cable is connected but there is no active signal input Mode key Press to switch between Wi...

Страница 15: ...olors with sharp detail Movie mode Displays scenes in clear details Presents great visuals even in environments without adequate lighting Adjusting the OSD settings Note The following is for general reference only Actual product specifications may vary Press to open the OSD and adjust the picture quality OSD timeout general settings and view product information Picture menu 1 Press to bring up the...

Страница 16: ...sting 3 Use the keys to adjust the timer Setting 1 Press to bring up the OSD 2 Use the shortcut buttons to select and press Enter to enter the main item page Press Enter again to start adjusting 3 Use the keys to adjust the sliding scales Product information 1 Press to bring up the OSD 2 Use the keys to select to view the product information English 16 ...

Страница 17: ...ure your computer matches the recommended hardware specification WiView Management Hardware Requirements CPU Quad Core 2 0 GHz or better RAM DDR3 2 GB or above GPU Graphics card with 512 MB RAM or above Wireless module 802 11n at 2 4 GHz or 5 GHz OS Windows Vista Windows 7 English 17 ...

Страница 18: ...the resolution used by the monitor Click Play to use the monitor Click Pause to freeze the screen on the monitor Click Stop to stop using the monitor Monitor SSID The connected monitor SSID Monitor IP The connected monitor IP Quality You can change the image quality if the display stops or jitters from time to time Choose Speedy mode for low latency and quick feedback such as when using the monito...

Страница 19: ...nected to an access point Search for home group monitors Select a monitor directly connected to the home group Monitor settings Adjust advanced monitor settings Monitor SSID Change the Monitor ID used to identify the monitor on the wireless network Switch wireless band Switch between 2 4GHz and 5GHz frequencies 5GHz area Select if you must use 5GHz wireless to match local requirements Auto connect...

Страница 20: ...o your monitor directly Monitor Wi Fi AP SSID SSID for the current monitor Monitor Wi Fi AP encryption Encryption type used by the current monitor detected automatically Monitor Wi Fi AP password Password used by the current monitor Enable Home Wi Fi AP SSID The home AP i e router the monitor is connected to Home Wi Fi AP encryption Encryption type used by the home AP detected automatically Home W...

Страница 21: ...r 2 To enter web management open your browser and enter the monitor IP address of your WiView monitor on the URL bar e g 192 168 100 10 Main Page Click Admin to access WiView Management English 21 Enter the password to login to WiView Management default password is admin Admin ...

Страница 22: ...sion number Network Status IP Address IP address of WiView Monitor Subnet Mask subnet mask Default Gateway default gateway Wireless MAC Address Network MAC address Connection Status Projecting Status Current display status Total Users How many users have connected English 22 Network Setup Click Network Setup to show current network settings ...

Страница 23: ...sword Enter the new password you want to use to login to WiView Management Confirm New Password Enter the password a second time to confirm English 23 Click Reset to Default to restore factory default settings Apply Click Apply to confirm you want to reset all settings Reset to Default Firmware Update ...

Страница 24: ...ate process The update process takes about five minutes The WiView monitor will reboot automatically when the process is completed Warning Do not power off your WiView monitor while the firmware update is in process This may damage your WiView monitor so that it must be returned for repair Reboot System Click Reboot System to restart system using saved settings Reboot Start the restart process Log...

Страница 25: ...Ground 15 DDC Serial Clock 8 B Ground 19 pin color display signal cable Pin Description Pin Description 1 TMDS Data 2 10 TDMS Clock 2 TMDS Data 2 Shield 11 TDMS Clock Shield 3 TMDS Data 2 12 TDMS Clock 4 TMDS Data 1 13 CEC 5 TMDS Data 1 Shield 14 Reserved N C on device 6 TMDS Data 1 15 SCL 7 TMDS Data 0 16 SDA 8 TMDS Data 0 Shield 17 DDC CEC Ground 9 TMDS Data 0 18 5V Power 19 Hot Plug Detect Note...

Страница 26: ... x 400 70 Hz 4 SVGA 800 x 600 56 Hz 5 SVGA 800 x 600 60 Hz 6 XGA 1024 x 768 60 Hz 7 XGA 1024 x 768 70 Hz 8 VESA 1152 x 864 75 Hz 9 SXGA 1280 x 1024 60 Hz 10 VESA 1280 x 720 60 Hz 11 WXGA 1280 x 800 60 Hz 12 WXGA 1440 x 900 60 Hz 13 WSXGA 1680 x 1050 60 Hz 14 UXGA 1920 x 1080 60 Hz English 26 ...

Страница 27: ...m is switched on Abnormal picture Image is missing off center too large or too small on the screen Using the OSD adjust focus clock H Position and V Position with non standard signals Check the display settings on your system In case of a missing image please select another resolution or vertical refresh rate Wait for a few seconds after adjusting the size of the image before changing or disconnec...

Страница 28: ...nt after switching the wireless band to 5GHz System operates normally but can t be found by the WiView software 1 Make sure your computer supports 5GHz wireless 2 Click Reset button on rear cover or in OSD to restore system to default settings USB keyboard mouse only work when using wireless display mode Check the system is using wireless display mode On media streaming or standby screen USB keybo...

Страница 29: ...ements EMC Directive 2004 108 EC as attested by conformity with the following harmonized standards EN55022 AS NZS CISPR22 Class B EN55024 EN61000 3 2 Class D EN61000 3 3 Low Voltage Directive 2006 95 EC as attested by conformity with the following harmonized standard EN60950 1 RoHS Directive 2002 95 EC on the Restriction of the Use of certain Hazardous Substances in Electrical and Electronic Equip...

Страница 30: ...ized standard l Article 3 1 a Health and Safety EN60950 1 EN62311 l Article 3 1 b EMC EN301 489 1 EN301 489 17 l Article 3 2 Spectrum Usages EN300 328 Year to begin affixing CE marking 201 _______________________________ RU Jan Sr Manager Regulation Acer Inc HE 201 Date English ...

Страница 31: ...ired operation The following local Manufacturer Importer is responsible for this declaration Product LCD Monitor Model Number DW271HL SKU Number DW271HL xxxxxx x 0 9 a z A Z or Blank Name of Responsible Party Acer America Corporation Address of Responsible Party 333 West San Carlos St San Jose CA 95110 U S A Contact Person Acer Representative Phone No 254 298 4000 Fax No 254 298 4147 Acer America ...

Отзывы: