background image

3

English

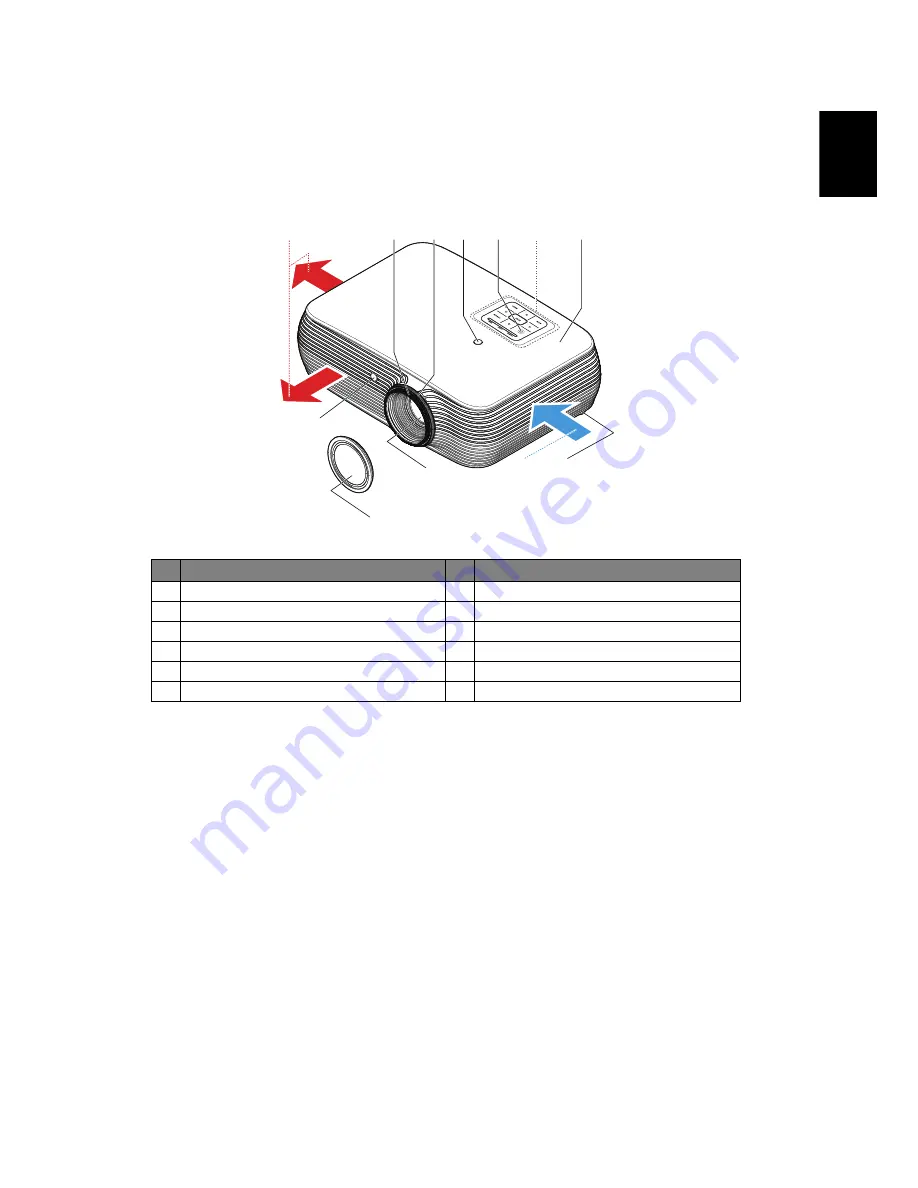
Projector Overview

Projector Outlook

Front / upper side

#

Description

#

Description

1

Air outlet

7

Lamp cover

2

Focus ring

8

Lens cap

3

Zoom ring

9

Projection lens

4

Remote control receiver

10 Tilt adjusting wheels

5

Power button

11 Air inlet

6

Control panel

12 Ambient light sensor

6

3

2

4

7

5

10

11

8

12

9

1

Содержание D1P1704

Страница 1: ...Acer Projector P5630 N368 PN WU17 PR642 MF 542 DWU1703 P5530 N358 PN 817 PR542 MF 442 D1P1704 P5330W N328 PN W17 PR442 MF 342 DWX1705 P5230 N318 PN X17 PR242 MF 142 DNX1706 User s Guide ...

Страница 2: ...lude the serial number model number and purchase information No part of this publication may be reproduced stored in a retrieval system or transmitted in any form or by any means electronically mechanically by photocopy recording or otherwise without the prior written permission of Acer Incorporated Model number _________________________________ Serial number __________________________________ Dat...

Страница 3: ...e and located as close to the equipment operator as possible When you need to disconnect power to the equipment be sure to unplug the power cord from the electrical outlet Warnings Do not use this product near water Do not place this product on an unstable cart stand or table If the product falls it could be seriously damaged Slots and openings are provided for ventilation to ensure reliable opera...

Страница 4: ... The overall system load must not exceed 80 of the branch circuit rating If power strips are used the load should not exceed 80 of the power strip s input rating This product s AC adapter is equipped with a three wire grounded plug The plug only fits in a grounded power outlet Make sure the power outlet is properly grounded before inserting the AC adapter plug Do not insert the plug into a non gro...

Страница 5: ...iant parts when adding or changing components Consult your reseller for purchase options Your device and its enhancements may contain small parts Keep them out of the reach of small children Additional safety information Do not look into the projector s lens when the lamp is on The bright may hurt your eyes Turn on the projector first and then signal sources Do not place the product in following e...

Страница 6: ...ring operation Allow the projector to cool for approximately 45 minutes prior to removing the lamp assembly for replacement Do not operate lamps beyond the rated lamp life It could cause it to break on rare occasions Never replace the lamp assembly or any electronic components unless the projector is unplugged The product will detect the life of the lamp itself Please be sure to change the lamp wh...

Страница 7: ...ction of the global environment please recycle For more information on the Waste from Electrical and Electronics Equipment WEEE regulations visit http www acer group com public Sustainability sustainability01 htm Mercury advisory For projectors or electronic products containing an LCD CRT monitor or display Lamp s inside this product contain mercury and must be recycled or disposed of according to...

Страница 8: ...ht light may hurt your eyes To reduce the risk of fire or electric shock do not expose this product to rain or moisture Please do not open or disassemble the product as this may cause electric shock When changing the lamp please allow unit to cool down and follow all changing instructions This product will detect the life of the lamp itself Please be sure to change the lamp when it shows warning m...

Страница 9: ...arted 10 Connecting the Projector 10 Turning the Projector On Off 11 Turning on the Projector 11 Turning the projector off 12 Adjusting the Projected Image 13 Adjusting the Height of Projected Image 13 How to optimize image size and distance 14 How to get a preferred image size by adjusting distance and zoom 18 User Controls 22 Installation menu 22 Onscreen Display OSD Menus 23 Color 24 Image 26 S...

Страница 10: ... 35 Network Setting 36 Alert Setting 36 Logout 37 Appendices 38 Troubleshooting 38 LED Alarm Definition Listing 42 Replacing the Lamp 43 Ceiling Mount Installation 44 Specifications 47 Compatibility modes 50 Regulations and safety notices 55 ...

Страница 11: ...rojected image based on actual ambient light Acer BluelightShield reduces the exposure ratio of blue light which can potentially cause long term eye damage by adjusting color hue and brightness Versatile display modes Bright Presentation Standard Video User enable optimum performance in any situation NTSC PAL SECAM compatible and HDTV 480i p 576i p 720p 1080i p supported Lower power consumption an...

Страница 12: ...missing Projector Power cord HDMI cable option VGA cable option Security card option User s guide Projector Quick start guide Projector Carrying case option Remote control AAA battery x2 option WirelessCAST option WirelessHD Kit option User s guide Media Wireless function Quick start guide Media Wireless function WirelessProjection Kit UWA3 option DC 5V IN MH L HD MI ...

Страница 13: ...er side Description Description 1 Air outlet 7 Lamp cover 2 Focus ring 8 Lens cap 3 Zoom ring 9 Projection lens 4 Remote control receiver 10 Tilt adjusting wheels 5 Power button 11 Air inlet 6 Control panel 12 Ambient light sensor 6 3 2 4 7 5 10 11 8 12 9 1 ...

Страница 14: ... top cover Illustration c 4 Install dongle Illustration d Description Description 1 Power socket 7 PC analog signal HDTV component video input connector VGA IN 1 VGA IN 2 2 HDMI 1 connector 8 Monitor loop through output connector for VGA IN 1 only 3 USB connector device charge and USB displays and upport mouse page up down function 9 LAN RJ45 Port for 10 100M Ethernet 4 HDMI 2 MHL connector 10 Aud...

Страница 15: ...ur directional select keys Use to select items or make adjustments to your selection 6 BACK BACK Returns to the previous operation 7 SOURCE SOURCE Changes the active source 8 ENTER ENTER Confirm your selection of items 9 Keystone Adjusts the image to compensate for distortion caused by tilting the projector 10 MENU MENU Press MENU to launch the Onscreen display OSD menu back to the previous step f...

Страница 16: ...stments to your selection 7 3D Press 3D to select 3D models 8 SOURCE Changes the active source 9 MODE Press MODE to select the display mode from Bright Presentation Standard Video and User 10 KEYSTONE Adjusts the image to compensate for distortion caused by tilting the projector 11 BACK Returns to the previous operation STOP Press to stop playback 12 VGA Press VGA to change source to the VGA conne...

Страница 17: ...ity OSD 19 MENU Press MENU to launch the Onscreen display OSD menu back to the previous step for the OSD menu operation or exit the OSD menu Confirm your selection of items 20 HDMI MHL To change source to HDMI MHL 21 HIDE Momentarily turns off the video Press HIDE to hide the image press again to display the image 22 ZOOM IN Zooms the projector display in 23 VIDEO To change source to COMPOSITE VID...

Страница 18: ...Multi Media mode 5 Volume Down Decreases the volume only for Multi Media mode 6 Select Enter Press to select enter the file only for Navigation mode Play Pause Toggles between playback and pause only for Multi Media mode 7 MENU Press to launch the root memu only for Navigation mode 8 Four directional select keys Use up down left right buttons to select items or make adjustments to your selection o...

Страница 19: ...model definition 10 MEDIA Press MEDIA to return to the home page of media mode 11 PgUp PgDn Use the button to select the next or previous page only for Navigation mode 12 KeyPad 0 9 Number buttons only for Numeric mode Icon Function Description ...

Страница 20: ...V 2 0A power output for power bank charging only when MHL source is not detected Note 6 VGA OUT loops through for VGA IN 1 only Description Description 1 Power cord 7 VGA to component HDTV adapter 2 USB cable for charging device 8 VGA cable 3 HDMI cable 9 LAN cable 4 MHL cable MicroUSB to HDMI 10 Audio cable Jack Jack 5 Composite video cable 11 Audio cable Jack RCA 6 3 RCA component cable 12 RS232...

Страница 21: ... video player etc The projector will detect your source automatically If the screen displays Lock and Source icons it means the projector is locked onto a specific source type and there is no such type of input signal detected If the screen displays No Signal please make sure the signal cables are securely connected or press source direct key If you connect to multiple sources at the same time use...

Страница 22: ...ow safe to unplug the power cord Warning indicators Projector Overheated Lamp will automatically turn off soon This onscreen message indicates that the projector has overheated The lamp with automatically turn off the projector will automatically shut down and the LED temp indicator will turn solid red Contact your local dealer or service center Fan failed Lamp will automatically turn off soon Thi...

Страница 23: ...cted Image Adjusting the Height of Projected Image The projector is equipped with elevator feet for adjusting the height of image To raise lower the image Use Tilt adjusting wheel to fine tune the display angle Tilt adjusting wheel ...

Страница 24: ...om Max zoom Diagonal inch B W cm x H cm From base to top of image cm C Diagonal inch B W cm x H cm From base to top of image cm C 1 0 25 52 x 39 45 33 67 x 50 58 1 5 38 78 x 58 67 50 101 x 76 87 2 0 51 104 x 78 89 66 134 x 101 116 3 0 76 155 x 117 134 99 202 x 151 174 4 0 102 207 x 155 179 132 269 x 202 232 5 0 127 259 x 194 223 165 336 x 252 290 6 0 153 311 x 233 268 199 403 x 303 348 7 0 178 363...

Страница 25: ...age cm C Diagonal inch B W cm x H cm From base to top of image cm C 1 30 65 x 40 45 39 84 x 53 59 1 5 45 97 x 61 68 59 126 x 79 89 2 0 60 130 x 81 91 78 168 x 105 118 3 0 90 194 x 121 136 117 253 x 158 178 4 0 120 259 x 162 182 156 337 x 221 237 5 0 150 324 x 202 227 196 421 x 263 296 6 0 180 389 x 243 273 235 505 x 316 355 7 0 210 453 x 283 318 274 590 x 369 414 7 7 232 499 x 312 350 301 17 649 x...

Страница 26: ...om base to top of image cm C 1 31 68 x 38 44 40 88 x 50 58 1 5 46 102 x 57 67 60 133 x 75 87 2 0 61 136 x 76 89 80 177 x 100 115 2 5 77 170 x 96 111 100 221 x 124 144 3 0 92 204 x 115 133 120 265 x 149 173 3 5 107 238 x 134 155 140 310 x 174 202 4 0 123 272 x 153 177 160 354 x 199 231 5 0 154 340 x 191 222 200 442 x 249 289 6 0 184 408 x 229 266 240 531 x 299 346 7 0 215 476 x 268 311 280 619 x 34...

Страница 27: ...m base to top of image cm C 1 32 68 x 42 44 41 88 x 55 58 1 5 47 102 x 64 66 62 133 x 83 86 2 0 63 136 x 85 88 82 177 x 111 115 2 5 79 170 x 106 110 103 221 x 138 144 3 0 95 204 x 127 133 123 265 x 166 173 3 5 110 238 x 149 155 144 310 x 194 201 4 0 126 272 x 170 177 164 354 x 221 230 5 0 158 340 x 212 221 205 442 x 277 288 6 0 189 408 x 255 265 247 531 x 332 345 7 0 221 476 x 297 309 288 619 x 38...

Страница 28: ...m Top cm Diagonal inch A W cm x H cm Max zoom B Min zoom C From base to top of image D 30 61 x 46 0 9 1 2 53 40 81 x 61 1 2 1 6 70 50 102 x 76 1 5 2 0 88 60 122 x 91 1 8 2 4 105 70 142 x 107 2 1 2 7 123 80 163 x 122 2 4 3 1 140 90 183 x 137 2 7 3 5 158 100 203 x 152 3 0 3 9 175 150 305 x 229 4 5 5 9 263 180 366 x 274 5 4 7 1 315 200 406 x 305 6 0 7 8 351 250 508 x 381 7 6 9 8 438 300 610 x 457 9 1...

Страница 29: ...D 30 65 x 40 0 8 1 0 45 40 86 x 54 1 0 1 3 61 50 108 x 67 1 3 1 7 76 60 129 x 81 1 5 2 0 91 70 151 x 94 1 8 2 3 106 80 172 x 108 2 0 2 7 121 90 194 x 121 2 3 3 0 136 100 215 x 135 2 6 3 3 151 150 323 x 202 3 8 5 0 227 180 388 x 242 4 6 6 0 272 200 431 x 269 5 1 6 7 303 250 538 x 337 6 4 8 3 378 300 646 x 404 7 7 454 Zoom Ratio 1 3x A C D B Desired Distance 2 0 m 1 5 m Height 91 cm from base to top...

Страница 30: ... D 30 66 x 37 0 8 1 0 43 40 89 x 50 1 0 1 3 58 50 111 x 62 1 3 1 6 72 60 133 x 75 1 5 2 0 87 70 155 x 87 1 8 2 3 101 80 177 x 100 2 0 2 6 116 90 199 x 112 2 3 2 9 130 100 221 x 125 2 5 3 3 144 150 332 x 187 3 8 4 9 217 180 398 x 224 4 5 5 9 260 200 443 x 249 5 0 6 5 289 250 553 x 311 6 3 8 1 361 300 664 x 374 7 5 433 Zoom Ratio 1 3x A C D B Desired Distance 2 0 m 1 5 m Height 87 cm from base to to...

Страница 31: ... D 30 65 x 40 0 7 1 0 42 40 86 x 54 1 0 1 3 56 50 108 x 67 1 2 1 6 70 60 129 x 81 1 5 1 9 84 70 151 x 94 1 7 2 2 98 80 172 x 108 1 9 2 5 112 90 194 x 121 2 2 2 9 126 100 215 x 135 2 4 3 2 140 150 323 x 202 3 7 4 8 210 180 388 x 242 4 4 5 7 252 200 431 x 269 4 9 6 3 280 250 538 x 337 6 1 7 9 350 300 646 x 404 7 3 420 Zoom Ratio 1 3x A C D B Desired Distance 1 9 m 1 5 m Height 84 cm from base to top...

Страница 32: ...nd pattern acts as a guide to adjusting the calibration and alignment settings such as screen size and distance focus and more 4 The Installation menu includes the following options Projection Mode Projection Location Auto Keystone settings Manual Keystone settings WirelessHD Dongle Pairing Language settings Reset to factory default function Use the up and down arrow keys to select an option the l...

Страница 33: ... setting Use the keys to select the desired item and adjust the settings by using the keys Select the next item to be adjusted in the submenu and adjust as described above Press BACK on the remote control or control panel the screen will return to the main menu To exit OSD press BACK on the remote control or control panel The OSD menu will close and the projector will automatically save the new se...

Страница 34: ...play Mode There are many factory presets optimized for various types of images Bright For brightness optimization Presentation For meeting presentation Standard For common environment Video For playing video in a bright environment User Memorize user s settings Wall color Use this function to choose a proper color according to the wall There are several choices including white light yellow light b...

Страница 35: ...of dark scenery With greater gamma value dark scenery looks brighter Advanced Ind Color Management Adjusts the red green blue cyan yellow and magenta colors Ind Hue Adjusts the color balance of red and green Ind Saturation Adjusts the selected color to be less or more saturated color Ind Gain Adjusts the selected color s contrast Brilliant Color Produces an expanded on screen color spectrum that d...

Страница 36: ...mage will be scaled to fit the width of the screen and the height adjusted to display the image using a 16 9 ratio L Box Keep original signal aspect ratio and zoom in by 1 333 times H V Keystone Auto V Keystone Automatically adjusts vertical image H Keystone Press the or button to adjust image distortion horizontally and makes a squarer image V Keystone Press the or button to adjust image distorti...

Страница 37: ...can see a vertical flickering bar in the projected image use this function to make the necessary adjustments Tracking Synchronizes the signal timing of the projector with the graphics card If you experience an unstable or flickering image use this function to correct it HDMI Color Range Adjust the color range of the HDMI image data to correct color display error Auto Automatically adjust by inform...

Страница 38: ...t in the red frame and system will capture your image after pressing ENTER Choose ENTER to use the current image as your customized startup screen Choose Back to cancel the screen capture and exit the onscreen display OSD A message appears stating that the screen capture is in progress When the screen capture is finished the message disappears and the original display is shown The customized start...

Страница 39: ...assword Press ENTER to setup or change the User Password Press number keys to set your password on the remote control and press ENTER to confirm Press to delete character Enter the password when you see Confirm Password displayed The password should be between 4 and 8 characters long If you select Request password only when plugging the power cord in the projector will prompt the user to enter the...

Страница 40: ... IP address manually Note 1 Only available when DHCP set to Off and will gray out if DHCP set to On 2 Press Enter to let users key in values and press Enter again to save values temporarily 3 Press Apply to confirm to save the settings for all in LAN setting page Note Grey out when LAN isn t plugged in and LAN IP X X X X show 0 0 0 0 LAN Reset Reset LAN function Information Display the projector i...

Страница 41: ...e On to power on projector while AC power plug in Control Panel Lock Off Default is set to Off Child Lock Enable Child Lock to disable the power key on projector while in the standby mode to avoid power trigger from children Take effect after power off Disable Child Lock temporarily to turn on projector by quick key holding the power key on projector for 3 seconds No need to lock any key after pow...

Страница 42: ... volume Press to increase the volume Mute Choose On to mute the volume Choose Off to restore the volume Power On Off Volume Select this function to adjust the notification volume when turning the projector on off Alarm Volume Select this function to adjust the volume of any warning notifications ...

Страница 43: ...24P 3D 96Hz or 144Hz inputs Aspect Ratio HDMI Scan Info will be gray out also HIDE will be not supported Language 3D Choose On to enable DLP 3D function On Choose this item while using DLP 3D glasses 120Hz 3D capable graphics cards and HQFS format file or DVD with corresponding SW player Off Turn off 3D mode 3D Format If the 3D content is not displayed correctly you can select a 3D format that sui...

Страница 44: ...ind below homepage of acer LAN webpage management A password is needed to login in before using Select a user Administrator is with high authority that can process more operations such as network setting and alert setting Default password of administrator is admin And User is with normal authority with default password by user Click Login button to enter into homepage with correct password ...

Страница 45: ... and you can find three main functions listed Control Panel Network Setting and Alert Setting Note Control Panel and Network Setting are only for Administrator account Control Panel Enduser can control and adjust projector setting value via this page ...

Страница 46: ...sword as wish After change network configurations or password projector will reboot automatically after press Apply Note Group Name and projector Name must be less then 32 characters Alert Setting Enduser can send mail with error message right away if projector has problem ...

Страница 47: ...37 English Logout After tap Logout you will return to login page within 5 seconds Note Functions vary depending on model definition ...

Страница 48: ...r PC Microsoft Windows 2000 XP Vista Windows 7 Windows 8 1 Windows 10 Macintosh OS compliant For an incorrectly displayed image Open My Computer open the Control Panel and then double click the Display icon Select the Settings tab Verify that your display resolution setting is lower than or equal to WUXGA RB 1920 x 1200 Click the Advanced Properties button If the problem still appears change the m...

Страница 49: ...computer 6 Image has vertical flickering bar Use Frequency to make an adjustment Refer to the Image section for more information Check and reconfigure the display mode of your graphics card to make it compatible with the projector 7 Image is out of focus Make sure the lens cap is removed Adjusts the focus ring on the projector lens Make sure the projection screen is within the required distance of...

Страница 50: ...t directly 10 Image has slanted sides If possible reposition the projector so that it is centered on the screen Press the Keystone button on the remote control until the sides are vertical 11 Image is reversed Select Image Projection Mode on the OSD and adjust the projection direction 12 LAN WiFi USB Display source show No Signal Power off projector and power on again 13 Image hangs up when displa...

Страница 51: ...reach its maximum lifetime Prepare to replace it soon Condition Solution 1 The projector stops responding to all controls If possible turn off the projector then unplug the power cord and wait at least 30 seconds before reconnecting power 2 Lamp burns out or makes a popping sound When the lamp reaches the end of its useful life it will burn out and may make a loud popping sound If this happens the...

Страница 52: ... to OFF 100ms Flash ON to OFF 100ms Flash ON to OFF 100ms Standby ON Power button ON ON Lamp retry Quick Flashing Power off Cooling state Quick Flashing Power button OFF cooling completed standby mode ON Error thermal failure ON ON Error fan lock Quick Flashing ON Error lamp breakdown ON ON Error color wheel fail Quick Flashing ON ...

Страница 53: ...the projector by pressing the Power button Allow the projector at least 30 minutes to cool down Disconnect the power cord 1 Use a screwdriver to remove the screw from the cover Illustration 1 Push to the direction of the arrow Illustration 2 Push up the cover Illustration 3 2 Remove the screw that secure the lamp module Illustration 4 Pull out the lamp plug Illustration 5 Lift the handle so that i...

Страница 54: ...ng a ceiling mount please refer to the steps below 1 Drill four holes into a solid structural ceiling member and secure the ceiling mount base to the ceiling 2 Choose the length combination based on actual environment CM 01S doesn t include Type 2 and Type 3 Type 1 Type 2 Type 3 ...

Страница 55: ... larger size use the sliding extensions for more supports Note It is recommended that you keep a reasonable space between the bracket and the projector to allow for proper heat distribution 4 Connect the main body connector to the projector bracket illustration 1 and then screw up four screws illustration 2 Type 1 Type 2 Type 3 Illustration 1 Illustration 2 ...

Страница 56: ...46 English 5 Adjust the angle and positioning as necessary Screw Type B Washer Type Diameter mm Length mm Large Small 4 25 V V 360 55 00 mm 55 00 mm 82 30 mm 83 84 mm SCREW SPEC M4 x 25 mm ...

Страница 57: ...XGA VGA SVGA SXGA WXGA WXGA WSXGA Video compatibility NTSC 3 58 4 43 PAL B D G H I M N SECAM B D G K K1 L HDTV 720p 1080i 1080p EDTV 480p 576p SDTV 480i 576i Aspect ratio Auto Full 4 3 16 9 L Box Displayable colors 1 07 billion colors Optical zoom ratio 1 3X Throw ratio P5230 N318 PN X17 PR242 MF 142 DNX1706 series 1 49 1 93 66 2m 5330W N328 PN W17 PR442 MF 342 DWX1705 series 1 19 1 54 78 2m P5530...

Страница 58: ...nput 100 240 V auto switching power supply Power consumption Normal mode 290W 10 110VAC ECO mode 205W 10 110VAC Standby mode 0 5W Network standby mode 3W Operating temperature 0ºC to 40ºC 32ºF to 104ºF Standard package contents AC power cord x1 VGA cable x1 option HDMI cable x1 option Remote control x1 AAA battery x2 for remote control option User s guide Projector CD ROM x1 User s guide Media Wir...

Страница 59: ...49 English Note Design and specifications are subject to change without notice HDMI 2 MHL V RS232 V 3 5 mm audio jack input V 3 5 mm audio jack output V RJ45 LAN input V ...

Страница 60: ...A 800x600 56 35 1 800x600 60 37 9 800x600 72 48 1 800x600 75 46 9 800x600 85 53 7 800x600 120 77 4 XGA 1024x768 60 48 4 1024x768 70 56 5 1024x768 75 60 0 1024x768 85 68 7 1024x768 120 99 0 SXGA 1152x864 70 63 8 1152x864 75 67 5 1152x864 85 77 1 1280x1024 60 64 0 1280x1024 72 77 0 1280x1024 75 80 0 1280x1024 85 91 1 QuadVGA 1280x960 60 60 0 1280x960 75 75 2 SXGA 1400x1050 60 65 3 UXGA 1600x1200 60 ...

Страница 61: ...60 65 3 1920x1080 1080P 60 67 5 1366x768 60 47 7 WUXGA 1920x1200 RB 59 94 74 04 Modes Resolution V Frequency Hz H Frequency KHz 480i 720x480 1440x480 59 94 29 97 15 7 576i 720x576 1440x576 50 25 15 6 480p 720x480 59 94 31 5 576p 720x576 50 31 3 720p 1280x720 60 45 0 720p 1280x720 50 37 5 1080i 1920x1080 60 30 33 8 1080i 1920x1080 50 25 28 1 1080p 1920x1080 23 97 24 27 0 1080p 1920x1080 60 67 5 108...

Страница 62: ... 1152x864 85 77 1 1280x1024 60 64 0 1280x1024 72 77 0 1280x1024 75 80 0 1280x1024 85 91 1 QuadVGA 1280x960 60 60 0 1280x960 75 75 2 SXGA 1400x1050 60 65 3 UXGA 1600x1200 60 75 0 Modes Resolution V Frequency Hz H Frequency KHz WXGA 1280x768 60 47 8 1280x768 75 60 3 1280x768 85 68 6 1280x720 60 44 8 1280x720 120 92 9 1280x800 60 49 6 1280x800 RB 119 909 101 6 1440x900 60 59 9 1920x1200 60 74 WSXGA 1...

Страница 63: ...me Packing 1280 x 720 60 45 0 1080p Frame Packing 1920 x1080 24 27 0 720p Frame Packing 1280 x 720 50 37 5 720p Frame Packing 1280 x 720 60 45 0 1080p Top and Bottom 1920 x1080 24 27 0 1080p Top and Bottom 1920 x1080 50 56 3 1080p Top and Bottom 1920 x1080 60 67 5 720p Side by Side Half 1280 x 720 60 45 0 1080i Side by Side Half 1920 x1080 50 25 28 1 1080i Side by Side Half 1920 x1080 60 30 33 8 1...

Страница 64: ...osed Caption 3 2 pull down 2 2 pull down 3D de interlace 3D comb filter 576i 720x576 1440x576 50 25 15 6 480p 720x480 59 94 60 31 5 576p 720x576 50 31 3 720p 1280x720 59 94 60 45 0 720p 1280x720 50 37 5 1080i 1920x1080 60 30 33 8 1080i 1920x1080 50 25 28 1 1080p 1920x1080 23 97 24 27 0 1080p 1920x1080 25 28 1 1080p 1920x1080 29 97 30 33 8 Graphic source monitor range limits Horizontal scan rate 15...

Страница 65: ...evice into an outlet on a circuit different from that to which the receiver is connected Consult the dealer or an experienced radio television technician for help Notice Shielded cables All connections to other computing devices must be made using shielded cables to maintain compliance with FCC regulations Notice Peripheral devices Only peripherals input output devices terminals printers etc certi...

Страница 66: ...ooth modules Canada Low power license exempt radio communication devices RSS 247 a Common information Operation is subject to the following two conditions 1 This device may not cause interference and 2 This device must accept any interference including interference that may cause undesired operation of the device b Operation in 2 4 GHz band To prevent radio interference to the licensed service thi...

Страница 67: ...2010 A1 2015 EN 61000 3 2 2014 Class A EN 61000 3 3 2013 R TTE Directive 1999 5 EC until Jun 12 2017 RED Directive 2014 53 EU From Jun 13 2017 EN 300 328 V1 8 1 EN 301 893 V1 7 1 EN 300 440 1 V1 6 1 EN 300 440 2 V1 4 1 EN 302 291 1 V1 1 1 EN 302 291 2 V1 1 1 EN 301 511 V9 0 2 EN 301 908 1 V6 2 1 EN 301 908 2 V6 2 1 EN 301 908 13 V6 2 1 EN 301 489 1 V1 9 2 EN 301 489 3 V1 6 1 EN 301 489 7 V1 3 1 EN...

Страница 68: ...facturer Importer is responsible for this declaration Product DLP Projector Model Number DWU1703 D1P1704 DWX1705 DNX1706 Machine Type P5630 P5530 P5330W P5230 N368 N358 N328 N318 PN WU17 PN 817 PN W17 PN X17 Name of Responsible Party Acer America Corporation Address of Responsible Party 333 West San Carlos St Suite 1500 San Jose CA 95110 U S A Contact Person Acer Representative Phone No 254 298 40...

Отзывы: