background image

Your Acer Chromebook tour - 9

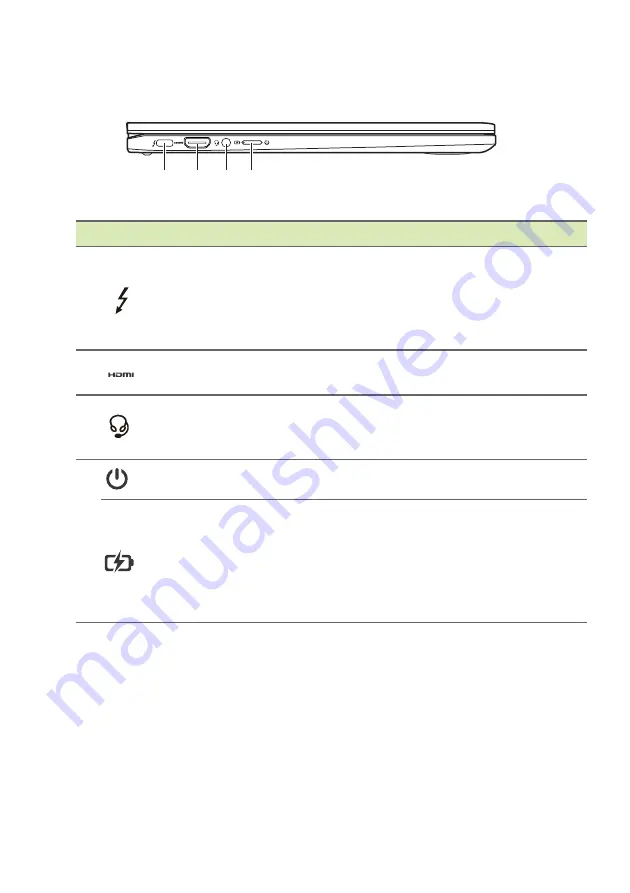
Left view

# Icon Item

Description

1

USB Type-C port 
with DC-in/ 
Thunderbolt™ 4 
port

Connects to the provided USB Type-C 
power adapter and to USB devices 
with a USB Type-C connector. 


Supports Thunderbolt™ 4 and 
displays.

2

HDMI port

Supports high-definition digital video 
connections.

3

Headset/speaker 
jack

Connects to audio devices 


(e.g., speakers, headphones), or a 
headset with microphone.

4

Power button 

Turns the Chromebook on and off.

Battery indicator

Indicates the Chromebook’s battery 
status.

Charging:

 The light shows amber 

when the battery is charging.

Fully charged:

 The light shows blue 

when in AC mode.

2

1

3 4

Содержание Chromebook Spin 714

Страница 1: ...USER S MANUAL ...

Страница 2: ... ______________________________ Google and Google Play are trademarks of Google LLC Important This manual contains proprietary information that is protected by copyright laws The information contained in this manual is subject to change without notice Images provided herein are for reference only and may contain information or features that do not apply to your computer Acer Group shall not be lia...
Страница 3: ...w 9 Right view 10 USB 3 2 Gen 2 information 10 USB Type C information 10 Bottom view 11 Rechargeable Active Stylus 12 Remove or insert the stylus 12 Usage Modes 13 Frequently asked questions 14 Get help or more information 15 Information for your safety and comfort 16 Basic care and tips for using your computer 16 Turning your computer on and off 16 Taking care of your computer 16 Taking care of y...

Страница 4: ...If network access is protected you will need an access password to connect to it Accept the Terms of Service Once connected to a network accept the Terms of Service Your Chromebook will then download any available system updates so you automatically get the latest Chrome OS features First time sign in Create a new Google Account You can create a new Google Account if you don t already have one Sel...

Страница 5: ... next to the webcam indicates that the webcam is active 4 Touchscreen Displays Chromebook output supports multi touch input 5 Stylus Remove the pen from the slot and perform touch actions on the screen 1 1 2 3 4 5 Note This monitor uses low blue light panel When the monitor is in default setting Preset mode Standard it works in compliance with TÜV Rheinland The Low Blue Light feature on the displa...

Страница 6: ...mebook 3 Fingerprint reader optional Fingerprint reader for unlocking your Chromebook 4 Touchpad click button Touch sensitive pointing device which functions like a Chromebook mouse Pressing down anywhere on the pad functions like the left button of a mouse Pressing down anywhere with two fingers functions like the right button of a mouse 4 3 2 1 ...

Страница 7: ...eyboard shortcuts press Ctrl Alt Icon Function Description Previous Go to the previous page Reload Reload the current page Full screen Open the page in full screen mode Next window Switch to the next window Screenshot Takes screenshot Brightness down Decreases the screen brightness Brightness up Increases the screen brightness Mute Turns off audio output Volume down Decreases the volume Volume up ...

Страница 8: ...ck Tapping the touchpad with two fingers or pressing and holding Alt on the keyboard and tapping the touchpad with one finger both equal a right click on a Chromebook mouse Two finger swipe Place two fingers on the touchpad and move them up and down to scroll vertically left and right to scroll horizontally Drag and drop Select the item you want to move with one finger With a second finger move th...

Страница 9: ...hunderbolt 4 and displays 2 HDMI port Supports high definition digital video connections 3 Headset speaker jack Connects to audio devices e g speakers headphones or a headset with microphone 4 Power button Turns the Chromebook on and off Battery indicator Indicates the Chromebook s battery status Charging The light shows amber when the battery is charging Fully charged The light shows blue when in...

Страница 10: ...B 3 2 Gen 2 information USB 3 2 Gen 2 compatible ports are blue Compatible with USB 3 2 Gen 2 and earlier devices For optimal performance use USB 3 2 Gen 2 certified devices Defined by the USB 3 2 Gen 2 specification SuperSpeed USB USB Type C information Supports DisplayPort audio video output Compatible with Thunderbolt 4 Delivers up to 3 A at 5 V DC for USB charging DC in requires power adapter ...

Страница 11: ...Your Acer Chromebook tour 11 Bottom view 1 Icon Item Description 1 Ventilation and cooling fan Allows the Chromebook to stay cool Do not cover or obstruct the openings ...

Страница 12: ... 15 minutes charging provide 4 hours of usage If you feel that the function is unstable please insert the stylus into the slot to charge it The pen will enter power saving mode Idle After 2 minutes move the tip over the touchscreen to wake the pen Remove or insert the stylus Charge pin Note Function may differ depending on apps ...

Страница 13: ...Usage Modes 13 USAGE MODES Your Chromebook features the following modes You can choose a mode to fit your needs Laptop Display Tent Tablet ...

Страница 14: ...re stored in the Files app Find the app by clicking the Launcher icon and searching Files How do I transfer my local files Transfer your local files using a compatible storage device Your Chromebook works with most external storage devices e g USB thumb drives removable hard drives You can also upload your files photos and videos to Google Drive After setting up your Chromebook with your Google Ac...

Страница 15: ...hromebook How do I set this up for my child If you want to set up parental controls for your child it s important that you sign in using your child s personal Google Account If they don t already have one you can create one during the sign in process on your Chromebook You will be able to add your child s school account after you complete device onboarding Question Answer ...

Страница 16: ...it near sources of heat such as a radiator Do not expose the computer to temperatures below 0º C 32º F or above 50º C 122º F Do not subject the computer to magnetic fields Do not expose the computer to rain or moisture Do not spill water or any liquid on the computer Do not subject the computer to heavy shock or vibration Do not expose the computer to dust or dirt Never place objects on top of the...

Страница 17: ... the plug The total ampere ratings of the equipment plugged in should not exceed the ampere rating of the cord if you are using an extension cord Also the total current rating of all equipment plugged into a single wall outlet should not exceed the fuse rating Cleaning and servicing When cleaning the computer follow these steps 1 Turn off the computer 2 Disconnect the AC adapter 3 Use a soft moist...

Страница 18: ...mage The charging port must be clean and free from debris and should only be used with Acer charging equipment Use of a non Acer battery or charging equipment can cause damage to the product and will void the warranty If you plan to store the device for a long period of time turn off the device remove AC power and store the product at room temperature 0 C 35 C in a dry humidity 45 80 well ventilat...

Страница 19: ...eratures over 50 C 122 F Failure to follow these guidelines may cause the battery to leak acid become hot explode or ignite and cause injury and or damage Do not pierce open or disassemble the battery If the battery leaks and you come into contact with the leaked fluids rinse thoroughly with water and seek medical attention immediately For safety reasons and to prolong the lifetime of the battery ...

Страница 20: ...in summer or winter Always try to keep the battery between 15 C and 25 C 59 F and 77 F A device with a hot or cold battery may not work temporarily even when the battery is fully charged Battery performance is especially limited in temperatures well below freezing Do not dispose of batteries in a fire as they may explode Batteries may also explode if damaged Dispose of batteries according to local...

Страница 21: ...our display clean Keep your head at a higher level than the top edge of the display so your eyes point downward when looking at the middle of the display Adjust the display brightness and or contrast to a comfortable level for enhanced text readability and graphics clarity Eliminate glare and reflections by placing your display in such a way that the side faces the window or any light source minim...

Отзывы: