background image

4 - Getting started

G

ETTING


STARTED

Turn on your Chromebook

On the Chromebook, press the power button. A "Welcome" screen will

appear when the Chromebook first boots up.

Select your language settings

Use the "Language" drop-down list  to choose  your default language

setting. If there is more than one way to type in your language, you

may be prompted to select a keyboard input method as well.

Connect to a network

Select a network from the "Connect to network" list to connect to the

Internet.  If  network  access  is  protected,  you  will  need  an  access

password to connect to it. 

Accept the Terms of Service

Once  connected  to  a  network,  accept  the  Terms  of  Service.  Your

Chromebook will then download any available system updates, so you

automatically get the latest ChromeOS features.

First-time sign-in

Create a new Google Account

You can create a new Google Account if you don’t already have one.

Select 

Create a Google Account

 to set up a new account. A Google

Account  gives  you  access  to  useful  web  services  developed  by

Google, such as Gmail, Google Drive, and Google Calendar.

Browse as a guest

You  can  also  use  the  Chromebook  without  a  Google  Account  by

selecting 

Browse as a Guest

.

Содержание C936

Страница 1: ...USER S MANUAL ...

Страница 2: ..._____________________ Date of purchase ______________________________ Place of purchase ______________________________ Google and Google Play are trademarks of Google LLC Important This manual contains proprietary information that is protected by copyright laws The information contained in this manual is subject to change without notice Images provided herein are for reference only and may contain...

Страница 3: ...rms of Service 4 First time sign in 4 Create a new Google Account 4 Browse as a guest 4 Your Acer Chromebook tour 5 Front view 5 Keyboard view 6 Function keys 7 Common keyboard shortcuts 7 Touchpad 8 Left view 9 USB Type A information 9 USB Type C information 9 Right view 10 Bottom view 11 Frequently asked questions 12 Get help or more information 13 ...

Страница 4: ... If network access is protected you will need an access password to connect to it Accept the Terms of Service Once connected to a network accept the Terms of Service Your Chromebook will then download any available system updates so you automatically get the latest ChromeOS features First time sign in Create a new Google Account You can create a new Google Account if you don t already have one Sel...

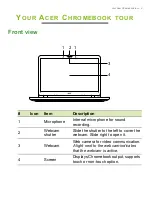
Страница 5: ... microphone for sound recording 2 Webcam shutter Slide the shutter to the left to cover the webcam Slide right to open it 3 Webcam Web camera for video communication A light next to the webcam indicates that the webcam is active 4 Screen Displays Chromebook output supports touch or non touch option 2 1 1 3 4 ...

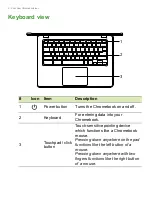
Страница 6: ... 2 Keyboard For entering data into your Chromebook 3 Touchpad click button Touch sensitive pointing device which functions like a Chromebook mouse Pressing down anywhere on the pad functions like the left button of a mouse Pressing down anywhere with two fingers functions like the right button of a mouse 1 3 2 ...

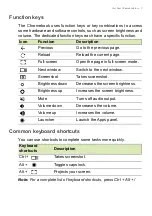
Страница 7: ...eyboard shortcuts press Ctrl Alt Icon Function Description Previous Go to the previous page Reload Reload the current page Full screen Open the page in full screen mode Next window Switch to the next window Screenshot Takes screenshot Brightness down Decreases the screen brightness Brightness up Increases the screen brightness Mute Turns off audio output Volume down Decreases the volume Volume up ...

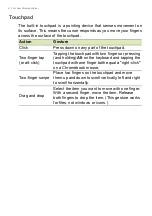
Страница 8: ...ck Tapping the touchpad with two fingers or pressing and holding Alt on the keyboard and tapping the touchpad with one finger both equal a right click on a Chromebook mouse Two finger swipe Place two fingers on the touchpad and move them up and down to scroll vertically left and right to scroll horizontally Drag and drop Select the item you want to move with one finger With a second finger move th...

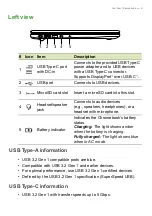
Страница 9: ...em Description 1 USB Type C port with DC in Connects to the provided USB Type C power adapter and to USB devices with a USB Type C connector Supports DisplayPort over USB C 2 USB port Connects to USB devices 3 MicroSD card slot Insert a microSD card into this slot 4 Headset speaker jack Connects to audio devices e g speakers headphones or a headset with microphone 5 Battery indicator Indicates the...

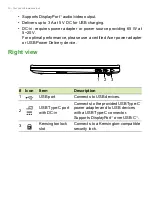
Страница 10: ...timal performance please use a certified Acer power adapter or USB Power Delivery device Right view Icon Item Description 1 USB port Connects to USB devices 2 USB Type C port with DC in Connects to the provided USB Type C power adapter and to USB devices with a USB Type C connector Supports DisplayPort over USB C 3 Kensington lock slot Connects to a Kensington compatible security lock 1 2 3 ...

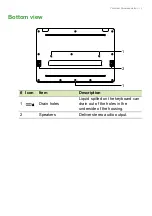
Страница 11: ...Acer Chromebook tour 11 Bottom view Icon Item Description 1 Drain holes Liquid spilled on the keyboard can drain out of the holes in the underside of the housing 2 Speakers Deliver stereo audio output 1 2 1 ...

Страница 12: ...re stored in the Files app Find the app by clicking the Launcher icon and searching Files How do I transfer my local files Transfer your local files using a compatible storage device Your Chromebook works with most external storage devices e g USB thumb drives removable hard drives You can also upload your files photos and videos to Google Drive After setting up your Chromebook with your Google Ac...

Страница 13: ...sign in using your child s personal Google Account If they don t already have one you can create one during the sign in process on your Chromebook You will be able to add your child s school account after you complete device onboarding For information on Refer to Chromebook Help Open the Explore app on your Chromebook ChromeOS google com support chromebook Question Answer ...

Отзывы: