background image

21

The voice call screen

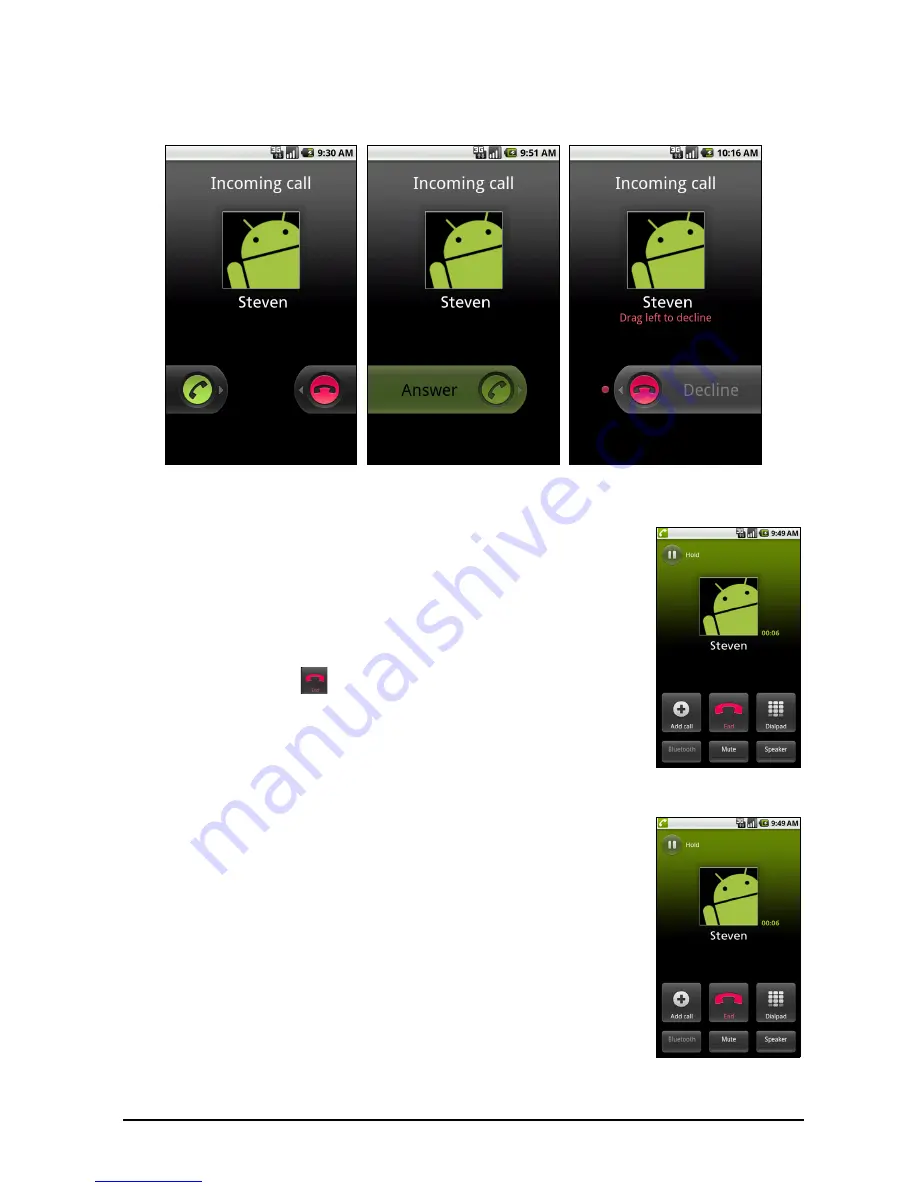
Answering or declining a call

When you receive an incoming call, the number or contact name will be shown 
on the screen. To accept or decline the call, drag the appropriate button across 
the screen.

The voice call screen

Once you have dialed the number the voice call screen 
appears, which displays the number/contact you are talking 
to, the call duration and call options (Bluetooth, Mute and 
Speaker).

Ending a call

To end the call, tap 

. If necessary, first press any button to 

activate the screen.

Onscreen call options

Using the speakerphone

The speakerphone function allows you to make calls 
without having to hold your smartphone. This handsfree 
function is especially useful for multitasking.
To activate the speakerphone, tap Speaker. Tap Speaker 
again to disable the speakerphone.

Muting a call

To mute a call, tap Mute on the voice call screen to switch 
off the microphone. Tap Mute again to switch the 
microphone back on.


Содержание beTouch E400

Страница 1: ...Acer beTouch E400 User Guide ...

Страница 2: ...ser Guide First issue 05 2010 Acer beTouch E400 Smartphone Model number __________________________________ Serial number ___________________________________ Date of purchase ________________________________ Place of purchase ________________________________ ...

Страница 3: ...s of this Agreement 7 Transfer your rights under this Agreement to any third parties 8 Export the Software in contravention of applicable export laws and regulations or i sell export re export transfer divert disclose technical data or dispose of any Software to any prohibited person entity or destination including without limitation Cuba Iran North Korea Sudan and Syria or ii use any Software for...

Страница 4: ...ce to any other rights Acer may immediately terminate this Agreement without notice if you fail to comply with any terms and conditions of this Agreement In such event you must 1 Cease all use of the Software 2 Destroy or return to Acer the original and all copies of the Software and 3 Delete the Software from all phones on which it was resident All disclaimers of warranties and limitation of liab...

Страница 5: ...d 11 The Home screen 13 Managing contacts Managing your contacts 17 Making Calls Before making a call 19 Making a call 19 The voice call screen 21 Ending a call 21 Onscreen call options 21 Messaging Creating a new message 23 Replying to a message 24 MMS messages 24 Going online Browsing the Internet 26 Setting up your Google email 27 Composing an email 27 Setting up Email 27 Online applications 27...

Страница 6: ...Tips Using the headset 41 Using a Bluetooth headset 41 Inserting a microSD Card 41 Appendix FAQ and troubleshooting 42 Other sources of help 43 Warnings and precautions 43 Emergency calls 46 Disposal and recycling information 46 Taking care of your smartphone 46 Specifications 48 Regulatory information 50 Index ...

Страница 7: ...t you immediately register it This will give you access to some useful benefits such as Faster service from our trained representatives Membership in the Acer community receive promotions and participate in customer surveys The latest news from Acer Hurry and register as other advantages await you How to register To register your Acer product please visit mobile acer com Click Product Registration...

Страница 8: ...Carefully unpack the box and remove the contents If any of the following items is missing or damaged contact your dealer immediately Acer beTouch E400 Smartphone Battery Quick Guide Companion CD USB cable AC adapter Headset Getting to know your smartphone Views 1 4 3 5 6 7 8 11 12 13 14 2 9 10 ...

Страница 9: ...ne menu step 8 Menu button Open the option menu 9 Micro USB connector Connect to a USB cable charger 10 Microphone Internal microphone 11 Volume control buttons Increase or decrease the ringer system volume press to wake the smartphone from sleep mode 12 Camera button Activate the camera or take a picture press to wake the smartphone from sleep mode 13 Camera A 3 2 megapixel camera for taking high...

Страница 10: ...l the way into the card slot Caution Turn off your smartphone and remove the battery before installing or removing the SIM or microSD card You may damage the card or your smartphone if the battery is still installed Installing or removing the battery Your smartphone uses a replaceable battery to provide power It is packed seperately from your smartphone and needs to be inserted and charged before ...

Страница 11: ... smartphone for eight hours After that you can charge it each day to recharge the battery to full capacity Connect the AC adapter cord to the micro USB connector on your smartphone Removing the battery 1 2 Open the battery compartment as shown in Installing the battery on page 8 Lift the battery out of the compartment using the clip on the top of the battery Replace the battery cover as described ...

Страница 12: ...select your language then tap the green android on the next screen Follow the rest of the instructions as they are displayed Sign in to or create a Google account If you have Internet access your smartphone allows you to synchronize information with a google account During the start up process you may create or sign in to your account which will be used to synchonise your contact list email calend...

Страница 13: ...nd hold an item to see a list of actions available for that item On the pop up menu that appears tap the action you want to perform Scroll To scroll up or down the screen simply drag your finger up or down the screen in the direction that you want to scroll The onscreen keyboard When you tap a text box to enter text an onscreen keyboard will appear Simply tap on keys to enter text If you require a...

Страница 14: ... or disable the following Android keyboard The standard Android keyboard has various features that assist you to enter correct text Tap the 123 button to see numbers and special characters and then tap the Alt key to see even more Tap and hold a key to select alternative characters such as letters with accents Additional keys vary depending on the type of text you enter E g a key to add a smiley i...

Страница 15: ...ut Method Settings or from the Home screen tap Menu Settings Language keyboard Penpower Input Method to access text entry settings The Home screen After the first start process is completed your smartphone will display the Home screen This screen gives you quick icon based access to many of the frequently used features of your smartphone The Home screen already features some useful icons and widge...

Страница 16: ...r add widgets on any of the screens see Personalizing the Home screen on page 15 Notification area The Notification area is at the top of the screen This area contains a variety of icons to inform you of your phone s status The left side of the Notification area displays event icons that indicate a new event such as a new message The icons on the right side indicate connectivity and battery status...

Страница 17: ...r removing shortcuts or widgets To add shortcuts or widgets either tap and hold anywhere on the Home screen or tap Menu Add to open the Add to Home screen menu Shortcuts Tap Shortcuts to open a list of quick links to applications and settings you can add to the Home screen Widgets Tap Widgets to open a list of small applications that you can add to your Home screen Widgets display useful informati...

Страница 18: ... named Folder To change the name tap the folder to open it then tap and hold the name bar at the top of the folder window This opens a dialog box that will allow you to rename the folder Removing an item from the Home screen To remove a Shortcut Widget or folder tap and hold the item until it is selected then drag it to the trash can at the bottom of the screen ...

Страница 19: ...t to add a new contact You will be asked if you want to create a Phone Google or SIM contact To create a contact you will be asked to enter the contact s Given and Family name Phone numbers Email addresses IM addresses Postal addresses Organizations To assign an image to your contact tap the silhouette and select an images from your smartphone s picture gallery select Gallery if requested You may ...

Страница 20: ...ch category such as multiple phone numbers or addresses Tap Menu then Options to set special entries for your smartphone Assign the contact to one or more groups Set a ringtone for calls recieved from the contact Send any calls from the contact directly to your voicemail Tap Done to save the changes or Cancel to discard them Editing a contact on your computer If you have synchronised your Google a...

Страница 21: ...ational call rates can vary greatly depending on the country you are calling and your network provider We suggest you check all call rates with your network provider to avoid excessive phone bills If you are using your smartphone abroad roaming charges will apply Consult your network provider for roaming rates specific to the country you are visiting before you leave Smart search Smart search allo...

Страница 22: ...tab and tap Add to contacts 3 Tap Create new contact and select how to complete the action Please refer to Adding a contact on page 17 Making a call to one of your contacts 1 Tap the Contacts tab in the phone or Contacts from the Home screen to view your contacts 2 Tap a contact A dialog will open asking if you want to Call the contact or send the contact an message Speed Dial You may add a contac...

Страница 23: ...uration and call options Bluetooth Mute and Speaker Ending a call To end the call tap If necessary first press any button to activate the screen Onscreen call options Using the speakerphone The speakerphone function allows you to make calls without having to hold your smartphone This handsfree function is especially useful for multitasking To activate the speakerphone tap Speaker Tap Speaker again...

Страница 24: ...ewing missed calls Missed calls will be displayed by the Home Ring and in the Notification area with the icon You can quickly view missed calls from the Notification area 1 Open the notification list by dragging the Notification area downwards to display the details of the missed calls 2 Select the call from the list and tap Return call or Call Contact to return the missed call You can save phone ...

Страница 25: ...nt enter your message in the text box labeled Type to compose Note An SMS message is normally limited to 160 characters If your message is longer than 160 characters it will be sent as multiple linked messages Most phones will automatically join the linked messages to present the recipient with a single long message however some older phones do not have this ability Press the Menu button to see wh...

Страница 26: ...you can send MMS messages Normally your smartphone will set up the profile for you based on information retrieved from your provider Tip Ask your network provider for the necessary information if you need to manually set up the MMS profile Receiving MMS messages When a new MMS message arrives a message icon appears at the top of the screen and a notification message is displayed 1 Open Messaging t...

Страница 27: ...the message to view the content 4 Press the Menu button and tap Reply to reply to the message The message window will appear Simple text replies will be sent as SMS messages If you wish to attach a file press the Menu button and tap Attach You will be presented with a menu of options 5 When you have finished composing the message press the Menu button and tap Send ...

Страница 28: ...ess the Menu button and tap New window from the menu that opens Tap Windows to view all the windows that are open You can zoom in or out of pages using the zoom buttons that appear when you tap the screen Double tap to zoom in to an area on the screen double tap again to zoom out and see the entire page Tap and hold an item on a page to open a contextual menu Voice Search You can search the Intern...

Страница 29: ... message tap Send Setting up Email Your smartphone enables you to access email from most ISP or business accounts Most popular ISPs can be set up in two steps Tap the Applications tab and then Email to start setting up your email access If necessary enter your email address and tap Manual setup to enter the parameters manually Tap Next to finish the setup process The combined inbox feature of your...

Страница 30: ...cted an application tap the Install button to download and install the application You will be told which services on your phone that the application has access to Tap OK to proceed with the installation You may keep track of the download progress from the Notification Area Important Some applications may require payment before you can download them You will need to have a Google Checkout account ...

Страница 31: ...low the use of a smartphone as a modem over HSDPA Please check with your provider before attempting to do so Setting up the modem on your PC Perform the following steps 1 Go to mobile acer com and download drivers for your smartphone 2 Install your smartphone s driver software on your computer 3 Connect your smartphone to your PC with the USB cable 4 From your smartphone s Home screen tap Acer Set...

Страница 32: ... APN settings Tap an item to adjust it 4 When you have finished press the Menu button and tap Save Important Some providers and countries do not allow the use of a smartphone as a modem over HSDPA Please check with your provider before attempting to do so ...

Страница 33: ...amera icons and indicators In the camera window the icons on the left show you which mode you are using Use the zoom slider at the bottom of the screen to adjust the digital zoom Taking a photo 1 Ensure you have adjusted the settings described below 2 Frame your subject and steady your smartphone 3 Zoom in or out as needed 4 Press the camera button down to take the photo To adjust settings press t...

Страница 34: ...top recording To adjust the settings press the Menu button The menu options in camcorder mode are Anti banding Video format Reset to default Supported formats The following file formats are supported Adjust the white balance Adjust the brightness Add a delay before taking the photo Open additional settings Color effect Review duration ISO Jpeg quality Auto exposure Geo tagging Anti banding Reset t...

Страница 35: ...omatically saved Once you have taken a photo or video you can view the it in Gallery by tapping Alternatively open the Applications tab and tap Gallery From Gallery you can share the file directly via Gmail Messaging Picasa YouTube or as a Roadsync message Note Share options vary depending on the file type ...

Страница 36: ...tphone in airplane mode on page 34 for instructions on turning Airplane mode on or off Putting your smartphone in airplane mode You can enter airplane mode also known as flight mode to turn off telephone Bluetooth and wireless LAN functions and use your smartphone as a handheld device during a flight Check with your airline to make sure this is permitted onboard Switch your smartphone off during t...

Страница 37: ...on and screen behavior with the settings available in this section Selecting a network Your phone wil automatically detect your carrier network settings when you insert a new SIM card However you may prefer to manually select a network This may be a good idea when roaming Tip When you are traveling manually selecting a network may help to reduce your roaming charges Check with your home service pr...

Страница 38: ...nter numbers You can also view and modify these settings manually through the Phone Settings screen Open the Applications tab and tap Settings Call settings Connecting to a PC You can connect your phone to a PC using the supplied USB cable Plug the USB sync cable into the micro USB connector on your smartphone Plug the USB client connector into an available USB port on your computer Drag down the ...

Страница 39: ...ed albums Browse this display by sliding your finger horizontally left or right and select an album by tapping it Browsing genres To browse the Gallery by genre tap the Genres button on the bottom left corner of the screen You will see a new screen with a list of different genres Tap on the genre you wish to view Sort To sort through Spinlets by Name Ratings or Newest content select the Sort butto...

Страница 40: ...il Tap Share It at the top right corner of the Spinlet select Send it and enter your name and your friend s email address Note Fuhu Spinlets Spinlet urFooz Fooz Avatars Fooz Creator Fooz Card and Fooz World are trademarks or registered trademarks of Fuhu Inc in the U S and or other countries Digital media server Your phone can act as a digital media server using UPnP technology This means that you...

Страница 41: ...ge keyboard to set your language region and text input preferences Managing applications Warning Make sure you trust the source of any program you install If you are not sure of the source do not install a program Installing programs from unknown sources increases your risk of virus attacks and theft of personal and private data You can remove programs installed on your smartphone to free up extra...

Страница 42: ...g a reset ensure that your smartphone is not locked Press any key or tap the screen to see if the phone responds Clean boot A clean boot will restore your smartphone to the factory settings Warning You should only perform a clean boot when all other options have failed to restore your smartphone to an operational state Warning This will erase all your personal information any contacts stored on yo...

Страница 43: ...rs are turned off To answer an incoming call press the button on the microphone Adjust the volume using the volume control buttons on the smartphone End the call by pressing the button again Using a Bluetooth headset Your smartphone s Bluetooth functions make it compatible with all standard Bluetooth headsets This allows you to use the unit handsfree when making calls without the inconvenience of ...

Страница 44: ...t supported Refer to Multimedia on page 48 for more information Why can t I play my music files You may be trying to play a file that is not supported Refer to Multimedia on page 48 for more information System information and performance How do I check the OS version of my device Tap Menu Settings About phone to check the OS version Kernel build number and other hardware and software information P...

Страница 45: ...hen listening to music To protect your hearing follow these instructions Increase the volume gradually until you can hear clearly and comfortably Do not increase the volume level after your ears have adjusted Do not listen to music at high volumes for extended periods Do not increase the volume to block out noisy surroundings Decrease the volume if you can t hear people speaking near you Battery i...

Страница 46: ...spare battery in your pocket or purse Short circuiting the terminals may damage the battery or the connecting object Leaving the battery in hot or cold places such as in a closed car in summer or winter conditions will reduce the capacity and lifetime of the battery Always try to keep the battery between 15 C and 25 C 59 F and 77 F A device with a hot or cold battery may not work temporarily even ...

Страница 47: ...the independent research by and recommendations of Wireless Technology Research Persons with pacemakers should do the following Always keep the device more than 15 3 cm 6 from the pacemaker Not carry the device near your pacemaker when the device is switched on If you suspect interference switch off your device and move it Hearing aids Some digital wireless devices may interfere with some hearing ...

Страница 48: ...ency call Consult this guide or your service provider for more information When making an emergency call give all the necessary information as accurately as possible Your wireless device may be the only means of communication at the scene of an accident Do not end the call until given permission to do so Disposal and recycling information Do not throw this electronic device into the trash when dis...

Страница 49: ...freezing point Also keep it away from heaters and other sources of heat 5 DO NOT use or store your smartphone in any location that is dusty damp or wet 6 DO use a soft damp cloth to clean your smartphone If the surface of the screen becomes soiled clean it with a soft cloth moistened with diluted window cleaning solution 7 DO NOT press down on the screen with force otherwise you may crack the scre...

Страница 50: ...icrophone Formats supported USB connector Micro USB connector USB Client DC power in 5 V 1 A Connectivity Bluetooth 2 1 EDR IEEE Wi Fi 802 11 b g WLAN GSM GPRS EDGE 850 900 1800 1900 WCDMA 900 2100 MHz or 850 1900 2100 MHz depends on model Camera 3 2 megapixel Expansion microSD memory card up to 32 GB Type Formats Audio playback MP3 AAC AMR Ringtone MP3 MIDI DLS iMelody WAVE Video recording MPEG 4...

Страница 51: ...ion will depend on power consumption which is based on system resource use For example constantly using the backlight or using power demanding applications will shorten battery life between charges Dimensions Stylish light and robust design Height 115 mm Width 59 3 mm Thickness 12 mm 12 6 mm at camera area Weight 125 g with battery ...

Страница 52: ...vention of hearing loss Caution Permanent hearing loss may occur if earphones or headphones are used at high volume for prolonged periods of time This device have been tested to comply with the Sound Pressure Level requirement laid down in the applicable EN 50332 1 and or EN 50332 2 standards Note For France mobile headphones or earphones for this device have been tested to comply with the Sound P...

Страница 53: ...sted and found to comply with the limits for a Class B digital device pursuant to Part 15 of the FCC Rules These limits are designed to provide reasonable protection against harmful interference in a residential installation This equipment generates uses and can radiated radio frequency energy and if not installed and used in accordance with the instructions may cause harmful interference to radio...

Страница 54: ...e at the ear is 1 38 W kg and when worn on the body as described in this user guide is 0 686 W kg Important Body worn measurements differ among phone models depending upon available enhancements and FCC requirements While there may be differences between the SAR levels of various phones and at various positions they all meet the government requirements The FCC has granted an Equipment Authorizatio...

Страница 55: ...ise from wireless devices For additional information about the FCC s actions with regard to hearing aid compatible wireless devices and other steps the FCC has taken to ensure that individuals with disabilities have access to telecommunications services please go to www fcc gov cgb dro Certificate Information SAR This device meets the EU requirements 1999 519 EC on the limitation of exposure of th...

Страница 56: ...un ske med batteri af samme fabrikat og type Levér det brugte batteri tilbage til leverandøren VARNING Explosionsfara vid felaktigt batteribyte Använd samma batterityp eller en ekvivalent typ som rekommenderas av apparattillverkaren Kassera använt batteri enligt fabrikantens instruktion VAROITUS Paristo voi räjähtää jos se on virheellisesti asennettu Vaihda paristo ainoastaan laitevalmistajan sous...

Страница 57: ... 2003 EN 50360 2001 EN 62209 1 2006 EN62311 2008 OET65C We hereby declare that the above named product is in conformance to all the essential requirements of the R TTE Directive 99 5 EC issued by the Commission of the European Community The conformity assessment procedure referred to in Article 10 and detailed in Annex IV of directive 1999 5 EC has been followed related to Articles R TTE Article 3...

Страница 58: ...ivity 48 contacts adding and editing 17 making calls to a contact 20 D display 48 E email 27 F FAQs 42 G Google 10 H help sources 43 I international numbers 19 K keyboard 11 L LED indicators 7 M MMS messages 24 P performance 48 phone connections 35 settings 36 S safety regulations 43 speakerphone 21 specifications 43 spinlets 37 T troubleshooting 42 turning on 10 U urFooz 28 USB connector 48 V vie...

Отзывы: