


22
Operating Instructions
Press the power button to turn the monitor on or off. The other control buttons are located at front panel of the
monitor. By changing these settings, the picture can be adjusted to your personal preferences.
•
The power cord should be connected.
•
Connect the video cable from the monitor to the video card.
•
Press the power button to turn on the monitor position. The power indicator will light up.
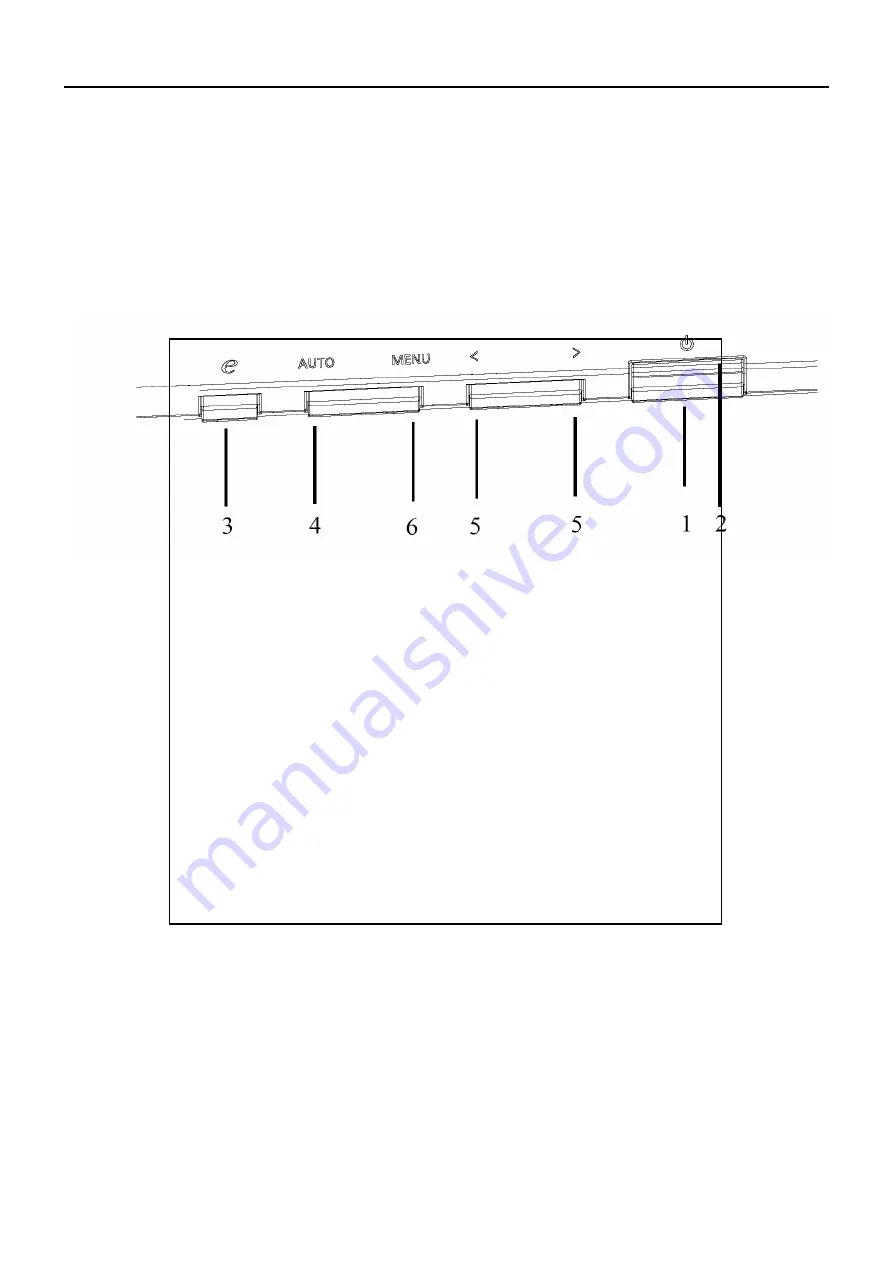
External Controls
1. Power Switch:
To turn ON or OFF the power.
2. Power LED:
Lights up to indicate the power is turned ON.
3. Empowering / Exit:
1) When OSD menu is in active status, this button will act as EXIT-KEY(EXIT OSD menu).
2) When OSD menu is in off status, press this button to select scenario mode.
1) When OSD menu is in active status, this button will act as EXIT-KEY (EXIT OSD menu).
2) When OSD menu is in off status, press this button for 2 seconds to activate the Auto Adjustment function. The
Auto Adjustment function is used to set the HPos, VPos, Clock and Focus.
5. < / >
1) Press < or > to select the desired function. Press < or > to change the settings of the current function.
2) Press < or > to adjust the volume up or down (Only for Audio).
6. MENU / ENTER:
Activate OSD menu when OSD is OFF or activate/de-activate adjustment function when OSD is ON.
Chapter 2
Содержание B203H
Страница 1: ...1 Acer B203H Service Guide h t t p w w w w j e l n e t ...
Страница 10: ...10 LCD Panel Specification General Specifications Block Diagram TFT LCD Module h t t p w w w w j e l n e t ...
Страница 11: ...11 Back light Unit Electrical Characteristics h t t p w w w w j e l n e t ...
Страница 12: ...12 Optical Specifications h t t p w w w w j e l n e t ...
Страница 13: ...13 Support Timing h t t p w w w w j e l n e t ...
Страница 20: ...20 Screen Position Adjustment h t t p w w w w j e l n e t ...
Страница 21: ...21 h t t p w w w w j e l n e t ...
Страница 23: ...23 eColor Management OSD h t t p w w w w j e l n e t ...
Страница 24: ...24 How to Adjust a Setting h t t p w w w w j e l n e t ...
Страница 25: ...25 Adjusting the picture h t t p w w w w j e l n e t ...
Страница 26: ...26 h t t p w w w w j e l n e t ...
Страница 30: ...30 FOR THE V203H AUDIO MODLE 5 The panel h t t p w w w w j e l n e t ...
Страница 37: ...37 Connector Information Chapter 5 h t t p w w w w j e l n e t ...
Страница 41: ...41 4 Power Board 5 Main Board 6 Audio Board B203H AUDIO h t t p w w w w j e l n e t ...
Страница 42: ...42 Schematic Diagram Main Board Chapter 7 h t t p w w w w j e l n e t ...
Страница 43: ...43 h t t p w w w w j e l n e t ...
Страница 44: ...44 h t t p w w w w j e l n e t ...
Страница 45: ...45 h t t p w w w w j e l n e t ...
Страница 46: ...46 Power board h t t p w w w w j e l n e t ...
Страница 47: ...47 h t t p w w w w j e l n e t ...
Страница 48: ...48 Audio board for B203H AUDIO h t t p w w w w j e l n e t ...