background image

English

23

Lock TV 

Locking TV content

Lock TV is a handy feature that can block a single channel, multiple channels or all TV sources.

Lock TV allows you to enter a password and effectively stop anyone without the password from watching TV.

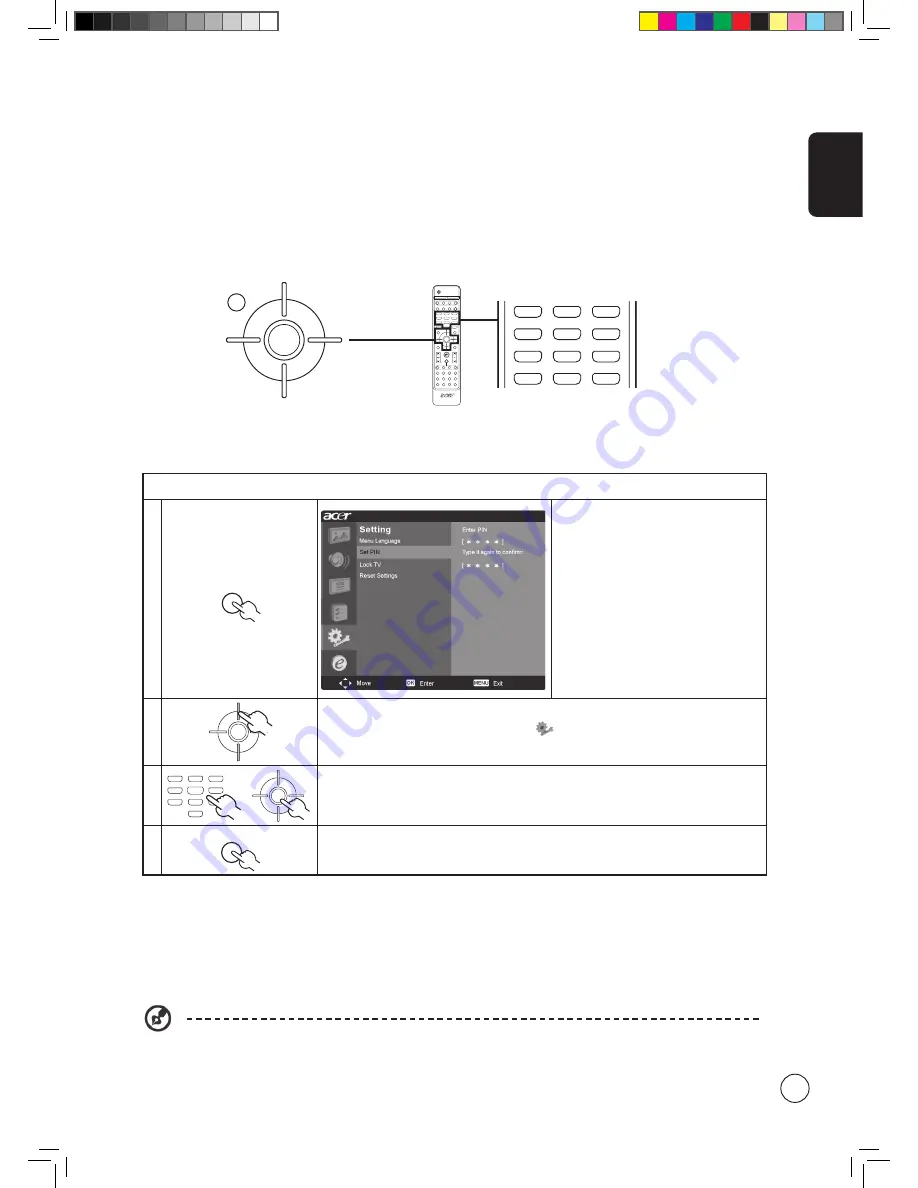
Setting a personal PIN

1

MENU

Press the 

MENU

 key on the remote 

control to bring up the OSD.

2

OK

Use the 

directional keys

 to navigate to the 

Setting menu. Then select 

Set PIN

.


(see note)

3

1

2

3

4

5

6

7

8

0

9

OK

MENU

Enter a four-digit password. Type it again and press 

OK

 to reconfirm.

4

MENU

Press 

MENU

 to exit.

DISPLAY

MUTE

TV

RECALL

MENU

- / CH LIST

BACK

EPG

SWAP

ACTIVE

POSITION

SIZE/MODE

MTS

CC

VOL

PIP/PBP/POP

CH/PG

ENTER

AV

COMPONENT

PC

SLEEP

WIDE

SRS/BBE

CARD/MGW

1

2

3

4

5

6

7

8

0

9

OK

ZOOM

ROTATE

SLIDE

OPTION

OK

MENU

To enable this feature:

The default PIN for this TV is "0000." First enter "0000" when you want to change the PIN. If you forget your PIN, 
please enter 6163 to reset.

Содержание AT3705-DTV

Страница 1: ...audio video equipment 15 Connecting a camera camcorder video game or headphones 16 Connecting a PC or notebook computer 16 Selecting the input source 16 OSD navigation 17 Navigating the OSD with the remote control 17 Adjusting the OSD settings 18 Empowering Technology 19 Set up Empowering mode 19 Default setting in different Empowering mode 20 Advanced features 21 PIP PBP POP 21 Lock TV 23 TV rati...

Страница 2: ...xpressed or implied with respect to the contents hereof and specifically disclaims the implied warranties of merchantability or fitness for a particular purpose Record the model number serial number purchase date and place of purchase information in the space provided below The serial number and model number are indicated on the label affixed to your device All correspondence concerning your unit ...

Страница 3: ...that the total rating of all products plugged into the wall outlet does not exceed the fuse rating 9 Never push objects of any kind into this product through cabinet slots as they may touch dangerous voltage points or short out parts which could result in a fire or electric shock Never spill liquid of any kind on the product 10 Do not attempt to service this product yourself as opening or removing...

Страница 4: ...ipherals input output devices terminals printers etc certified to comply with the Class B limits may be attached to this equipment Operation with non certified peripherals is likely to result in interference to radio and TV reception Caution Changes or modifications not expressly approved by the manufacturer could void the user s authority which is granted by the Federal Communications Commission ...

Страница 5: ...ZS CISPR 24 1997 Information technology equipment Immunity characteristics Limits and methods of measurement The Low Voltage Directive 73 23 EEC as attested by conformity with the following harmonized standard EN60065 1998 Audio video and similar electronic apparatus safety requirements EN60950 2000 3rd Safety of Information Technology Equipment Including electrical business equipment LCD pixel st...

Страница 6: ...lliant color 3D motion adaptive de interlacing for exquisite details up to 1080p DCTI DLTI and 3D comb filtering for sharp and accurate images SRS WOW BBE Digital and Dolby Digital audio technology for awesome audio performance Acer Empowering Technology for selecting and defining personalized user preferences Packing checklist Your LCD TV package should contain the following accessories in additi...

Страница 7: ...When the OSD is on functions the same as the Up arrow Channel down When the OSD is on functions the same as the Down arrow 3 Menu key Turns the OSD menu ON and OFF 4 Input key When the OSD is on press this button to confirm selection Front panel view 1 Volume up down 2 Input key 3 Menu key 4 Channel up down 5 Headphone jack 6 Video jack 7 Audio L R jacks 8 Power ON OFF 1 2 3 4 5 6 7 8 AV5 ...

Страница 8: ...IGITAL TUNER 4 5 6 7 8 9 11 10 Bottom panel view 4 Power switch 8 VGA in 5 AC in 9 Audio in 6 HDMI in 10 Analog antenna in 7 DVI in 11 Digital antenna in Rear panel view 1 AV in 1 4 2 AV out 3 Component in 1 3 3 2 ...

Страница 9: ... list See page 30 12 Directional keys OK 13 BACK Press to return to previous screen 14 EPG Press to launch Electronic Program Guide EPG mode Digital TV mode only See page 31 15 e Empowering Technology Activate Acer Empowering Technology See page 19 16 VOL up down Press these buttons to increase and decrease the volume 17 CH up down Press these buttons to sequentially select the TV channel 18 PIP P...

Страница 10: ...Do not tamper with batteries Keep them away from children Aug When you anticipate that the remote control will not be used for an extended period remove the batteries to prevent possible damage as a result of battery leakage Dispose of used batteries according to local regulations Recycle if possible Setting up the remote control 1 Open the cover on the back of the remote unit 2 Insert two AAA bat...

Страница 11: ...Setup Wizard The first time you switch on the TV the Setup Wizard will guide you to complete the language selection and channel scanning OK Press the OK key to begin the setup process You can also adjust these settings using the front control panel Please see Front panel view on page 7 for details Enjoying analog and digital TV Connecting an antenna cable Connect the antenna cable to the appropria...

Страница 12: ...rd Step 1 Select the setup language you prefer Step 2 Please select time zone Step 3 Enable daylight saving time or not Step 4 Ensure that your co axial cables are connected correctly before proceeding see page 12 for details ...

Страница 13: ...p 6 Please select TV system Step 7 Scan for analog channels Step 8 Setup is now complete You are ready to begin watching TV If you leave the setup process before it is complete you will be given a choice of options 1 Resume setup 2 Resume setup at next startup 3 Exit and don t remind me Select an option and press OK to exit Setup may vary due to local broadcast differences ...

Страница 14: ...o select a channel The channel changes after 2 seconds Press ENTER to select the channel immediately CH PG b Pressing the channel CH up down button on the remote control will also change the channel 4 Adjusting the volume VOL Adjust the volume level using the volume VOL up down button on the remote control ...

Страница 15: ...g a DVD VCR or audio video equipment Connect your DVD player VCR or audio video equipment using the component port located at the rear of your LCD TV as shown below AV Recorder R Y Y W R W SPDIF COMPOSITE AUDIO Acer recommends using the SPDIF connector to connect to your AV amplifier for 5 1 surround sound while watching digital TV programs since your LCD TV supports Dolby digital sound For detail...

Страница 16: ...ed your antenna or external equipment to the TV you need to select the correct input source Press the corresponding button on the remote control to select the correct input source Input button guide 1 TV key Toggle Digital TV DTV and Analog TV ATV between input sources 2 AV key Toggle AV1 5 and HDMI between input sources 3 COMPONENT key Toggle Component 1 3 between input sources 4 PC key Toggle VG...

Страница 17: ...ring Use the following method to navigate these menus 1 MENU Press the MENU button on the remote control or the MENU button on the control panel 2 OK Select your desired menu by using the up and down directional keys to switch between the six menus 3 OK Use the directional keys to interact with the menu The up down directions will scroll through the menu options while left right will adjust the di...

Страница 18: ... 4 The Audio menu can also be used to adjust the treble balance sound effects and other important sound related settings Adjusting the channel management 1 Press the Menu key to bring up the OSD 2 Using the directional keys select Channel Management from the OSD 3 Use the directional keys to navigate the menus 4 The Channel Management menu can be used to adjust delete and reorder the channel list ...

Страница 19: ...echnology Set up Empowering mode To change your Empowering Key s default setting The Empowering Key opens up the Acer Empowering Technology functions Empowering Technology has different functions depending on your current mode In TV mode the choice is between Scenario mode and Favorite channel see page 20 for details The default setting for both modes is Scenario mode OK MENU Default setting in di...

Страница 20: ... playing field and darker auditoriums Sports mode also brilliantly enhances colors and presents swiftly moving pictures without residual images All of this is achieved via specific Gamma corrections and saturation adjustments Precise audio can be heard thanks to BBE performance Concert Concert mode places you in a virtual concert hall opera house or other dim environment by means of adaptive brigh...

Страница 21: ...ess the SWAP key to change the content between the primary and the subscreen PIP PIP Swap SWAP ACTIVE POSITION SIZE MODE PIP PBP POP 3 Press the POSITION key to select the location of the subscreens from upper left upper right lower right lower left as shown in the im age PIP PIP PIP PIP SWAP ACTIVE POSITION SIZE MODE PIP PBP POP 4 Press the SIZE MODE key to select the size of the subscreen from 2...

Страница 22: ... PIP PBP POP 1a Press the ACTIVE key to toggle between POP screens 1 2 3 4 5 6 7 8 0 9 CH PG 1b Press the number keys or CH up or down to change the TV channel on the active screen SWAP ACTIVE POSITION SIZE MODE PIP PBP POP 2 Press the SIZE MODE key to access the 1 5 or 1 12 picture on picture mode as shown in the image POP POP POP POP POP POP POP POP POP POP POP POP POP POP POP POP POP 1 5 1 12 1...

Страница 23: ...eys to navigate to the Setting menu Then select Set PIN see note 3 1 2 3 4 5 6 7 8 0 9 OK MENU Enter a four digit password Type it again and press OK to reconfirm 4 MENU Press MENU to exit DISPLAY MUTE TV RECALL MENU CH LIST BACK EPG SWAP ACTIVE POSITION SIZE MODE MTS CC VOL PIP PBP POP CH PG ENTER AV COMPONENT PC SLEEP WIDE SRS BBE CARD MGW 1 2 3 4 5 6 7 8 0 9 OK ZOOM ROTATE SLIDE OPTION OK MENU ...

Страница 24: ...nagement menu Then select Lock This Channel 4 1 2 3 4 5 6 7 8 0 9 OK MENU Enter your PIN Type it again and press OK to reconfirm see page 23 note Locking your TV 1 MENU Press the MENU key on the remote control to bring up the OSD 2 OK Use the directional keys to navigate to the Setting menu Then select Lock TV 3 1 2 3 4 5 6 7 8 0 9 OK MENU Enter your PIN Type it again and press OK to reconfirm see...

Страница 25: ...ories you wish to block 4 1 2 3 4 5 6 7 8 0 9 You will need to enter your PIN before you make any adjustments to the settings Press OK to set the age rating yourself using the directional keys Press OK to confirm your settings OK MENU 5 MENU Press MENU to exit DISPLAY MUTE TV RECALL MENU CH LIST BACK EPG SWAP ACTIVE POSITION SIZE MODE MTS CC VOL PIP PBP POP CH PG ENTER AV COMPONENT PC SLEEP WIDE S...

Страница 26: ... PIN enter 6163 to reset the feature Enable Disable the V Chip The U S has two rating systems for viewing content TV parental guidelines and movie ratings Motion Picture Association of America MPAA ratings The MPAA system is used mainly for rating movies 1 To set MPAA use the following method to access Menu Settings TV Rating System MPAA Set Rating The categories are as follows Rating Description ...

Страница 27: ...ating System TV ratings Set Rating Click on a rating category to block it indicates the item is blocked 2 The TV Y7 TV PG TV 14 and TV MA settings have additional options for blocking content The TV content control menu will show the appropriate items for your current TV ratings setting Use the following method to alter the content settings Menu Settings TV Rating System TV Content Ctrl set conten...

Страница 28: ... for rating Television content Canadian English ratings and Canadian French ratings Canadian English ratings The categories are as follows Rating Description E Exempt programming C Children under 7 years old C8 Children over 8 years old G General audiences PG Parental guidance suggested 14 Over 14 years old 18 Adults None No block Canadian French ratings The categories are as follows Rating Descri...

Страница 29: ... 4 Analog TV Digital TV 6 OK MENU MENU Select OK and press MENU to exit Re scan for channels The first time you completed the setup wizard all available channels were listed If you need to re scan for new channels please follow the steps below DISPLAY MUTE TV RECALL MENU CH LIST BACK EPG SWAP ACTIVE POSITION SIZE MODE MTS CC VOL PIP PBP POP CH PG ENTER AV COMPONENT PC SLEEP WIDE SRS BBE CARD MGW 1...

Страница 30: ...the channel list Channel list for digital TV mode Channel list allows you to quickly find the TV channel you are searching for DISPLAY MUTE TV RECALL MENU CH LIST BACK EPG SWAP ACTIVE POSITION SIZE MODE MTS CC VOL PIP PBP POP CH PG ENTER AV COMPONENT PC SLEEP WIDE SRS BBE CARD MGW 1 2 3 4 5 6 7 8 0 9 OK ZOOM ROTATE SLIDE OPTION DISPLAY MUTE TV RECALL MENU CH LIST BACK EPG SWAP ACTIVE POSITION SIZE...

Страница 31: ...e introduction section on a separate page b Preview area In the top right hand corner of the EPG screen is the preview area The preview area will show live TV content from the channel currently highlighted Highlight a new channel or program and press OK to display it in the preview area c Content area The content area is divided into three columns date channel and program Use the directional keys ...

Страница 32: ...G pages pressing OK will enable the remind feature Each time you select a show and push OK a marker will appear on the left side of the program name Then when your selected program is due to start a reminder will flash on the screen to warn you The remind feature will also warn you of any conflicts in your selections e g if you select two shows that are due to be broadcast at the same time 1 EPG P...

Страница 33: ...d by the inherent characteristics of the loudspeaker BBE Digital addresses these problems by compensating for phase and amplitude distortions and in effect delivers the signal to the speaker in a form that allows it to reproduce the original performance more fully and more faithfully To enable BBE Digital press the SRS BBE key on the remote control Dolby Digital Digital TV only Dolby Digital surro...

Страница 34: ... 3 4 3 For 4 3 standard pictures A side bar appears on each side 16 9 In this mode the whole picture is stretched toward each side of the screen Panorama In this mode the picture is progressively stretched toward each side of the screen Letterbox 1 2 and 3 In this mode the picture is enlarged linearly to fit the screen The top and bottom portions of the picture may be cut off DISPLAY MUTE TV RECAL...

Страница 35: ... Sub TV AV1 AV2 AV3 AV4 AV5 DTV Component1 Component2 Component3 VGA DVI HDMI TV X AV1 X X X X X X X X X X X X X AV2 X X X X X X X X X X X X X AV3 X X X X X X X X X X X X X AV4 X X X X X X X X X X X X X AV5 X X X X X X X X X X X X X DTV X X X X X X X X X X X X X Component1 X X X X X X X X X X X X X Component2 X X X X X X X X X X X X X Component3 X X X X X X X X X X X X X VGA X X X X X X X X X X X ...

Страница 36: ...English 36 Dimension 1184 70 717 70 430 50 348 28 635 48 828 8 470 90 200 00 400 00 100 00 122 00 282 18 32 00 Unit mm ...

Страница 37: ...occur due to a VHS camera camcorder or other peripheral being connected at the same time Switch off one of the other peripherals The ghost or double image may be caused by obstruction to the antenna due to high rise buildings or hills Using a highly directional antenna may improve the picture quality The horizontal dotted lines shown on the pictures may be caused by electrical interference e g hai...

Страница 38: ...dard ATSC compliant MPEG II MP HL Sound system ISO11172 3 layer1 layer2 32KHz 44 1KHz 48KHz Stereo system Dolby AC3 PCM MPEG Layer I II Stereo 32 44 1 48KHz SPDIF 2 4 6 Channel Closed Caption CS1 CS2 CS3 CS4 CS5 CS6 CC1 CC2 CC3 CC4 EPG 7days EPG Frequency 8 MHz Video format 16bit YUV Digital TV Tuner quantity 1 Audio system Speaker 15W 15W Audio Enhancement BBE SRS WOW Digital Audio Dolby Digital ...

Отзывы: