background image

Aspire AX1470 Service Guide

95

Aspire AX1470


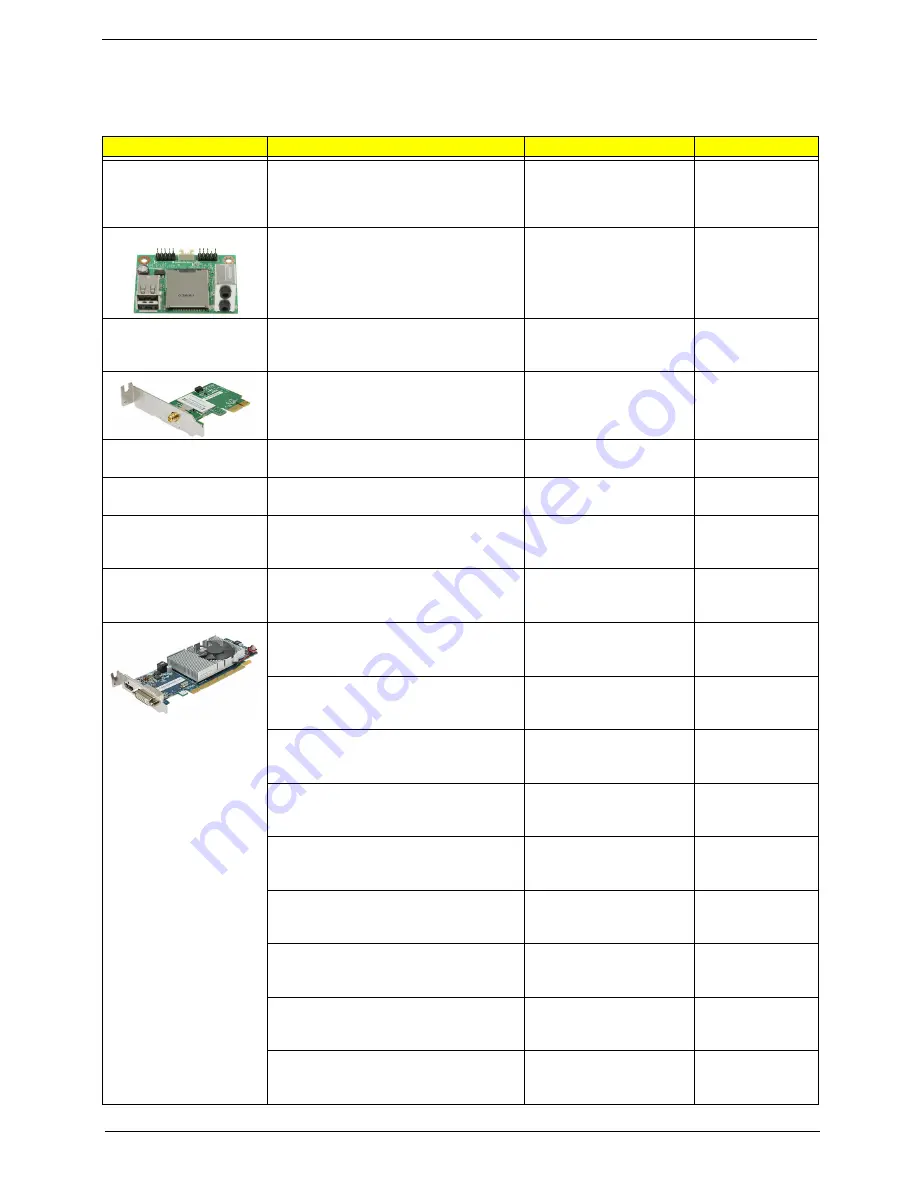
FRU List

ACER_AX1470_W_APARKER(NO:81.3FU01.001G)

Category

Part Name

Description

Acer Part No.

ACCESSORY

PHILIPS REMOTE CONTROLLER ECO 
KB REMOTE, ACER CODE, QWERTY 
LAYOUT KB W/I MULTI-CHARACTER 
SUPPORT, W/I BATTERY

REMOTE CONTROLLER 
ECO KB REMOTE

RT.11300.031

BOARDS

FRONT IO & CARD READER BOARD 
USB 2.0 2 USB PORT 2 AUDIO PORT

CARD READER 6 IN 1 
USB 2.0 2 USB PORT 2

55.NCM01.002

FRONT IO BOARD USB 2.0 2 USB 
PORT 2 AUDIO PORT W/O CARD 
READER

F-IO BD USB 2.0 2 USB 
PORT 2 AUDIO PORT

55.NCM01.001

TV TUNER CARD AVERMEDIA H753-D 
PCIE HYBRID DVB-T S/W ENCODER LP 
BRACKET

AVERMEDIA H753-D TV 
TUNER CARD PCIE 
HYBR

TU.10500.075

MODEM CARD LITE-ON D-1156E#A10A 
LOW-PROFILE PCI-E 56K V.92

MODEM 56K ATX LSI 
UNIVERSAL (PCI-E) 56K

FX.10100.003

WIRELESS LAN BOARD 802.11BGN 
PRONETS WU71RL USB

WLAN 802.11 BGN 
WU71RL USB

NI.10200.023

WIRELESS LAN BOARD 802.11BGN 
1X1 RALINK RT3090 LOW-PROFILE

WLAN 802.11BGN 1X1 
RALINK RT3090 (LOW-
PR)

NI.10200.038

VGA CARD 288-2E180-A00AC HD6450 
1GB SDDR3 64BITS DVI-I + HDMI 
SAMSUNG (LP)

VGA CARD HD6450 1GB 
64BITS SDDR3 SDI DVI

VG.APC64.523

VGA CARD 288-2E180-C00AC HD6450 
1GB SDDR3 64BITS DVI-I + HDMI 
HYNIX (LP)

VGA CARD HD6450 1GB 
64 BITS SDDR3 HYNIX

VG.APC64.525

VGA CARD 89D685-321108 HD6450 
1GB SDDR3 64BITS DVI-I + HDMI 
SAMSUNG (LP)

RADEON 6450 1GB 
SDDR3 SDI DVI-I/HDMI 
LP

VG.ECS64.5A2

VGA CARD 288-1E180-C00AC HD6450 
512MB SDDR3 SDI DVI-I/HDMI/LP

VGA CARD HD6450 
512MB SDDR3 SDI DVI-I/
HD

VG.APC64.504

VGA CARD 288-1E180-D00AC HD6450 
512MB SDDR3 HYNIX DVI-I/HDMI/LP

VGA CARD HD6450 
512MB SDDR3 HYNIX 
DVI-I

VG.APC64.506

VGA CARD 89D685-321109 HD6450 
512MB SDDR3 64BITS DVI-I + HDMI 
SAMSUNG (LP)

RADEON HD6450 512MB 
DVI-I/HDMI LP

VG.ECS64.502

VGA CARD 288-1E181-B01AC HD6570 
1GB DDR3 128BITS DVI-I (DL) + HDMI 
SAMSUNG LP

VGA CARD HD6570 1GB 
DDR3 SDI DVI-I(DL)

VG.APC65.712

VGA CARD 288-1E181-C01AC HD6570 
1GB DDR3 128BITS DVI-I (DL) + HDMI 
HYNIX LP

VGA CARD HD6570 1GB 
DDR3 HYNIX DVI-I(DL)

VG.APC65.714

VGA CARD 288-6N158-C01AC 405 1GB 
DDR3 64BITS DVI + HDMI SAMSUNG 
LP

PCP NV GT405 1GB 
DDR3 SDI DVI/HDMI LP

VG.PCPT4.AA2

VGA CARD 288-6N158-B01AC 405 1GB 
DDR3 64BITS DVI + HDMI HYNIX LP

PCP NV GT405 1GB 
DDR3 HYNIX DVI/HDMI 
LP

VG.PCPT4.AA4

Содержание Aspire X1470

Страница 1: ...Aspire AX1470 Desktop Computer Service Guide PRINTED IN TAIWAN ...

Страница 2: ...ii Aspire AX1470 Service Guide Revision History Refer to the table below for changes made on this version of the Aspire AX1470 Desktop Computer Service Guide Date Chapter Updates ...

Страница 3: ...s no representations or warranties either expressed or implied with respect to the contents hereof and specifically disclaims any warranties of merchantability or fitness for any particular purpose Any Acer Incorporated software described in this guide is sold or licensed as is Should the programs prove defective following their purchase the buyer and not Acer Incorporated its distributor or its d...

Страница 4: ...reen NOTE Gives additional information related to the current topic WARNING Alerts you to any physical risk or system damage that might result from doing or not doing specific actions CAUTION Gives precautionary measures to avoid possible hardware or software problems IMPORTANT Reminds you to do specific actions relevant to the accomplishment of procedures ...

Страница 5: ...vice guide In such cases please contact your regional offices or the responsible personnel channel to provide you with further technical details FRU Information Please note WHEN ORDERING FRU PARTS that you should check the most up to date information available on your regional web or channel If for whatever reason a part number change is made it will not be noted in the printed service guide For A...

Страница 6: ...vi Aspire AX1470 Service Guide ...

Страница 7: ...n Boards 31 Removing the Memory Modules 32 Removing the Power Supply Unit 33 Removing the Front I O and Optional Card Reader Assemblies 35 Removing the Mainboard 38 Reassembly Procedures 40 Reinstalling the Mainboard 40 Reinstalling the Front I O and Optional Card Reader Assembly 42 Reinstalling the Power Supply Unit 45 Installing the Memory Modules 47 Installing the Optional Expansion Boards 48 R...

Страница 8: ...er pin definition 86 Connector pin definition 87 Connecting Optional Devices 89 Connecting Case Components 91 Field Replaceable Unit FRU List 93 Exploded Diagram 94 Aspire AX1470 FRU List 95 Technical Specifications 107 Processor 107 Chipsets 107 BIOS 107 Memory 108 Hard Disk Drive 108 Optical Disc Drive 108 Card Reader optional 109 Gigabit Ethernet 109 Audio 109 Power Supply Unit 109 Power Manage...

Страница 9: ... DIMM slots supporting 240 pin unbuffered DDR3 SDRAM modules Data rate supported 800 1066 1333 MT s Maximum memory 16 GB using four 4 GB modules Expansion options One PCI Express x16 slot reserved for GPU card installation One PCI Express x1 slot Connectivity Wired LAN RTL8111E VL CG with surge protection Single Chip Port 10 100 Fast Ethernet PHYceiver with Auto MDIX WLAN option 802 11 b g n wirel...

Страница 10: ...states support On board device power management support On board device configuration support Item Description Audio codec Realtek ALC662 5 1 Channel High Definition Audio Codec Audio jacks Front panel Headphone and microphone jacks Rear panel Microphone line out and line in jacks Component Description I O ports Front panel USB ports two Headphone jack Microphone jack Multi in 1 card reader slot o...

Страница 11: ... Aspect Description Chassis dimension W D H 100 mm W X 367 8 mm D x 268 5 mm H System weight 5 808 kg Mainboard form factor microATX µATX Mainboard dimensions W H 244 220 mm Aspect Description Operating temperature 5 to 35 C 41 to 95 F Operating humidity 15 to 80 RH non condensing ...

Страница 12: ...es in this section illustrate the physical outlook of the computer Front View No Component 1 Power button indicator 2 Optical drive cover 3 Optical drive eject button 4 Headphone jack 5 Microphone in jack 6 Multi in 1card reader optional 7 USB 2 0 ports 8 Acer logo ...

Страница 13: ...Line in jack 3 Line out jack 4 Microphone jack 5 USB 2 0 ports 6 External monitor port 7 HDMI port 8 PS 2 keyboard connector 9 PS 2 mouse connector 10 Fan aperture 11 Voltage selector switch 12 Power connector 13 Kensington lock 14 Key lock 15 LAN connector 16 USB 3 0 ports ...

Страница 14: ...6 Aspire AX1470 Service Guide ...

Страница 15: ...e prompted Run Setup message to make changes to the CMOS setup NOTE If you repeatedly receive Run Setup messages the battery may be bad In this case the system can not retain configuration values in CMOS Ask a qualified technician for assistance CMOS setup loads the configuration values in a battery backed non volatile memory called CMOS RAM This memory area is not part of the system RAM which all...

Страница 16: ...keys Move the cursor to the field you want and keys Select a value for the currently selected field only if it is user configurable Press these keys repeatedly to display each possible entry or the Enter key to choose from a pop up menu NOTE Grayed out fields are not user configurable Enter key Display a submenu screen NOTE Availability of submenu screen is indicated by a Esc If you press this key...

Страница 17: ...y Menus The Setup Main menu includes the following main setup categories Main Advanced Power Security Boot Options Exit In the descriptive table following each of the menu screenshots settings in boldface are the default and suggested settings ...

Страница 18: ...led on the system Core Frequency Core speed of the CPU installed on the system Count Physical CPU core Memory Size Total size of system memory installed on the system Product Name Product name of the system System Serial Number Serial number of the system Asset Tag Number Asset tag number of this system System Date Set the date following the weekday month day year format System Time hh mm ss Set t...

Страница 19: ...nter to access the Miscellaneous submenu Advanced Chipset Configuration Press Enter to access the Advanced Chipset Configuration submenu Integrated Peripherals Press Enter to access the Integrated Peripherals submenu PC Health Status Press Enter to access the PC Health Status submenu ...

Страница 20: ... Disabled Spread Spectrum Enables or disables the reduction of the mainboard s EMI Note Remember to disable the Spread Spectrum feature if you are overclocking A slight jitter can introduce a temporary boost in clock speed causing the overclocked processor to lock up Enabled Disabled Bootup Num lock Selects power on state for Num Lock On Off USB Beep Message Enables or disables BIOS to display err...

Страница 21: ...isabled AMD V Enables or disables the Virtualization Technology VT availability If enabled a virtual machine manager VMM can utilize the additional hardware virtualization capabilities provided by this technology Note A full reset is required to change the setting Enabled Disabled UMA Frame Buffer Size Select the amount of system memory used by the Intel graphics device Auto 32MB 64MB 128MB 256MB ...

Страница 22: ...t Enables or disables support for legacy USB devices Enabled Disabled USB Storage Emulation Select emulation type for a USB mass storage device Auto Floppy Hard Disk Onboard Graphics Controller Enables or disables the onboard graphics controller Enabled Onboard Audio Controller Enables or disables the onboard audio controller Enabled Disabled Onboard LAN Controller Enables or disables the onboard ...

Страница 23: ...Aspire AX1470 Service Guide 15 PC Health Status Parameter Description Option Smart Fan Enables or disables the smart system fan control function Enabled Disabled ...

Страница 24: ...disables to wake up the system from a power saving mode through an event on a PCI Express device Enabled Disabled Wake Up by PS 2 KB Mouse Enables or disables to wake up the system from a power saving mode using a PS2 keyboard or mouse Enabled Disabled Wake Up by USB KB Mouse Enables or disables to wake up the system from a power saving mode using a USB keyboard or mouse Enabled Disabled Restore O...

Страница 25: ...e original password then press Enter 3 Type a new password then press Enter 4 Retype the password to verify the first entry then press Enter again 5 Press F10 6 Select Yes to save the new password and close the Setup Utility Removing a system password 1 Use the up down arrow keys to select password parameter Change Supervisor Password or Change User Password menu then press Enter 2 Enter the curre...

Страница 26: ...riority Press Enter to access the Optical Disk Drive Priority submenu and specify the boot device priority sequence from available CD DVD drives Removable Device Priority Press Enter to access the Removable Device Priority submenu and specify the boot device priority sequence from available removable drives Network Device Priority Press Enter to access the Network Device Priority submenu and speci...

Страница 27: ...ect Discard Changes and Exit Setup from the Exit menu and press Enter Save Changes Select this option and press Enter to save all the changes and return to the BIOS Setup Utility Load Default Settings To set this feature select Load Default Settings from the Exit menu and press Enter Then select OK to allow the BIOS to automatically load optimal defaults to the BIOS settings The Optimal settings a...

Страница 28: ...20 AX1470 Service Guide ...

Страница 29: ...mponents vary in size During the disassembly process group the screws with their corresponding components to avoid mismatches when putting back the components Pre disassembly Procedure Before proceeding with the disassembly procedure perform the steps listed below 1 Make sure that the optical disc drive and the optional card reader slots are empty 2 Turn off the power to the computer and all perip...

Страница 30: ...ving the Side Panel 1 Remove the two screws located on the rear edge of the side panel 2 Slide the panel back about 2 5 cm 1 0 in to release it from the chassis notches then detach the panel from the chassis 3 Put the side panel aside for reinstallation later ...

Страница 31: ...retention tabs from the chassis interior 2 Pull the front bezel away from the chassis NOTE The power switch and LED cable from the front bezel is still connected to its connector on the mainboard To detach the front bezel completely you have to remove the hard disk and optical drive ...

Страница 32: ... sink with any metal or with your hands 1 Use a phillips screwdriver to loosen the four screws on the heat sink in the order as shown below 2 Lift the heat sink fan assembly away from the mainboard 3 Lay down the heat sink fan assembly in an upright position on top of the optical drive as shown below then disconnect the fan cable from the mainboard ...

Страница 33: ...ING The processor becomes very hot when the system is on Allow it to cool off first before handling 1 Release the load lever 1 2 Pull the load lever to the fully open upright position 2 3 Pull out the processor from the socket IMPORTANT If you are going to install a new processor note the arrow on the corner to make sure the processor is properly oriented over the socket ...

Страница 34: ...26 Aspire AX1470 Service Guide Removing the HDD ODD Bracket 1 Remove the two screws that secure the HDD ODD bracket to the chassis 2 Lift the bracket up and turn it over ...

Страница 35: ...70 Service Guide 27 Removing the Optical Drive and the Hard Disk Drive 1 Disconnect the power 1 and SATA 2 cables from the rear of the optical drive 2 Disconnect the other end of the SATA cable from the mainboard ...

Страница 36: ...28 Aspire AX1470 Service Guide 3 Disconnect the SATA 1 and power 2 cables from the rear of the hard disk drive 4 Remove the screws that secure the optical drive to the HDD ODD bracket ...

Страница 37: ...Aspire AX1470 Service Guide 29 5 Pull the optical drive out of the drive bay 6 Remove the four screws that secure the hard disk drive to the HDD bracket 7 Slide the hard disk drive out of the bracket ...

Страница 38: ... Aspire AX1470 Service Guide Detaching the Front Bezel 1 Disconnect the power button LED cable from its mainboard connector 2 Pull out the power button LED cable from the chassis 3 Detach the front bezel ...

Страница 39: ... board bracket opposite the PCIe x16 slot 2 Gently pull up the expansion board 1 move it slightly to the left and remove 2 from the slot 3 Remove the screw from the expansion board bracket opposite the PCIe x1 slot 4 Gently pull up the expansion board 1 move it slightly to the left and remove 2 from the slot ...

Страница 40: ...e memory modules 2 Gently pull the DIMM upward 2 to pull it away from the chassis NOTE Circuit board has been highlighted with the yellow rectangle as above image shows Please detach the circuit board and follow local regulations for disposal 3 Repeat steps 1 and 2 to remove additional memory modules ...

Страница 41: ...4 pin and the 24 pin ATX power supply cables from its mainboard connector a Squeeze on the retaining latch 1 attached to the cable end of the connector b Grasp the cable end of the connector and pull it straight up 2 2 Remove the screw that secures the power supply to the chassis ...

Страница 42: ...rvice Guide 3 Remove the two screws that secure the power supply to the rear panel 4 Push the power supply module 1 toward the front 5 Tilt the power supply module slightly to the right 2 and lift it out of the chassis 3 ...

Страница 43: ...ing the Front I O and Optional Card Reader Assemblies 1 Disconnect the front I O card reader and SATA cables from their mainboard connectors 2 Open the plastic clip 1 and release the cables from the metal clip 2 in the direction indicated ...

Страница 44: ...e AX1470 Service Guide 3 Detach the cables from the front I O and optional card reader board Remove the cables 4 Remove the screw that secures the bracket to the chassis 5 Pull the bracket out from the chassis ...

Страница 45: ...spire AX1470 Service Guide 37 6 Remove the two screws that secure the front I O and optional card reader assembly to the bracket 7 Remove the front I O and optional card reader assembly from the bracket ...

Страница 46: ...Remove the six screws that secure the mainboard to the chassis NOTE Circuit board has been highlighted with the yellow rectangle as above image shows Please detach the circuit board and follow local regulations for disposal 2 Lift the board from the chassis ...

Страница 47: ... AX1470 Service Guide 39 3 Remove the RTC battery NOTE The RTC battery has been highlighted with the yellow circle as above image shows Please detach the RTC battery and follow local regulations for disposal ...

Страница 48: ...Mainboard 1 Slide the mainboard into the chassis with the I O ports of the mainboard extruding from their port holes then lower the mainboard in place 2 Make sure the screw holes on the main board are aligned with those on the chassis Secure the mainboard with six screws ...

Страница 49: ...Aspire AX1470 Service Guide 41 3 Install the RTC battery into the battery holder on the mainboard ...

Страница 50: ...e Front I O and Optional Card Reader Assembly 1 Insert the front I O and optional card reader assembly into the bracket 2 Secure the front I O and optional card reader assembly to the bracket using two screws 3 Install the bracket into the chassis ...

Страница 51: ...s to the front I O and optional card reader assembly 6 Insert all cables into the metal clip 1 and plastic clip 2 Press to close the plastic clip 3 Make sure that all cables are arranged properly and lay as close as possible to the chassis to facilitate the re installation of the HDD ODD bracket later ...

Страница 52: ...44 Aspire AX1470 Service Guide 7 Connect the front I O card reader and SATA cables to their mainboard connectors ...

Страница 53: ...e Guide 45 Reinstalling the Power Supply Unit 1 Slide the power supply module into the chassis 1 and tilt to the left 2 Push the power supply module toward the rear 2 until the power connector extrudes from the rear panel ...

Страница 54: ...ire AX1470 Service Guide 3 Secure the power supply to the rear panel using two screws 4 Secure the power supply to the chassis using one screw 5 Connect the ATX power supply cables to its mainboard connector ...

Страница 55: ... Installing the Memory Modules 1 Insert the memory module into the DIMM1 slot 1 and then press it down until it clicks into place 2 2 If additional memory modules are available install it in the other DIMM slots by repeating step 1 ...

Страница 56: ...ightly to the right 1 making sure the card guide is aligned with the slot guide on the chassis Insert the expansion card properly into the PCIe x16 slot 2 2 Insert the expansion board properly until the expansion slot locks into place in the direction indicated 3 Secure the expansion board bracket opposite the PCIe x16 slot using one screw ...

Страница 57: ...er the PCIe x1 slot and move it slightly to the right 1 making sure the card guide is aligned with the slot guide on the chassis Insert the expansion card properly into the PCIe x1 slot 2 5 Secure the expansion board bracket opposite the PCIe x1 slot using one screw ...

Страница 58: ...re AX1470 Service Guide Reinstalling the Front Bezel Power Button LED Cable 1 Insert the power button LED cable through the front of the chassis 2 Connect the power button LED cable to its mainboard connector ...

Страница 59: ...Aspire AX1470 Service Guide 51 Reinstalling the Optical Drive and the Hard Disk Drive 1 Slide the hard disk drive into the drive bay 2 Secure the hard disk drive to the HDD ODD bracket using four screws ...

Страница 60: ...52 Aspire AX1470 Service Guide 3 Slide the optical drive into the drive bay 4 Secure the optical drive to the HDD ODD bracket using two screws ...

Страница 61: ...Aspire AX1470 Service Guide 53 5 Connect the SATA 1 and power 2 cables to their connectors on the rear of the hard disk drive 6 Connect one end of the SATA cable to the SATA1 connector on the mainboard ...

Страница 62: ...54 Aspire AX1470 Service Guide 7 Connect the power 1 and SATA 2 cables to their connectors on the rear of the optical drive ...

Страница 63: ...Aspire AX1470 Service Guide 55 Reinstalling the HDD ODD Bracket 1 Install the HDD ODD bracket into the chassis 2 Secure the HDD ODD bracket to the chassis using two screws ...

Страница 64: ...Note the arrow on the corner and make sure the processor is properly oriented over the socket 1 With the load lever in the fully upright position press the processor into the socket 2 Push the load lever downward 1 until it locks into place at the side of the socket 2 ...

Страница 65: ...em is on NEVER touch the heat sink with any metal or with your hands 1 Connect the fan cable to its mainboard connector 2 Position the heat sink fan assembly on top of the processor making sure the screws are aligned with the screw holes on the mainboard 3 Secure the heat sink fan assembly to the mainboard using four screws ...

Страница 66: ...e Front Bezel 1 Insert the tabs on the front bezel into the notches 1 on the left side of the chassis and attach the front bezel 2 in the direction indicated 2 Make sure the front bezel retention tabs are securedly fastened to the chassis interior ...

Страница 67: ...Reinstalling the Side Panel 1 Align the tabs on the lower edge of the side panel with the notches on the bottom side of the chassis 2 Align the tabs on the upper edge of the side panel with the notches on the top side of the chassis ...

Страница 68: ...60 Aspire AX1470 Service Guide 3 Push the side panel toward the front of the chassis until it is firmly closed 4 Secure the side panel to the rear edge of the chassis using two screws ...

Страница 69: ... false errors and invalid system responses Power System Check If the system can be powered on skip this section Proceed to the System Internal Inspection procedure on the next page If the system will not power on do the following Check if the power cable is properly connected to the AC power jack and a functional AC power source Check if the voltage selector switch is set to the correct voltage se...

Страница 70: ...in cards that show the value of I O port 80h on a LED display Checkpoints may appear on the bottom right corner of the screen during POST This display method is limited since it only displays checkpoints that occur after the video card has been activated NOTE Please note that checkpoints may differ between different platforms based on system configuration Checkpoints may change due to vendor requi...

Страница 71: ...See the POST Code Checkpoints section for more information Checkpoint Description E0 Initialize the floppy controller in the super I O Some interrupt vectors are initialized DMA controller is initialized 8259 interrupt controller is initialized L1 cache is enabled E9 Set up floppy controller and data Attempt to read from floppy EA Enable ATAPI hardware Attempt to read from ARMD and ATAPI CDROM EB ...

Страница 72: ... 0A Initializes the 8042 compatible Key Board Controller 0B Detects the presence of PS 2 mouse 0C Detects the presence of Keyboard in KBC port 0E Testing and initialization of different Input Devices Also update the Kernel Variables Traps the INT09h vector so that the POST INT09h handler gets control for IRQ1 Uncompress all available language BIOS logo and Silent logo modules 13 Early POST initial...

Страница 73: ...r response for error 87 Execute BIOS setup if needed requested Check boot password if installed 8C Late POST initialization of chipset registers 8E Program the peripheral parameters Enable Disable NMI as selected 90 Late POST initialization of system management interrupt A0 Check boot password if installed A1 Clean up work needed before booting to OS A2 Takes care of runtime image preparation for ...

Страница 74: ...ou make changes in the Setup menus reboot the computer enter Setup again and load Setup defaults to correct the error Checkpoint Description 2A Initialize different buses and perform the following functions Reset Detect and Disable function 0 Static Device Initialization function 1 Boot Output Device Initialization function 2 Function 0 disables all device nodes PCI devices and PnP ISA cards It al...

Страница 75: ...rticular device This message is usually followed by other information concerning the device Invalid Boot Diskette A diskette was found in the drive but it is not configured as a bootable diskette Drive Not Ready The BIOS was unable to access the drive because it indicated it was not ready for data transfer This is often reported by drives when no media is present A Drive Error The BIOS attempted t...

Страница 76: ...vices in POST 5th Master Hard Disk Error The IDE ATAPI device configured as Master in the 5th IDE controller could not be properly initialized by the BIOS This message is typically displayed when the BIOS is trying to detect and configure IDE ATAPI devices in POST 5th Slave Hard Disk Error The IDE ATAPI device configured as Slave in the 5th IDE controller could not be properly initialized by the B...

Страница 77: ...er failed an ATAPI compatibility test This message is typically displayed when the BIOS is trying to detect and configure IDE ATAPI devices in POST 6th Slave Drive ATAPI Incompatible The IDE ATAPI device configured as Slave in the 6th IDE controller failed an ATAPI compatibility test This message is typically displayed when the BIOS is trying to detect and configure IDE ATAPI devices in POST S M A...

Страница 78: ...here was an error in while validating the NVRAM data This causes POST to clear the NVRAM data Resource Conflict More than one system device is trying to use the same non shareable resources Memory or I O NVRAM Ignored The NVRAM data used to store Plug n Play PnP data was not used for system configuration in POST NVRAM Bad The NVRAM data used to store Plug n Play PnP data was not used for system co...

Страница 79: ...en the keyboard controller is initialized PS 2 Keyboard not found PS 2 keyboard support is enabled in the BIOS setup but the device is not detected PS 2 Mouse not found PS 2 mouse support is enabled in the BIOS setup but the device is not detected Keyboard Interface Error Keyboard controller failure This may indicate a problem with system hardware Unlock Keyboard PS 2 keyboard is locked User needs...

Страница 80: ... Symptoms Symptom Error Action FRU Processor fan does not run but power supply fan runs Ensure the system is not in power saving mode With the system powered on measure the voltage of the processor fan connector Its reading should be 12Vdc If the reading shows normal but the fan still does not work then replace the heat sink fan Mainboard Processor test failed Processor Mainboard Mainboard and Mem...

Страница 81: ...wer on measure the voltage of the HDD LED connector HDD LED cable Optical Disc Drive related Symptoms Symptom Error Action FRU CD DVD ROM drive LED doesn t come on but works normally Enter CMOS Setup and load the default settings DIMM Mainboard CD DVD ROM drive LED flashes for more than 30 seconds before LED shutting off Software asks to reinstall disc Software displays a reading CD DVD error CD D...

Страница 82: ...rd In Win 98 ensure the telephone application is configured correctly for your modem and set to receive messages and or fax Data fax modem software program invoked but cannot receive send data fax Ensure the modem card is installed properly Fax voice modem software program invoked but has no sound output Data files are received normally voice from modem cannot be produced but system sound feature ...

Страница 83: ...stem Only unplugging the power cord from electrical outlet can turn off the system Ensure the Soft off by PWR BTTN in CMOS Setup under Power Management is not set to Instant off Power switch cable assembly Pressing the power button does not turn on the system Ensure the power override switch located at the back of the computer just above the connector for the power cable is not set to OFF Power sw...

Страница 84: ... then LCD assembly one at a time Do not replace a non defective FRU Beep Status Possible Causes One short beep System ready System is OK Continuous one long beep Memory not installed or memory error Something is wrong with the memory installed There is problem accessing the memory i e mainboard problem One long beep then two short beeps and repeat VGA not installed or VGA error The mainboard can n...

Страница 85: ... USB storage device will be cleared during the creation of the crisis disk 2 Set up a computer running the Windows XP or Windows Vista operating system and plug in the USB storage device into an available USB port 3 Copy the target BIOS ROM file to the USB storage device and rename it as amiboot rom 4 Unplug the USB storage device 5 Eject the removable USB storage device from the computer Performi...

Страница 86: ...cd dostool Go to BIOS path like A DOSTOOL 3 Key in flash1M bat or flash1M 4 Press Enter to flash the system BIOS 5 Reboot the computer 6 Press Delete to run the CMOS Setup Utility 7 Press F9 to load the system default settings 8 Select Ok then press Enter 9 Press F9 to save the default settings and close the Setup utility 10 Select Ok then press Enter ...

Страница 87: ... a computer running a 32 or 64 bit Windows OS 1 Press the power button to turn on the computer 2 Click Start Command Prompt Run as administrator 3 Perform the steps below if your computer is running 32 bit Windows a Key in cd wintool 32 Go to BIOS path like D WinTool 32 b Key in flash1M bat or flash1M ...

Страница 88: ...470 Service Guide c Press Enter to flash the system BIOS 4 Perform the steps below if your computer is running 64 bit Windows a Key in cd wintool 64 Go to BIOS path like D WinTool 64 b Key in flash1M bat or flash1M ...

Страница 89: ...the system BIOS 5 Reboot the computer 6 Press Delete to run the CMOS Setup Utility 7 Press F9 to load the system default settings 8 Select Ok then press Enter 9 Press F9 to save the default settings and close the Setup utility 10 Select Ok then press Enter ...

Страница 90: ...peripheral devices from the computer 4 Place the computer on a flat steady surface 5 Remove the side panel 6 If necessary remove any expansion cards assemblies or cables that prevent access to the CMOS clear jumper 7 Locate the JP1701 jumper on the mainboard 8 Remove the jumper block and set it over the 2 3 pins for 20 to 30 seconds 9 Return the jumper block to its default 1 2 position 10 Reinstal...

Страница 91: ...de 83 This chapter shows the block diagram and board layout of the Aspire AX1470 computer Block Diagram The core subsystems of the Aspire AX1470 computer are depicted in the following block diagram System Architecture Chapter 5 ...

Страница 92: ... x1 slot 4 PWR2 Standard 24 pin power connector 15 AUDJACK2 Line in Line Out MIC 5 U23 ITE 8758 16 USBR1 USB A 8P connector 6 JP1701 Clear CMOS jumper 17 USBLAN1 RJ45 USB connector 7 SATA1 3 Serial ATA connectors 18 USBR2 USB A 8P connector 8 LEDH1 12 pin power cable header 19 VGA1 VGA connector 9 USBF 2 3 Front panel USB header 20 HDMI1 HDMI connector 10 USBF 1 Front panel card reader header 21 P...

Страница 93: ...ced on the correct pins The following illustration shows the location of JP1701 The following table shows the settings of the 3 pin Clear CMOS JP1701 jumper Place the jumper cap on pins 1 and 2 to close or short the jumper Place the jumper cap on pins 2 and 3 to open or clear the jumper Jumper Type Description Setting default JP1701 3 pin Clear CMOS 1 2 Close default 2 3 Open Before clearing the C...

Страница 94: ... 5 GND 6 PWR_SW 7 RESET 8 GND 9 NC 10 Key 11 NC 12 VCC 13 NC 14 ACTIVE_C FRONT USB HEADER 1 USBVCC_1 2 USBVCC_1 3 USB0_XN 4 USB1_XN 5 USB0_XP 6 USB1_XP 7 GND 8 GND 9 KEY 10 GND FRONT USB HEADER 1 USBVCC_2 2 USBVCC_2 3 USB2_XN 4 USB4_XN 5 USB2_XP 6 USB4_XP 7 GND 8 GND 9 KEY 10 GND FRONT AUDIO HEADER 1 PORT F_L 2 AUGND 3 PORT F_R 4 FRONT_AUD_DET 5 PORT E_R 6 MIC2_JD 7 AUGND 8 KEY 9 PORT E_L 10 LINE2...

Страница 95: ...REEN 3 BLUE 4 11 NC 9 HDMIVCC 12 VDAC_SDAT 13 HSYNC 14 VSYNC 15 VDAC_SCLK 5 6 7 8 10 16 17 GND SATA CONN 1 GND 2 SATA0_TX_P 3 SATA0_TX_N 4 GND 5 SATA0_RX_N 6 SATA0_RX_P 7 GND SATA CONN 1 GND 2 SATA1_TX_P 3 SATA1_TX_N 4 GND 5 SATA1_RX_N 6 SATA1_RX_P 7 GND ATX_POWER CONN 1 VCC3 13 VCC3 2 VCC3 14 12V 3 GND 15 GND 4 VCC 16 ATX_PSON_L 5 GND 17 GND 6 VCC 18 GND 7 GND 19 GND 8 ATX_PWRGD 20 NC 9 5VSB 21VC...

Страница 96: ...88 Aspire AX1470 Service Guide ATX12V CONN 1 GND 2 GND 3 12V_4P 4 12V_4P Header Name Function Definition ...

Страница 97: ...C assembly It eliminates limitations of the current Parallel ATA interface but maintains register compatibility and software compatibility with Parallel ATA AUDIOF1 Front Panel Audio header This header allows the user to install auxiliary front oriented microphone and line out ports for easier access Pin Signal Name Pin Signal Name 1 Ground 2 TX 3 TX 4 Ground 5 RX 6 RX 7 Ground Pin Signal Name Pin...

Страница 98: ... have this kind of case use auxiliary USB connector to connect the front mounted ports to the motherboard Pin Signal Name Function 1 USBPWR Front Panel USB Power 2 USBPWR Front Panel USB Power 3 USB_FP_P0 USB Port 0 Negative Signal 4 USB_FP_P1 USB Port 1 Negative Signal 5 USB_FP_P0 USB Port 0 Positive Signal 6 USB_FP_P1 USB Port 1 Positive Signal 7 GND Ground 8 GND Ground 9 Key No pin 10 USB_FP_OC...

Страница 99: ...fer to the following 1 Connect the CPU cooling fan cable to CPUFAN1 2 Connect the standard power supply connector to PWR2 3 Connect the case switches and indicator LEDs to the LEDH1 4 Connect the auxiliary case power supply connector to PWR1 CPUFAN1 CPU Cooling Fan Power Connector Pin Signal Name Function 1 GND System ground 2 12V Power 12V 3 Sense Sensor 4 PWM PWM ...

Страница 100: ...V 3 Ground 15 Ground 4 5V 16 PS_ON 5 Ground 17 Ground 6 5V 18 Ground 7 Ground 19 Ground 8 PWRGD 20 5V 9 5VSB 21 5V 10 12V 22 5V 11 12V 23 5V 12 3 3V 24 Ground Pin Signal Name 1 Ground 2 Ground 3 12V 4 12V Pin Signal Name Function Pin Signal Name Function 1 VCC Reset Switch 2 GLED0 MSG LED 3 HDD_LEDN Hard disk LED 4 GLED1 MSG LED 5 GND Reset Switch 6 PWRSW Power Switch 7 HWRST_L Reset Switch 8 GND ...

Страница 101: ...eb or channel For whatever reasons a part number is changed it will NOT be noted on the printed Service Guide For Acer authorized service providers your Acer office may have a different part number code from those given in the FRU list of this printed Service Guide You MUST use the local FRU list provided by your regional Acer office to order FRU parts for service NOTE Follow the local government ...

Страница 102: ...mbly 1 2 HDD ODD bracket 1 3 Front I O and card reader board bracket 1 4 Front cover assembly 1 5 Lowercase support 1 6 Side cover 1 7 Front I O and card reader board 1 8 Plastic cable clip 1 9 Screw I 6 32 L5 2 4 10 Screw Pan M3 L5 2 11 Screw Flat 6 32 3 16 NI 4 12 Screw Pan 6 32 L6 NI 13 ...

Страница 103: ...180 A00AC HD6450 1GB SDDR3 64BITS DVI I HDMI SAMSUNG LP VGA CARD HD6450 1GB 64BITS SDDR3 SDI DVI VG APC64 523 VGA CARD 288 2E180 C00AC HD6450 1GB SDDR3 64BITS DVI I HDMI HYNIX LP VGA CARD HD6450 1GB 64 BITS SDDR3 HYNIX VG APC64 525 VGA CARD 89D685 321108 HD6450 1GB SDDR3 64BITS DVI I HDMI SAMSUNG LP RADEON 6450 1GB SDDR3 SDI DVI I HDMI LP VG ECS64 5A2 VGA CARD 288 1E180 C00AC HD6450 512MB SDDR3 SD...

Страница 104: ...PCPT5 302 VGA CARD 288 7N162 B01AC GT530 2GB 128BIT DDR3 DVI HDMI HYNIX LP PCP NV GT530 2GB DDR3 HYNIX DVI HDMI VGA VG PCPT5 304 CABLES POWER CORD 1830MM BLACK TW I SHENG POWER CORD 110V TW 27 01518 0M1 POWER CORD 1800MM 250V EURO POWER CORD 1800MM 250V EURO 27 01518 0J1 ODD CABLE SATA C A SATA ODD GTL ELENA 50 SFF01 003 ODD CABLE SATA C A SATA ODD VSO ELENA 50 SFF01 004 HDD SATA CABLE C A SATA HD...

Страница 105: ... GH70N LF HF BLACK BEZEL SATA WIN7 ODD DVD RW HH SATA HLDS GH70N KU 0160D 055 ODD PLDS Super Multi DRIVE HH DL 16X DH 16ABSH LF Black Bezel HF Win7 SATA 16X ODD PLDS DH 16ABSH SM HH BLK W7 KU 0160F 011 ODD HLDS DVD ROM HH DL 16X DH40N LF HF Black Bezel HF Win7 SATA ODD DVD ROM SATA HH TL HLDS DH40N KV 0160D 017 ODD PLDS DVD ROM HH DL 16X TRAY DH 16D5SH LF BLACK BEZEL SATA HF WIN 7 DVD ROM HH HF W7...

Страница 106: ...NISH KB USB0B 454 KEYBOARD LITE ON SK 9621B USB BLACK PORTUGUESE KB SK 9621B USB BLACK PORTUGUESE KB USB0B 455 KEYBOARD LITE ON SK 9621B USB BLACK CANADIAN FRENCH KB SK 9621B USB BLACK CANADIAN FRENCH KB USB0B 456 KEYBOARD LITE ON SK 9621B USB BLACK BRAZILIAN PORTUGUESE KB SK 9621B USB BLACK BRAZILIAN PORTUGU KB USB0B 457 KEYBOARD LITE ON SK 9621B USB BLACK JAPANESE KB SK 9621B USB BLACK JAPANESE ...

Страница 107: ...SB0B 479 KEYBOARD LITE ON SK 9621B USB BLACK TURKISH Q KB SK 9621B USB BLACK TURKISH Q KB USB0B 480 KEYBOARD LITE ON SK 9621B USB BLACK ARABIC FRENCH KB SK 9621B USB BLACK ARABIC FRENCH KB USB0B 481 KEYBOARD LITE ON SK 9621B USB BLACK KAZAKH KB SK 9621B USB BLACK KAZAKH KB USB0B 482 KEYBOARD LITE ON SK 9621B USB BLACK TURKMEN KB SK 9621B USB BLACK TURKMEN KB USB0B 483 KEYBOARD LITE ON SK 9621B USB...

Страница 108: ...B PS20B 170 KEYBOARD LITE ON SK 9611 PS 2 BLACK SWEDISH KB SK 9611 PS 2 BLACK SWEDISH KB PS20B 171 KEYBOARD LITE ON SK 9611 PS 2 BLACK UK KB SK 9611 PS 2 BLACK UK KB PS20B 172 KEYBOARD LITE ON SK 9611 PS 2 BLACK DUTCH KB SK 9611 PS 2 BLACK DUTCH KB PS20B 173 KEYBOARD LITE ON SK 9611 PS 2 BLACK SWISS G KB SK 9611 PS 2 BLACK SWISS G KB PS20B 174 KEYBOARD LITE ON SK 9611 PS 2 BLACK BELGIUM KB SK 9611...

Страница 109: ...LACK CZECH SLOVAK KB PS20B 195 KEYBOARD LITE ON SK 9611 PS 2 BLACK SWISS FR KB SK 9611 PS 2 BLACK SWISS FR KB PS20B 196 KEYBOARD LITE ON SK 9611 PS 2 BLACK KOREAN KB SK 9611 PS 2 BLACK KOREAN KB PS20B 197 KEYBOARD LITE ON SK 9611 PS 2 BLACK SPANISH LATIN KB SK 9611 PS 2 BLACK SPANISH LATIN KB PS20B 198 KEYBOARD PRIMAX KB36111 PS 2 BLACK US KB KB36111 PS 2 BLACK US KB PS20P 204 KEYBOARD PRIMAX KB36...

Страница 110: ...GIAN KB PS20P 224 KEYBOARD PRIMAX KB36111 PS 2 BLACK HEBREW KB KB36111 PS 2 BLACK HEBREW KB PS20P 225 KEYBOARD PRIMAX KB36111 PS 2 BLACK POLISH KB KB36111 PS 2 BLACK POLISH KB PS20P 226 KEYBOARD PRIMAX KB36111 PS 2 BLACK SLOVENIAN KB KB36111 PS 2 BLACK SLOVENIAN KB PS20P 227 KEYBOARD PRIMAX KB36111 PS 2 BLACK SLOVAK KB KB36111 PS 2 BLACK SLOVAK KB PS20P 228 KEYBOARD PRIMAX KB36111 PS 2 BLACK RUSSI...

Страница 111: ... INTERNATIONAL KB KB36211 USB BLACK US INTERNATIONAL KB USB0P 220 KEYBOARD PRIMAX KB36211 USB BLACK ARABIC ENGLISH KB KB36211 USB BLACK ARABIC ENGLISH KB USB0P 221 KEYBOARD PRIMAX KB36211 USB BLACK THAILAND KB KB36211 USB BLACK THAILAND KB USB0P 222 KEYBOARD PRIMAX KB36211 USB BLACK SPANISH KB KB36211 USB BLACK SPANISH KB USB0P 223 KEYBOARD PRIMAX KB36211 USB BLACK PORTUGUESE KB KB36211 USB BLACK ...

Страница 112: ...USB0P 246 KEYBOARD PRIMAX KB36211 USB BLACK ROMANIAN KB KB36211 USB BLACK ROMANIAN KB USB0P 247 KEYBOARD PRIMAX KB36211 USB BLACK TURKISH KB KB36211 USB BLACK TURKISH KB USB0P 248 KEYBOARD PRIMAX KB36211 USB BLACK TURKISH Q KB KB36211 USB BLACK TURKISH Q KB USB0P 249 KEYBOARD PRIMAX KB36211 USB BLACK ARABIC FRENCH KB KB36211 USB BLACK ARABIC FRENCH KB USB0P 250 KEYBOARD PRIMAX KB36211 USB BLACK KA...

Страница 113: ...9 DIMM 2G ACR256X64D3U1333C9 KN 2GB07 002 MEMORY KINGSTON UNB DIMM DDRIII 1333 2GB ACR256X64D3U13C9G LF HF DIMM 2G ACR256X64D3U13C9G DDR3 UNB KN 2GB07 007 MEMORY NANYA UNB DIMM DDRIII 1333 4GB NT4GC64B8HB0NF CG LF 256 8 0 055UM DIMM 4G NT4GC64B8HB0NF CG DDR3 UNB KN 4GB03 006 MEMORY MICRON UNB DIMM DDRIII 1333 4GB MT16JTF51264AZ 1G4D1 LF 256 8 0 055UM DIMM 4G MT16JTF51264AZ 1G4D1 DDR3 UNB KN 4GB04 ...

Страница 114: ...Y 2200B 009 POWER SUPPLY 220W CHICONYPOWER REGULAR CPB09 D220R AAGASSI SPS 220W REGULAR CPB09 D220R AAGA PY 2200F 004 POWER SUPPLY 220W PFC 230V DELTA DPS 220UB 4A EUP SPS 220W EUP PFC 230V DPS 220UB 4A NEW PY 22009 010 POWER SUPPLY 220W LITE ON PFC 230V PE 5221 08AF EUP SPS PFC 220W 8 5L EUP PE 5221 08AF ABO PY 2200B 010 POWER SUPPLY 220W CHICONYPOWER PFC CPB09 D220A AAGASSI SPS 220W PFC CPB09 D2...

Страница 115: ...n micro PGA package Chipsets BIOS Item Specification Series AMD A6 AMD A8 Model A6 3650 A8 3850 No of cores 4 4 Base frequency 2 6 GHz 2 90 GHz L2 cache 4 0 MB 4 0 MB DDR3 speed support Yes Yes Thermal design power 100W 100W Item Specification Chipset AMD A75 FCH or AMD A55 FCH Item Specification BIOS chip AMI BIOS Setup utility CMOS Setup Utility Technical Specifications Appendix A ...

Страница 116: ...s Item Specification Controller Integrated in the AMD A75 A55 FCH Chipset Number of HDD bays 1 Form factor 3 5 inch 25 4 mm Interface SATA 3 0 Supported capacities 320 GB Seagate Pharaoh ST3320413AS WD WD3200AAKX 221CA0 500 GB Seagate Pharaoh ST3500413AS WD WD5000AAKX 221CA0 1000 GB Seagate Pharaoh ST31000524AS WD WD10EADX 22TDHB0 1500 GB Seagate Brinks ST31500341AS WD WD15EARS 22MVWB0 Item Specif...

Страница 117: ...ontroller Realtek RTL8201EL Single Chip Port 10 100 Fast Ethernet PHYceiver with Auto MDIX LAN protocol 10 100 1000 Mbit LAN connector type RJ 45 Item Specification Controller Realtek RTL8111E VL CG Audio jacks Front panel Headphone and microphone jacks Rear panel Microphone line out and line in jacks Item Specification Vendor and Model Delta DPS 220UB 3A non PFC Delta DPS 220UB 4A PFC Delta DPS 2...

Страница 118: ...ce Guide 110 Power Management Devices S1 S3 S4 S5 Power Button V V V V USB Keyboard Mouse V V N A N A PME Disabled Disabled Disabled Disabled RCT Disabled Disabled Disabled Disabled WOR Disabled Disabled Disabled Disabled ...

Страница 119: ...16 BIOS Setup enter Setup 8 block diagram 83 boot block checkpoints 62 execute 77 button optical drive eject 4 C card reader install 42 remove 35 checkpoints boot block 62 DIM 66 overview 62 POST 64 Chipset 2 CMOS clear 82 CMOS RAM 7 connectivity options 1 specifications 109 connector LAN 5 power 5 PS 2 keyboard 5 PS 2 mouse 5 cover optical drive 4 D DIM checkpoints 66 disassembly procedures card ...

Страница 120: ... 47 remove 32 specifications 108 troubleshooting 72 microphone jack rear 5 modem board troubleshooting 74 monitor port 5 O ODD see optical disc drive 1 operating system 1 optical disc drive reinstall 51 remove 27 specifications 108 troubleshooting 73 OS support 1 P PCB 2 PhoenixBIOS Setup Utility see BIOS Setup 8 POST see Power On Self Test 64 power ACPI compliance 2 button indicator 4 specificati...

Страница 121: ...09 Ethernet 109 hard disk drive 108 memory 108 optical disc drive 108 power management 110 power supply unit 109 processor 107 system BIOS 107 system chipsets 107 system architecture 83 system chipsets 107 system dimensions 3 system utilities 7 system views rear view 5 system weight 3 T temperature operating 3 troubleshooting BIOS checkpoints 62 BIOS recovery 77 BIOS update 78 clearing CMOS 82 com...

Отзывы: