background image


Switching the power 
 
First, switch on the hard-switch on the backside of monitor, then turn on PC and power button on 
monitor’s control panel. When you see the LED on the power button go green, this indicates the computer 
is ready for use. Allow about 10 seconds for the video signal to appear. If you do not see the green light 
on the power button or a video signal, check the connections. 


Adjusting display settings


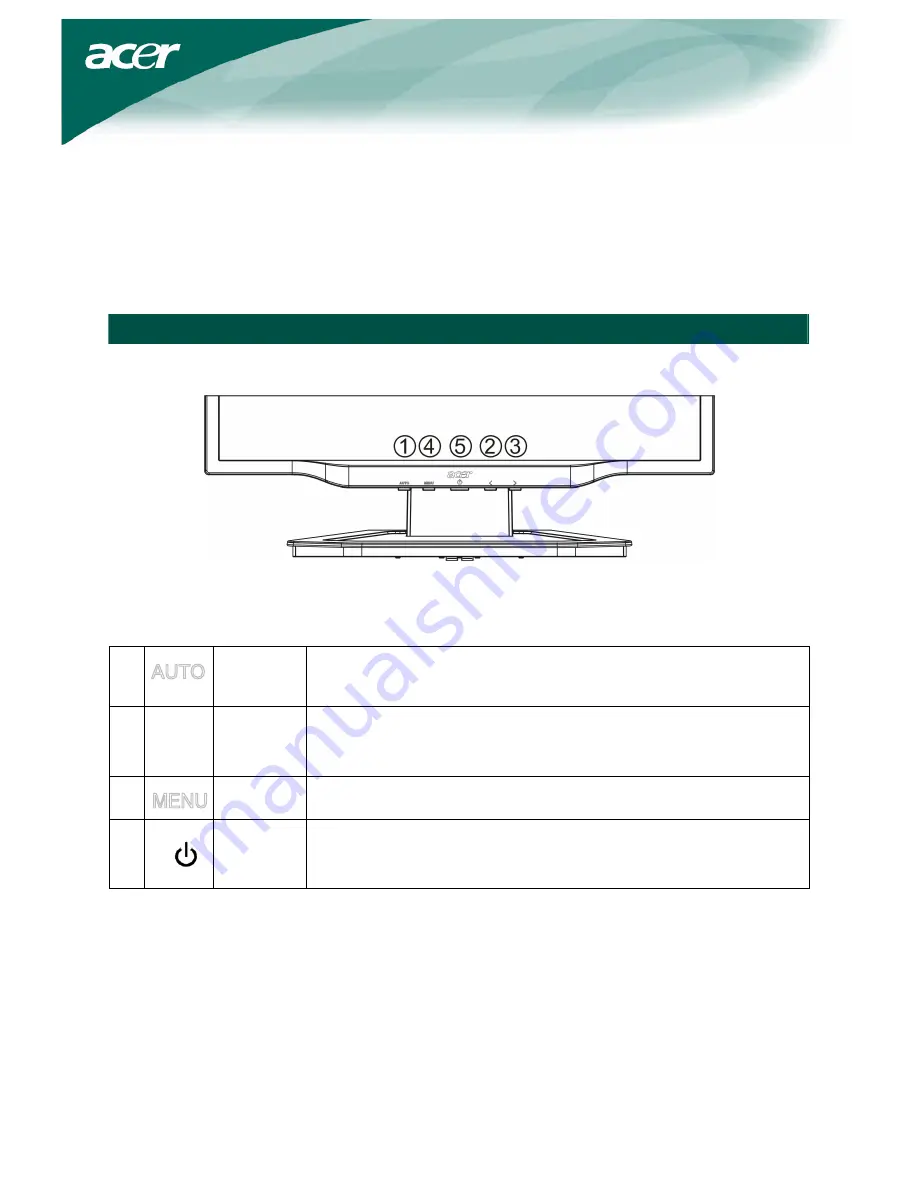
External controls 


Auto 

If the OSD is active, press Auto to exit a selection in the OSD. If the OSD is 
inactive, press Auto and the monitor will automatically optimize the 
position, focus, and clock of your display. 

2/3 

<

/

Minus / Plus   

If the OSD is active, press Minus  or Plus to toggle between the OSD 
options. If OSD is inactive, press Minus or Plus to adjust the volume. 


OSD 

functions 

Press to view the OSD. Press again to enter a selection in the OSD. 


Power 

Power on/off 
Green: power on 
Orange: in sleep mode 


Содержание AL1923 h

Страница 1: ...Package contents 3 Installation instructions 3 Assembling the monitor 3 Adjusting the viewing angle 4 Connecting the devices 6 Switching the power 7 Adjusting display settings 7 External controls 7 OSD options 8 OSD menu 8 Troubleshooting 11 General specifications 12 ...

Страница 2: ...ur problem Recycling information Acer cares very much about protecting the environment and firmly believes that the environment will be healthier if appropriate measures are taken to treat and recycle industrial technology products Such products contain hazardous poisonous substances that can seriously harm the environment Furthermore industrial technology products contain materials that can be re...

Страница 3: ...kaging the monitor and base must be separated in order to fit in the carton To detach the monitor 1 Unplug the AC power cord to make sure the power is off 2 Pull the 4 hooks on the bottom side of the base and hold 3 Separate the monitor and base Important When separating the monitor and base find a clean flat surface to place the monitor on and place a clean dry cloth under the monitor to protect ...

Страница 4: ...e side swivel adjustment To make an adjustment grasp the monitor with both hands on the right and left edge of the casing and move it to the desired position Do not perform a pulling or plugging action when the display is under slanting status to prevent the display from ejecting Pull out the pin from the display support frame as per the figure and then adjust the height Note that upon pulling out...

Страница 5: ...e screen height to suit your own position as per Fig 4 5 To return to original position turn 90 degrees in counter clockwise direction as per Fig 5 6 After rotation is complete adjust the screen height to suit your own position as per Fig 6 一 二 三 四 五 六 In order to use the Pivot function the included Pivot Software must be installed Portrait Displays Inc All rights reserved NOTES Do not touch the L...

Страница 6: ...ter Then tighten the thumbscrews on the connector 3 DVI D cable Connect the signal cable to the DVI D input socket of the monitor and connect the signal cable to the DVI D output socket of the graphics card on the computer Then tighten the thumbscrews on the connector 4 Audio cable Connect the audio input socket AUDIO IN of the LCD monitor and the computer by means of the audio cable 5 Power switc...

Страница 7: ... signal check the connections Adjusting display settings External controls 1 Auto If the OSD is active press Auto to exit a selection in the OSD If the OSD is inactive press Auto and the monitor will automatically optimize the position focus and clock of your display 2 3 Minus Plus If the OSD is active press Minus or Plus to toggle between the OSD options If OSD is inactive press Minus or Plus to ...

Страница 8: ...adjusting the OSD settings press the Auto button to exit the OSD OSD menu Contrast This adjusts dark and light shades of color relative to each other Brightness This adjusts the brightness of the picture on the screen Focus This removes any horizontal distortion and makes the picture clear and sharp Clock If there are any vertical stripes seen on the background of the screen this renders them less...

Страница 9: ...re Language for Asia Select the OSD menu language Select from English German Spanish Simplified Chinese Traditional Chinese French Italian and Japanese Language for EMEA Select the OSD menu language Select from English German Spanish Russia Nederlands French Italian and Finnish OSD Settings This changes the position of the OSD window on the screen and the staying time ...

Страница 10: ...10 Input signal Select either Analog Input or Digital Input video Information This shows information about the screen Reset Resets all settings to default levels Exit Exit from OSD ...

Страница 11: ...e shows inappropriate colors y See color adjustment p 8 to adjust RGB color Picture bounces or a wave pattern is present in the picture y Move or switch off electrical devices that may be causing interference y Inspect the monitor s video cable and ensure that none of the pins are bent Image is not sized or centered properly y Press select auto key and the monitor will automatically optimize the p...

Страница 12: ...t signal Information Information Reset Reset Exit Exit Video Interface Video Analog 0 7 V Digital TMDS Sync TTL Plug Play DDC2B Power Power source 100 240 V AC 50 60 Hz Power consumption during normal operation 40 W Power consumption during active off operation 2W Dimension and weight Dimensions W H D 413 9 X 338 7 X 189 7 mm with stand Weight Net Gross 4 5 kg 6 5 kg Dimensions W H D 413 9 x 427 7...

Отзывы: