background image

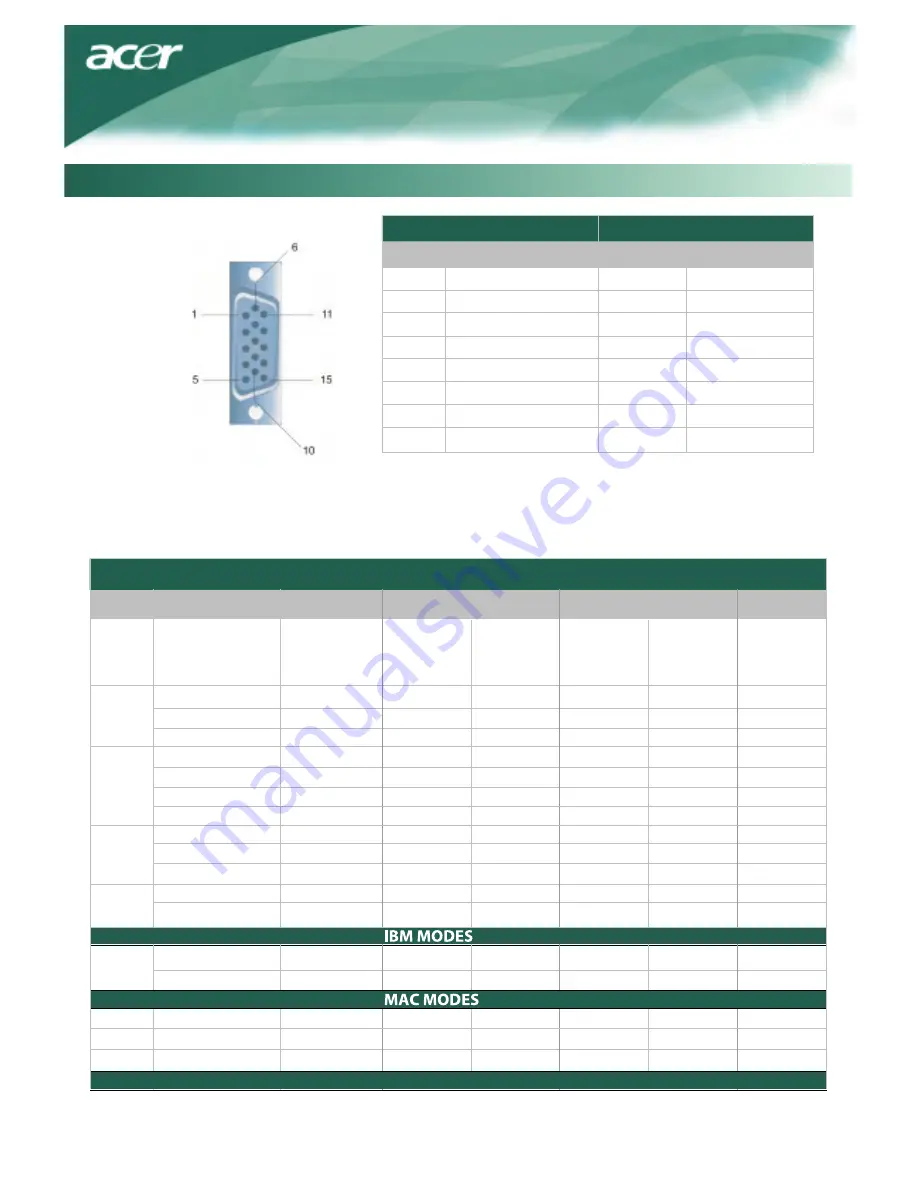
Standard Timing Table

If the selected timing is NO T included in table below, this LCD monitor will go into the sleep mode.

VESA MODES

Mode

VGA

SVGA

XGA

SXGA

EGA

9

Horizontal                            Vertical

Resolution

640*480@60Hz

640*480@72Hz

640*480@75Hz

800*600@56Hz

800*600@60Hz

800*600@72Hz

800*600@75Hz

1024*768@60Hz

1024*768@70Hz

1024*768@75Hz

1280*1024@60Hz

1280*1024@75Hz

Total

Nominal

Frequency

+/-0.5KHz

   Sync

  Polarity

Nominal

Frequency

+/-1Hz

   Sync
  Polarity

Nominal

Pixel

Clock
(MHz)

800*525

832*520

840*500

1024*625

1056*628

1040*666

1056*625

1344*806

1328*806

1312*800

1688*1066

1688*1066

31.469

37.861

37.500

35.156

37.879

48.077

46.875

48.363

56.476

60.023

63.981

79.976

59.940

72.809

75.000

56.250

60.317

72.188

75.000

60.004

70.069

75.029

60.020

75.025

N

N

N

P

P

P

P

N

N

P

P

P

25.175

31.500

31.500

36.000

40.000

50.000

49.500

65.000

75.000

78.750

108.000

135.000

N

N

N

P

P

P

P

N

N

P

P

P

640*350@70Hz

720x400@70Hz

 832*624@75Hz

1024*768@60Hz

1024*768@75Hz

800*449

900*449

 1152*667

1312*813

1328*804

31.469

31.469

49.728

48.780

60.241

P

N

N

N

N

70.086

0.087

 74.551

0.001

74.927

P

N

N

N

N

N

25.175

28.322

57.284

57.284

64.000

80.000

SVGA

XGA

XGA

Pin Assignment

Signal

PIN          Description                            PIN          Description

1              Red                                         9              +5V

2              Green                                    10             N.C.

3              Blue                                       11             N.C.

4              N.C.                                       12            DDC_SDA

5              GND                                       13            HSYNC

6              Red_GND                              14            VSYNC.

7              Green_GND                           15            DDC_SCL

8              Blue_GND

Technical Information

Signal

Содержание AL1917X

Страница 1: ...Viewing Angle Connecting the Devices Switching the Power Adjusting Display Settings External Controls OSD Options OSD Menu Brightness Contrast Tracking Position Color Language Setting Auto Configuration Information Recall General Specifications Technical Information Pin Assignment Standard Timing Table Troubleshooting 1 2 3 3 4 4 4 4 4 4 5 5 5 5 6 6 6 6 6 7 7 7 7 7 8 8 8 9 10 OSD Option ...

Страница 2: ...nd environmental labelling of personal computers The labelling scheme was developed as a joint effort by the TCO The Swedish Confederation of Professional Employees Svenska Naturskyddsforeningen The Swedish Society for Nature Conservation and Statens Energimyndighet The Swedish National Energy Administration Approval requirements cover a wide range of issues environment ergonomics usability emissi...

Страница 3: ... g increased risks of skin cancer malignant melanoma as a consequence Lead Lead can be found in picture tubes display screens solders and capacitors Lead damages the nervous system and in higher doses causes lead poisoning The relevant TCO 99 requirement permits the inclusion of lead since no replacement has yet been developed Bio accumulative is defined as substances which accumulate within livin...

Страница 4: ...nd clean the screen gently 2 Do not place the LCD Monitor near a window Exposing the monitor to rain water moisture or sunlight can severely damage it ter moisture or sunlight can severely damage it 3 Do not place the LCD Monitor near a window Exposing the monitor to rain water moisture or sunlight can severely damage it ter moisture or sunlight can severely damage it 4 Do not remove the cover or ...

Страница 5: ...Pull the monitor slightly up and away from the stand Adjusting the Viewing Angle The viewing angle of the monitor ranges from forward 5 to backward 15 Caution Do not force the LCD Monitor over its maximum viewing angle settings as stated above Attempting this will result in damaging the Monitor and Monitor stand Connecting the Devices Please shut down the power of computer and monitor before you d...

Страница 6: ...to save after 45 seconds First switch the power on to the monitor then switch the power on to the computer When you see the LED on the power button go green this indicates the computer is ready for use Allow about 10 seconds for the video signal to appear If you do not see the green light on the power button or a video signal check the connections If OSD is active press to exit If OSD is inactive ...

Страница 7: ... makes the picture clear and sharp CLOCK If there are any vertical stripes seen on the background of the screen this renders them less noticeable by minimizing their size It also changes the size of horizontal screen Position V Position This removes any horizontal distortion and makes the picture clear and sharp H Position This adjusts the horizontal Color Temperature There are three ways of adjus...

Страница 8: ...is changes the position of the OSD window on the screen TIMEOUT function allow user define the OSD appearing period from 10 seconds to 60 seconds AUTO Configuration Adjust the monitor parameter automatically Information This shows brief information on the screen User defined You can adjust the colors red green and blue to the intensity you desire ...

Страница 9: ...uto MENU Video In Analog 0 7V Sync TTL Plug Play DDC2B EMI and Safety UL USA CBC B Mark Poland PSB Singapore TUV Germany CB BSMI Taiwan CCC China PSE Japan FCC USA C tick Australia CE Europe VCCI Japan TCO 99 ISO13406 2 TUV GS TUV Ergo WHQL Microsoft 8 Power Source 100 240V AC 50 60 Hz Power Consumption During Normal Operation 40W Power Consumption During Active off Operation 5W Dimension W_H_D 42...

Страница 10: ...66 31 469 37 861 37 500 35 156 37 879 48 077 46 875 48 363 56 476 60 023 63 981 79 976 59 940 72 809 75 000 56 250 60 317 72 188 75 000 60 004 70 069 75 029 60 020 75 025 N N N P P P P N N P P P 25 175 31 500 31 500 36 000 40 000 50 000 49 500 65 000 75 000 78 750 108 000 135 000 N N N P P P P N N P P P 640 350 70Hz 720x400 70Hz 832 624 75Hz 1024 768 60Hz 1024 768 75Hz 800 449 900 449 1152 667 131...

Страница 11: ...n the LCD Monitor is ON all connections are secured and the system is running on the correct timing Refer to Chapter 3 for information on timing 2 Turn off the LCD Monitor and then turn it back on again If there is still no picture press the Adjustment Control button several times 3 If step 2 doesn t work connect your PC system to another external CRT If your PC system Functions properly with a CR...

Отзывы: