background image


5

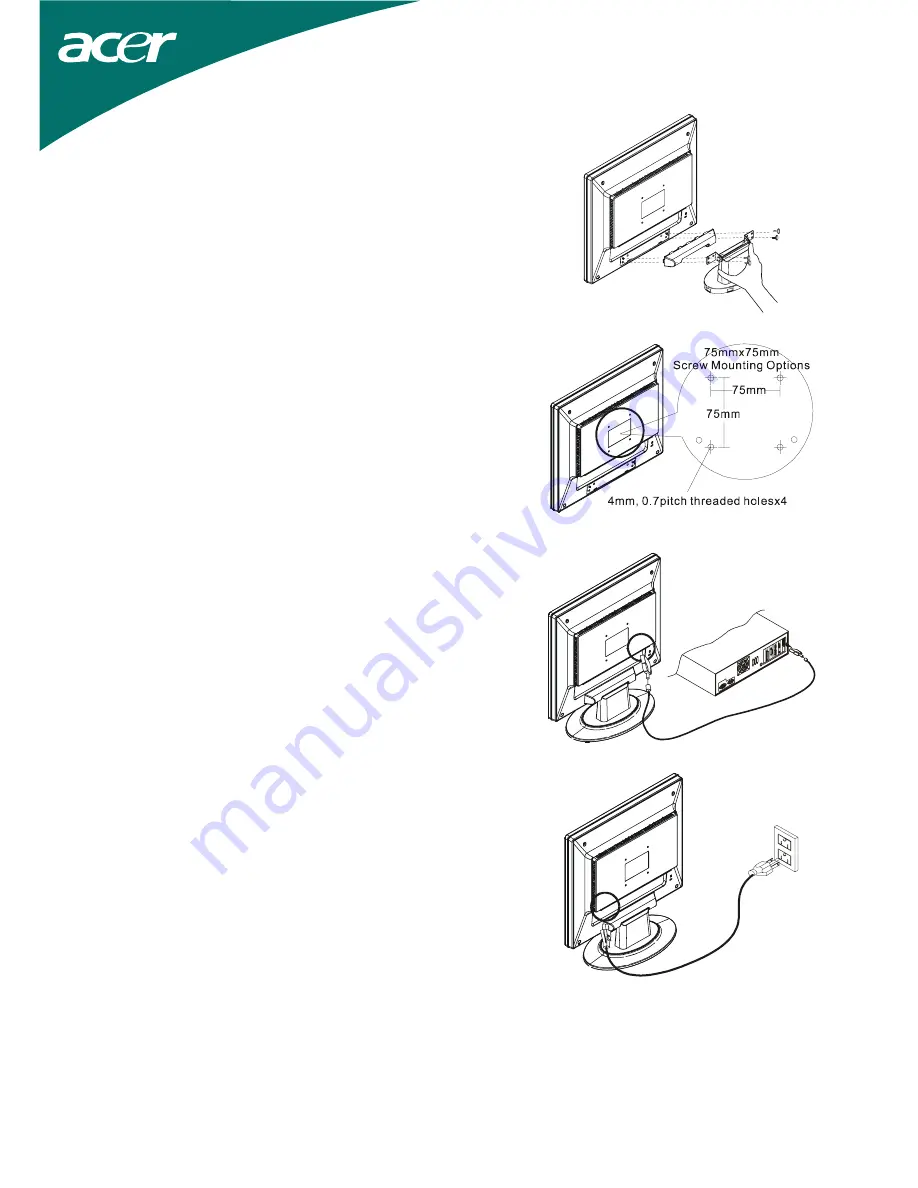
Detaching LCD Monitor from Its Stand


Unscrew screws the swivel base support column and pull 
down the hinge to release. 


Figure 1-3 

Interface for Arm Applications   

Before installing to mounting device, please refer to 
Fig.1-3. 
The rear of this LCD display has four integrated 4 mm, 0.7 
pitches threaded nuts, as well as four 5 mm access holes in 
the plastic covering as illustrated in Figure 1-4. These 
specifications meet the 

VESA Flat Panel Monitor 

Physical Mounting Interface Standard

 (paragraphs 2.1 

and 2.1.3, version 1, dated 13 November 1997).


Figure 1-4 

Connecting the Display 


1. Power off your computer.   
2. Connect one end of the signal cable to the LCD 

Monitor’s VGA port.(See Fig 1-5)   

3. Connect the other end of the signal cable to the VGA 

port on your PC. 

4. Make sure connections are secure.


Figure 1-5 

Connecting the AC Power 


1.  Connect the power cord to the LCD Monitor.(See Fig. 

1-6)  

2.  Connect the power cord to an AC power source.


Figure 1-6


Содержание AL1515

Страница 1: ...CD Monitor from Its Stand 5 Interface for Arm Applications 5 Connecting the Display 5 Connecting the AC Power 5 Connecting the Audio Cable For AL1515 m and AL1515 bm 6 Power Management System 6 Chapter 2 Display Controls 7 General Instructions 7 Front Panel Control 8 How To Adjust A Setting 9 Adjusting The Picture 9 Chapter 3 Technical Information 11 Specifications 11 Standard Timing Table 13 Trou...

Страница 2: ...use harmful interference to radio communications However there is no guarantee that interference will not occur in a particular installation If this equipment does cause harmful interference to radio or television reception which can be determined by turning the equipment off and on the user is encouraged to try to correct the interference by one or more of the following measures Reposition or rel...

Страница 3: ...Do not remove the cover or attempt to service this unit by yourself Servicing of any nature should be performed by an authorized technician 5 Store LCD Monitor in a room with a room temperature of 20 60 C or 4 140 F Storing the LCD Monitor outside this range could result in permanent damage 6 If any of the following occurs immediately unplug your monitor and call an authorized technician Monitor t...

Страница 4: ...Monitor to PC VGA Cable 1 8M Stereo Jack Audio Cable for AL1515 m and AL1515 bm 1 8M Power Cord Base If you find that any of these items is missing or appears damaged contact your dealer immediately Connecting the LCD Monitor and Base 1 Take the base from the package and place it on a stable surface e g desk or table 2 Ensure that the arrow on the base faces forward 3 Place the LCD securely on the...

Страница 5: ...lustrated in Figure 1 4 These specifications meet the VESA Flat Panel Monitor Physical Mounting Interface Standard paragraphs 2 1 and 2 1 3 version 1 dated 13 November 1997 Figure 1 4 Connecting the Display 1 Power off your computer 2 Connect one end of the signal cable to the LCD Monitor s VGA port See Fig 1 5 3 Connect the other end of the signal cable to the VGA port on your PC 4 Make sure conn...

Страница 6: ...he other end of the audio cable to the LCD Monitor s AUDIO IN jack Figure 1 7 Power Management System This LCD Monitor complies with the VESA DPMS version 1 0 Power Management guidelines The VESA DPMS provides four power saving modes through detecting a horizontal or vertical sync signal When the LCD Monitor is in power saving mode the monitor screen will be blank and the power LED indicator will ...

Страница 7: ...igure 2 1 By changing these settings the picture can be adjusted to your personal preferences The power cord should be connected Connect the video cable from the monitor to the video card Press the power button to turn on the monitor position The power indicator will light up Figure 2 1 External Controls 1 Auto Adjust Key Exit 4 MENU ENTER 2 Volume 5 LED 3 Volume 6 Power Key ...

Страница 8: ...ill act as EXIT KEY EXIT OSD menu 2 When OSD menu is in off status press this button for 2 seconds to activate the Auto Adjustment function The Auto Adjustment function is used to set the HPos VPos Clock and Focus NOTES Do not install the monitor in a location near heat sources such as radiators or air ducts or in a place subject to direct sunlight or excessive dust or mechanical vibration or shoc...

Страница 9: ...djusting The Picture The descriptions for function control LEDS Main Menu Icon Sub Menu Icon Sub Menu Item Description Contrast Adjusts the contrast between the foreground and background of the screen image Brightness Adjusts the background brightness of the screen image Focus Adjusts picture Focus Clock Adjusts picture Clock H Position Adjust picture Focus V Position Adjust picture Clock N A Warm...

Страница 10: ...ion Adjust the vertical position of the OSD OSD Timeout Adjust the OSD timeout N A Auto Config Auto Adjust the H V Position Focus and Clock of picture N A Information Show the resolution H V frequency and input port of current iput timing N A Reset Clear each old status of Auto configuration and set the color temperature to Cool N A Exit Save user adjustment and OSD disappear ...

Страница 11: ... mA rms typical Viewing Angle Vertical 55 45 Horizontal 65 65 Display Colors 16 7M with FRC or Dithering Video Input Signal Input Impedance Polarity Amplitude Multi mode Supported Analogue RGB 0 7Vp p 75 Ohm 2 Positive Negative 0 0 7 0 05 Vp Horizontal Frequency 24 60 KHz Vertical Frequency 49 75 Hz Control Power switch On Off switch with LED indicator Audio AL1515 m AL1515 bm Input 500mVrms Outpu...

Страница 12: ...C input AC socket Video Cable 1 8M with 15 pin D sub connector Audio Cable 1 8M with Stereo Jack Environment Operating Condition Storage Condition Temperature Relative Humidity Temperature Relative Humidity 5 C to 40 C 41 F to 104 F 20 to 80 20 C to 60 C 4 F to140 F 5 to 85 Power Supply AC Input Input Voltage Single phase 100 240VAC 50 60 Hz Input Current 1 2 A maximum Size and Weight Dimensions 3...

Страница 13: ...1 70 15 449 400 2 13 34 640X480 31 469 800 640 96 16 48 25 175 VESA PAL 50 030 629 480 2 62 85 640x480 31 469 800 640 96 16 48 25 175 VGA 480 59 94 525 480 2 10 33 640x480 35 00 864 640 64 64 96 30 24 APPLE MAC 480 66 67 525 480 3 3 39 640x480 37 861 832 640 40 16 120 31 5 VESA 480 72Hz 72 809 520 480 3 1 20 640x480 37 5 840 640 64 16 120 31 5 VESA 480 75Hz 75 500 480 3 1 16 720x400 31 469 900 720...

Страница 14: ...GA 60 004 806 768 6 3 29 1024x768 53 964 1328 1024 176 16 112 71 664 COMPAQ XGA 66 132 816 768 4 8 36 1024x768 56 476 1328 1024 136 24 144 75 VESA 768 70Hz 70 069 806 768 6 3 29 1024x768 60 023 1312 1024 96 16 176 78 75 VESA 768 75Hz 75 029 800 768 3 1 28 1024x768 60 24 1328 1024 96 32 176 80 APPLE MAC 768 75 02 803 768 3 3 29 Note Mode 640x350 640x400 and 720x400 will locate on middle position bu...

Страница 15: ...he normal PC operating environment PROBLEM There is no picture on LCD Monitor If there s no picture on the LCD Monitor please perform the following steps 1 Make sure the power indicator on the LCD Monitor is ON all connections are secured and the system is running on the correct timing Refer to Chapter 3 for information on timing 2 Turn off the LCD Monitor and then turn it back on again If there i...

Отзывы: