background image

E-10


  User

s Guide

Main

Menu

Icon

Sub

Menu

Icon

Sub

Menu

Item

Description

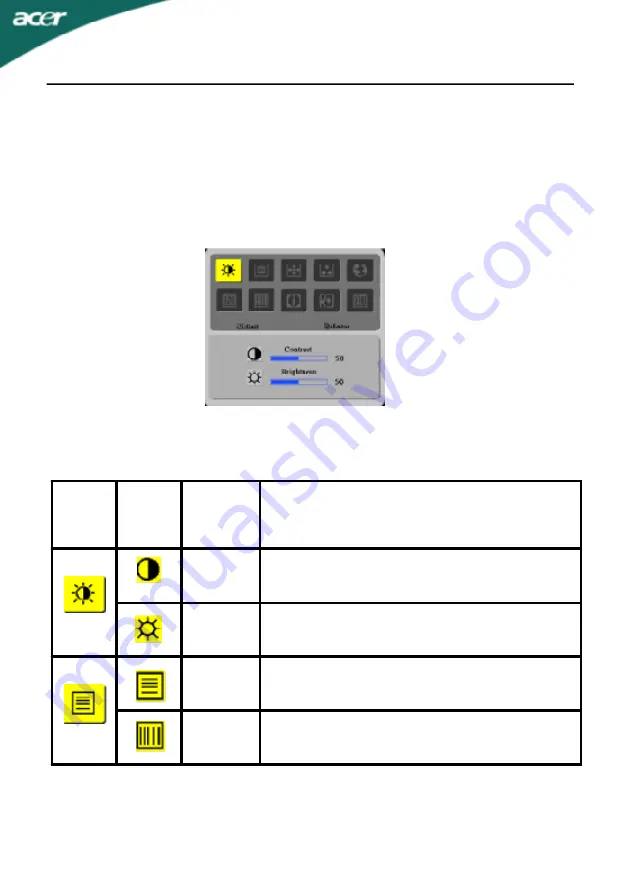
Contrast

Adjusts the contrast between the foreground and
background of the screen image.

Brightness

Adjusts the background brightness of the screen
image.

Focus

Adjusts picture Focus

Clock

Adjusts picture Clock

HOW TO ADJUST A SETTING

1. Press the MENU-button  to activate the OSD window.
2. Press < or  > to select the desired function.
3. Press the MENU-button  to select the function that you want to adjust.
4. Press < or  > to change the settings of the current function.
5. To exit and save, select the exit function. If you want to adjust any other function, repeat
steps 2-4.

ADJUSTING THE PICTURE

The descriptions for function control LEDS

Содержание AL1502

Страница 1: ...Analog LCD Monitor AL1502 User s Manual ...

Страница 2: ...tures 2 Unpacking 3 Attaching Removing the base 4 Screen position adjustment 4 Connecting the power cord 5 Safety precaution 5 Cleaning your monitor 5 Preset modes 6 Power saving 7 DDC 7 Installation 8 User controls 9 Troubleshooting 13 Specification 14 TABLE OF CONTENTS ...

Страница 3: ...er Connect this equipment to an outlet on a circuit different from which the receiver is connected to Consult the dealer or an experienced radio TV technician for help Caution To comply with the limits for an FCC Class B computing device always use the shielded signal cable supplied with this unit Caution to the user The Federal Communications Commission warns the user that changes or modification...

Страница 4: ...Macintosh compatible color video cards The monitor is able to properly function even in case of upgrade video cards or software because of the wide auto scanning compatibility range without requiring to buy a new monitor The internal microprocessor digitally controls auto scanning For horizontal scan frequencies between 30 KHz and 61 KHz and vertical scan frequencies between 55 Hz and 76 Hz In eac...

Страница 5: ...AL1502 E 3 LCD Monitor UNPACKING Please check the following items are present when you unpack the box and save the packing materials in case you will need to ship or transport the monitor in future ...

Страница 6: ...e monitor as shown in the figure below The monitor can be adjusted to 30 degrees up or 5 degrees down as indicated by arrow below Attaching Removing the Base Install Align the four hooks on the bottom of the monitor with the corresponding slots on the bottom of the base Remove Depress the hook as indicated first before removing the base and follow the arrow direction to remove it ...

Страница 7: ...UTION Avoid placing the monitor or any other heavy object on the power cord to avoid damage to the cable Do not expose the monitor to rain excessive moisture or dust Do not cover the ventilation slots or openings of the monitor Always put the monitor in a place where there is adequate ventilation Avoid placing the monitor against a bright background or where sunlight or other light sources may ref...

Страница 8: ... difference for horizontal frequency or 1 Hz for vertical frequency or the sync signal polarities are different from the default modes Mode Resolution H Freq KHz Band Width MHz Polarity H V 1 VGA 720 x 350 70 Hz 31 47 28 322 2 VGA 720 x 400 70 Hz 31 47 28 322 3 VGA 640 x 480 56 Hz 24 83 21 053 4 VGA 640 x 480 60 Hz 31 47 25 175 5 MAC 640 x 480 66 Hz 35 00 32 24 6 VESA 640 x 480 72 Hz 37 86 31 5 7 ...

Страница 9: ... fromActive OFF state back to ON state is around 3 seconds DDC To make your installation easier the monitor is able to Plug and Play with your system if your system also supports DDC protocol The DDC Display Data Channel is a communication protocol through which the monitor automatically informs the host system about its capabilities for example supported resolutions and corresponding timing The m...

Страница 10: ...video cable to the computer 2 Connect power cord Connect the power cord to the monitor then to a properly grounded AC outlet 3 Connect the Audio Cable 4 Power ON Monitor and Computer Power ON the monitor first then power ON the computer This sequence is very important 5 If the monitor still does not function properly please refer to the troubleshooting section to diagnose the problem Please don t ...

Страница 11: ...n The Auto Adjustment function is used to set the HPos VPos Clock and Focus 4 Volume Activates the volume control when the OSD is OFF or navigate through adjustment icons when OSD is ON or adjust a function when function is activated 5 Volume Activates the volume control when the OSD is OFF or navigate through adjustment icons when OSD is ON or adjust a function when function is activated 6 MENU E...

Страница 12: ...e Focus Clock Adjusts picture Clock HOW TO ADJUST A SETTING 1 Press the MENU button to activate the OSD window 2 Press or to select the desired function 3 Press the MENU button to select the function that you want to adjust 4 Press or to change the settings of the current function 5 To exit and save select the exit function If you want to adjust any other function repeat steps 2 4 ADJUSTING THE PI...

Страница 13: ...ition V Position Adjust the vertical position N A Warm Set the color temperature to warm white N A Cool Set the color temperature to cool white User Red Adjusts Red Green Blue intensity User Green User Blue N A English Multi language selection N A N A Deutsch N A Francais N A Espanol N A Italiano N A N A ...

Страница 14: ...l position of the OSD OSD Timeout Adjust the OSD timeout N A Auto Config Auto Adjust the H V Position Focus and Clock of picture N A Information Show the resolution H V frequency and input port of current iput timing N A Reset Clear each old status of Auto configuraation and set the color temperature to Cool N A Exit Save user adjustment and OSD disappear ...

Страница 15: ...cture Check if the specification of graphics adapter and monitor is in compliance which may be causing the input signal frequency mismatch Display is missing center shift or too small or too large in display size Using OSD adjust RESOLUTION CLOCK CLOCK PHASE H POSITION and V POSITION with non standard signals Using OSD in case of missing full screen image please select other resolution or other ve...

Страница 16: ...sponse time 25 ms Video R G B Analog Interface H Frequency 30KHz 61KHz V Frequency 55 76Hz Display Colors 16 2M Colors Dot Clock 80MHz Max Resolution 1024 x 768 75Hz Plug Play VESA DDC DDC2B EPA ENERGY STAR ON Mode 30W OFF Mode 3W Input Connector D Sub 15pin Input Video Signal Analog 0 7Vp p standard 75 OHM Positive Maximum Screen Size Horizontal 304 1mm Vertical 228 1mm Power Source 100 240VAC 47...

Страница 17: ...Unit net External Controls Switch Auto Adjust Key Volume Volume Power Button MENU Exit Functions Contrast Brightness Focus Clock H Position V Position Language Auto configuration Warm Color Cool Color RGB Color temperature Reset OSD position timeout Display information Exit Power Consumption Maximum 30 Watts Audio Output Rated Power 1 5W rms Per channel Regulatory Compliance CUL FCC VCCI CCC MPR I...

Отзывы: