background image

5


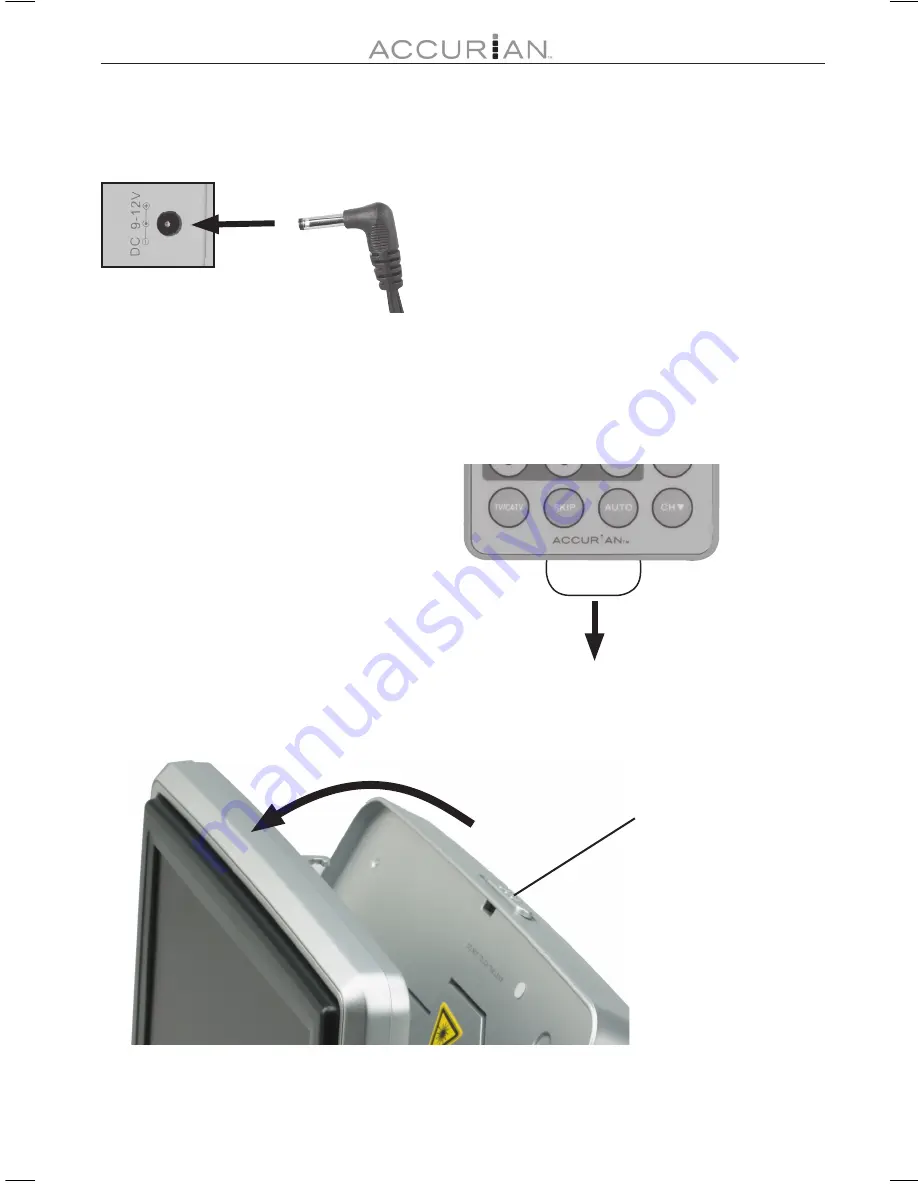
Plug in vehicle power adapter to the DVD player / 
monitor.


Slide latch, and pull the DVD player open. Then place 
disc inside graphic side facing toward you.


Turn on both player and monitor and click the OK 
button on the front of the DVD player.


Your remote control comes with a battery already 
installed. Pull the plastic tab out of the battery 
compartment to begin using the remote.

Using an adapter that was 
not included may not meet 
the player’s specifications 
and could damage the 
player or the adapter. 
For more information on 
supplying power to your 
player, see page 17.

For a complete description 
of your remote’s features 
see page 10 -11.

Vehicle Power 
Adapter

Remote 
control

NOTE:

CAUTION!

Stop movie and 
turn off DVD player 
before turning off 
your vehicle. 

NOTE:

Slide latch to 
the left

Содержание APD-3911

Страница 1: ...D Player 7 inch Dual Screen Portable DVD Player APD 3911 What s Included Please read this user s guide before installing setting up or using your new product remote AC adapter mini DIN cable carrying bag vehicle adapter user s guide video cable monitor Quick Start p 4 DVD player ...

Страница 2: ...g title time 13 DVD Player System Setup 14 Access and Change System Settings 14 System Setup 14 Language Setup 15 Video Setup 15 Password Setup 15 Default Setup 16 Frequently Asked Questions FAQ 16 Why won t my disc play 16 What is region encoding 17 Can I play MP3 or picture discs 17 What if Appears 17 Why won t the player turn on 17 Why is there no picture or the picture jumps 18 Why is there no...

Страница 3: ...3 ...

Страница 4: ...e page 6 11 Or Install straps by inserting straps into holes on back of DVD player and monitor Then loop the strap back through the buckle Install in vehicle over seats as shown Plug the Mini DIN cable into both the DVD player and the monitor Make sure all equipment and the cables are installed safely Mini DIN Cable NOTE Pull out stand to prop the DVD player for use outside of vehicle ...

Страница 5: ...installed Pull the plastic tab out of the battery compartment to begin using the remote Using an adapter that was not included may not meet the player s specifications and could damage the player or the adapter For more information on supplying power to your player see page 17 For a complete description of your remote s features see page 10 11 Vehicle Power Adapter Remote control NOTE CAUTION Stop ...

Страница 6: ... when you press ENTER Press STOP twice for Full Stop Playback starts at the beginning when you press ENTER NEXT Skip to the next chapter or track WIDE Switch between the 16 9 and 4 3 display size ratio OK Play a disc Arrows Scroll through menu choices Front Headphone jacks Left Side Insert one or two sets of headphones for private listening Insert in headphone jack 1 to mute sound Front ...

Страница 7: ...ble to play to additional monitors or receive input from additional devices optional MONITOR Insert the mini DIN cable to play to the other monitor included You can also play to additional monitors or receive input from additional devices not included Out In Select either DVD output from the built in player or to receive input from other devices Power Insert either the A C adapter or the car power...

Страница 8: ... included Front SELECT Switch between the video 1 and video 2 input VOLUME Adjust the sound volume ON 1OFF Picture Select to adjust the picture brightness contrast color and tint Use the and buttons to adjust the setting WIDE Switch between the 16 9 and 4 3 display size ratio Front ...

Страница 9: ...mini DIN cable to receive input from the DVD player included Or receive input from additional devices not included Right Side Power Insert an A C adapter or a car power adapter for use with additional equipment not included MONITOR PORT Insert the mini DIN cable to receive input from the DVD player included Or receive input from additional devices not included Bottom Right Side ...

Страница 10: ...ks MENU DVD menus vary according to how each DVD disc is formatted and is separate from the DVD player s features SKIP Press SKIP to hide or activate a channel by selecting between Skip Mode ON and Skip Mode OFF SETUP Access the SETUP menu screen TV CATV Switch between DVD playback and television mode AUTO When setting up for TV search for channels automatically STOP Stop playback Angle Mark Press...

Страница 11: ...acing the Battery in your Remote Control Press the tab on the battery compartment tray slide the battery compartment tray out and insert a new battery plus side up Slide the tray back into the battery compartment until it clicks Battery Notes Keep button cell batteries away from children Swallowing a button cell battery can be fatal Dispose of the old battery promptly and properly Do not burn or b...

Страница 12: ... 1 3 CH 2 23 Ì 00 02 04 Press Display again to show the following menu options Current language and subtitle information 1 6 ENG 5 1 CH 5 12 CH 1 OFF Current title number Total number of titles Current chapter number Total number of chapters Elapsed play time for the title Current number of audio languages total number of audio languages Current audio language Audio channel mode Current subtitle l...

Страница 13: ...music CD time related information in sequence in the last column Elapsed chapter time ß TT 1 3 CH 2 23 Ì 00 02 04 Remaining chapter time ß TT 1 3 CH 2 23 C 00 00 39 Elapsed title time ß TT 1 3 CH 2 23 T 00 19 39 Remaining title time ß TT 1 3 CH 2 23 T 01 00 13 ...

Страница 14: ... select System Setup Screen Saver On Off When enabled the DVD player will go into Screen Saver mode after five minutes Angle Mark On Off If enabled the angle mark icon will display in the Display menu if different angles are available on a disc The different angles are accessed by selecting Angle on the remote TV Display 4 3 Pan Scan When wide screen video material is played in this mode the right ...

Страница 15: ...e on a DVD Select from the following subtitle languages English player default French Spanish German and Japanese Menu Language The DVD menu displays in the default language automatically if available on a DVD Select from the following DVD disc menu languages English player default French Spanish German and Japanese These settings are DVD disc specific and may not be available on all discs Video Se...

Страница 16: ...formed inside the unit due to a sudden change in temperature Wait about an hour for it to clear and try again Check the back of the DVD box to see if it states that the DVD is for PC DVDs Not all DVD players can play PC DVDs There are some DVDs that can read CD X formats as well as CD R and CD Extra Do not use irregularly shaped discs such as heart or star shaped discs as they may cause the DVD pl...

Страница 17: ...land Mexico and Central and South America Region 5 Africa Russia and rest of Asia Region 6 China Can I play MP3 or picture discs Yes you can play DVDs MP3 discs and many picture discs What if Appears The feature or action cannot be completed because The disc s software restricts it The disc s software does not support that feature for example angles The feature is not available at the moment You h...

Страница 18: ...e volume may be low If you have headphones plugged into headphone jack 1 on the DVD player the sound mutes Unplug the headphones How do I connect to additional hardware You can connect the DVD player to a TV not included 1 Connect one end of the supplied A V cable s stereo plug into the DVD player s A V OUTPUT jack 2 Connect the other end to the AUDIO INPUT and VIDEO INPUT jacks on your TV white l...

Страница 19: ...typical individual units might vary Specifications are subject to change and improvement without notice Actual product may vary from the product images in this document Region Management Information This DVD player is designed and manufactured to respond to the region management information that is recorded on a DVD The region number of this DVD player is 1 USA CANADA If the region local number of ...

Страница 20: ...not occur in a particular installation If this equipment does cause harmful interference to radio or television reception which can be determined by turning the equipment off and on the user is encouraged to try to correct the interference by one or more of the following measures Reorient or relocate the receiving antenna Increase the separation between the equipment Connect the equipment to an out...

Отзывы: