Advanced Reference Guide
EtherHub 1500 System
10
11
Threshold Menu
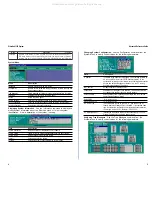
Select the Threshold command from the menu bar to define limits for the
parameters monitored by the hub system. Limits can be set for the System
(entire stack), Any Hub or Any Port, or a Select Hub or Select Port. Variables to
monitor include frames, bytes, collisions, frame allignment errors, CRC errors
or total errors. High and low watermarks may be set. While the trigger action
includes warning, warning and isolate (for hubs), or warning and disable (for
ports). When any threshold is exceeded, the agent will issue an alarm to the
network management station based on the selected action.
To set thresholds:
1. Open the Threshold dialog box from the menu bar.
2. Select the system component (Type: System, Any Hub, Any Port, Select Hub,
Select Port). If you choose Select Hub or Select Port, then choose the Hub
ID or Port ID using the <F2> function key.
3. Select the variable to monitor (Variable: Frames, Bytes, Collisions,
Allignments, CRCs or Total Errors). If you choose Select Hub or Select Port,
then choose the variable Type using the <F2> function key.
4. Input an integer value for the low and high watermarks.
5. Select the appropriate action (Action: INACTIVE, WARNING, WARNING &
ISOLATE for hubs, or WARNING & DISABLE for ports).
6. Implement your settings by pressing the <F3> function key.
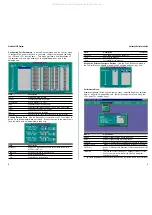
Threshold Parameters
- Hub/Port parameters include the following items:
Parameter
Description
Frame
The total number of frames.
Bytes
The total number of bytes.
Collisions
Multiple packets transmitted over a medium at the same time, making them
unintelligible.
Alignments
Frame alignment errors occur when the received frame is a multiple of 8 bits.
CRCs
This error occurs when the cyclic redundancy check for a frame is wrong.
(The cyclic redundancy check an error-checking algorithm used to indicate
frame reception errors.)
Total Errors
The total number of collisions, frame alignment errors and CRC errors.
Event Activation
- After initial event activation (crossing the high watermark),
the monitored variable must reach the low watermark before another event is
activated (again crossing the high watermark).
T: triggered N: not triggered
Notes
: 1. The rate for all values is per one second.
2. Threshold entries are stored in the agent.
Troubleshooting
Refer to the Quick Installation Guide for a more detailed listing of troubleshooting
procedures. However, if you have trouble making a connection via SNMP
network management software, then please refer to the following section.
Network Management Access
You can access the EtherHub-16mi
+
from anywhere within the attached
network. However, you must first configure it with a valid IP address, subnet
mask, and default gateway. If you have trouble establishing a link to the SNMP
agent (with network management software such as AccView/Open), check to
see if you have a valid network connection. Then verify that you entered the
correct IP address from your location. Also, be sure the port through which
you are connecting to the hub has not been disabled. (See the Control Menu
on page 7.) If it has not been disabled, then check the network cabling that
runs between your management site and the stack.
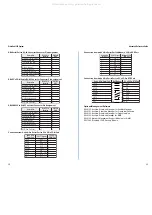
Pin Assignments for Serial Port Connections
DB9 Serial Port Pin Description
The DB9 serial port on the back panel is used to connect the hub to a
management device. The configuration program can be accessed from a PC,
or from a remote location via a modem connection. You can use the
management port to configure port settings (e.g., enabled or disabled), or to
update device firmware. The pin assignments used to connect various device
types to the hub's management port are provided in the following tables.
DB9 Port Pin Assignments
A
I
E
ti
u
c
ri
C
T
T
I
C
C
la
n
g
i
S
n
o
it
p
ir
c
s
e
D
s'
b
u
H
E
T
D
9
B
D
#
n
i
P
9
B
D
C
P
E
T
D
#
n
i
P
m
e
d
o
M
E
C
D
5
2
B
D
#
n
i
P
la
n
g
i
S
n
o
it
c
e
ri
D
E
C
D
-
E
T
D
F
C
9
0
1
D
C
D
)
d
et
c
et
e
D
r
ei
rr
a
C
at
a
D
(
1
1
8
--
--
--
--
-
<
B
B
4
0
1
D
x
R
)
at
a
D
d
e
vi
e
c
e
R
(
2
2
3
--
--
--
--
-
<
A
B
3
0
1
D
x
T
)
at
a
D
d
et
ti
m
s
n
a
r
T
(
3
3
2
>
--
--
--
--
-
D
C
2
.8
0
1
R
T
D
)
y
d
a
e
R
la
ni
m
r
e
T
at
a
D
(
4
4
0
2
>
--
--
--
--
-
B
A
2
0
1
G
S
)
d
n
u
o
r
G
la
n
gi
S
(
5
5
7
--
--
--
--
-
C
C
7
0
1
R
S
D
)
y
d
a
e
R
t
e
S
at
a
D
(
6
6
6
--
--
--
--
-
<
A
C
5
0
1
S
T
R
)
d
n
e
S
-
ot
-t
s
e
u
q
e
R
(
7
7
4
>
--
--
--
--
-
B
C
6
0
1
S
T
C
)
d
n
e
S
-
ot
-r
a
el
C
(
8
8
5
--
--
--
--
-
<
E
C
5
2
1
I
R
)r
ot
a
ci
d
nI
g
ni
R
(
9
9
2
2
--
--
--
--
-
<
1
9
T
N
T
H
L
All manuals and user guides at all-guides.com


