background image

English

4. Charging the battery 

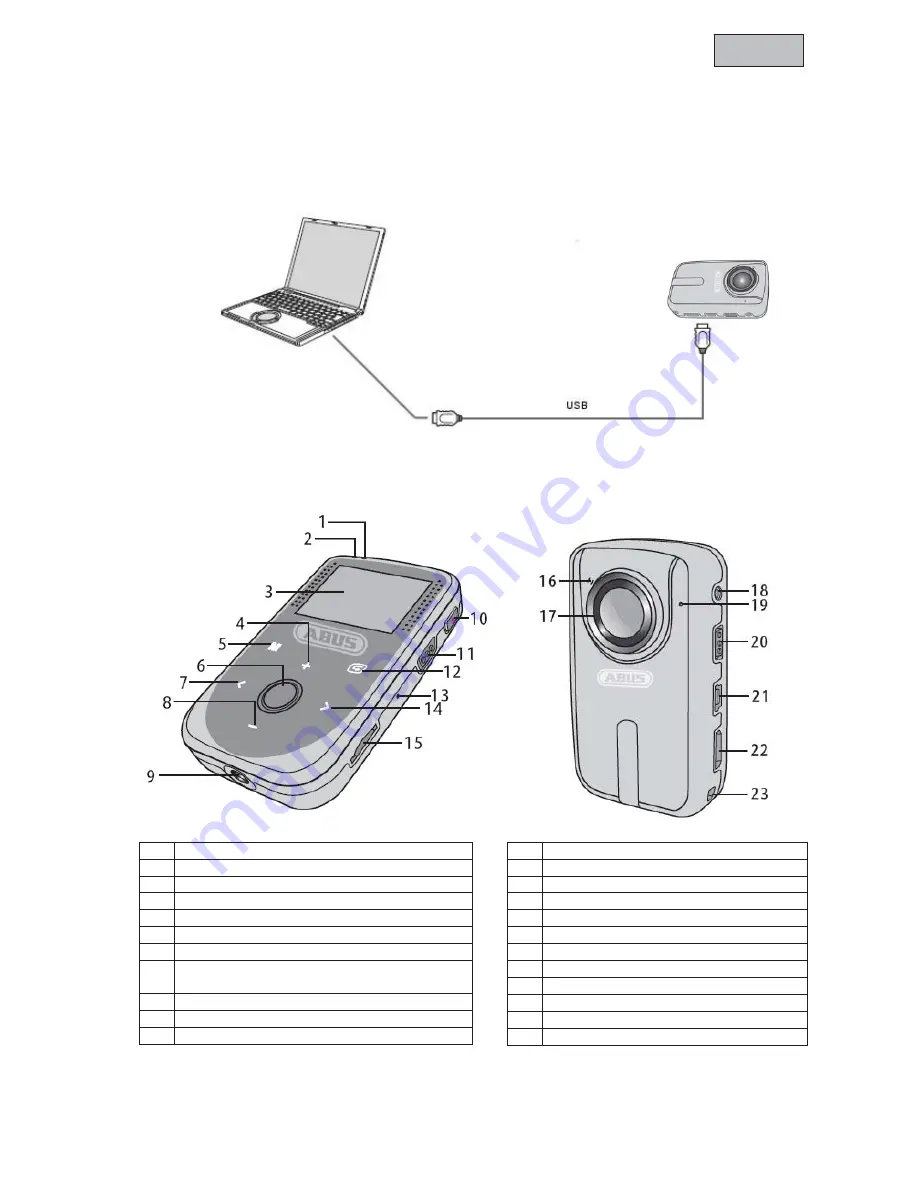
To charge the built-in battery, connect the camcorder to a PC or notebook with the USB cable supplied. 
You can also use other standard 5 V DC USB charging devices. When the battery is completely 
discharged, the charging time will take approx. 4 hours. 

The camcorder can record for approx. 3 hours once it is fully charged. 

5. Product overview 

1

Video status indicator* (green) 

2

Power status indicator* (red) 

3

Display 

4

To navigate up / zoom in / to increase sound 

5

Menu button 

6

OK/photo trigger / key lock 

7

To navigate to the left 

8

To navigate up / zoom out / to decrease 
sound 

9

Thread for stand 

10 

To start / stop video recording 

11 

VOX active / deactive 

12 

To navigate back / archive 

13 Reset 
14 

To navigate to the right 

15 

Micro SD card slot 

16 

Camera trigger status 

17 Camera 

lens 

18 AV 

output 

19 Microphone 
20

On / Off switch 

21 

Mini USB connection 

22 HDMI 

output 

23 

Eyelet for hand strap 

7

Содержание TVVR11000

Страница 1: ...TVVR11000 User Manual Version 12 2011 Original English user manual Keep for future use ...

Страница 2: ...ment are registered trademarks All rights reserved If you have any questions please contact your installer or your local dealer Disclaimer This user manual was prepared with greatest care If you should notice omissions or inaccuracies please inform us about these on the back of this manual given address The ABUS Security Center GmbH assumes no liability for technical and typographical faults and r...

Страница 3: ...are not sure of the type of power supplied to your home consult your local power company Disconnect the product from the mains before you start any maintenance or installation procedures 2 Overloading Do not overload a wall outlet extension cord or adapter as this may result in electric fire or shock 3 Liquids Setup the device only in dry and dust protected rooms Protect the device from any kind o...

Страница 4: ...product when it is out of order If you continue to use the product when defective serious damage can be caused to it Make sure to contact your local product distributor if the product is out of order During the installation into an existing video surveillance system make sure that all devices are disconnected from the low and supply voltage circuit If in doubt allow a professional electrician to m...

Страница 5: ...Resetting the hardware 8 6 Remote control 9 7 Using accessories 9 7 1 Clip holder for camera 9 7 2 Waterproof housing 9 7 3 Clip used with the waterproof housing 10 8 OSD menu settings 10 8 1 Inserting the micro SD card and switching on the camcorder 10 8 2 Basic settings 10 8 3 Photo camera settings 11 8 4 Video camera settings 11 9 Transferring data to media 12 10 Displaying films and photos on ...

Страница 6: ... guidelines During installation inform your customers of the existence of these guidelines 2 Scope of delivery 1x Camcorder 1x USB cable 1x Waterproof housing 1x AV cable 1x Remote control 1x Strap 1x Clip for camera 1x Allen key for housing 1x Clip for waterproof housing 1x Velcro fastener 1x Clip for remote control 1x Belt 1x Belt attachment for waterproof housing 1x Manual 3 Features and functi...

Страница 7: ...roduct overview 1 Video status indicator green 2 Power status indicator red 3 Display 4 To navigate up zoom in to increase sound 5 Menu button 6 OK photo trigger key lock 7 To navigate to the left 8 To navigate up zoom out to decrease sound 9 Thread for stand 10 To start stop video recording 11 VOX active deactive 12 To navigate back archive 13 Reset 14 To navigate to the right 15 Micro SD card sl...

Страница 8: ...vate the noise detection by pushing the VOX 11 switch from OFF to ON The camcorder records automatically for 2 minutes after detecting a single noise above 65dB If the noise level of a minimum of 65dB is exceeded again while recording the length of the recording is extended If the recording is not triggered again within 2 minutes the camcorder switches to standby mode and starts the next recording...

Страница 9: ... the OK button 2 On the remote control press the Start recording and Stop recording buttons at the same time for 4 seconds to finish the training Note x The distance between the remote control and camcorder can be approx 5 metres depending on the surroundings 7 Using accessories The camcorder can be attached to a person or an object using various clips or holders 7 1 Clip holder for camera TVVR110...

Страница 10: ...ngs use the Menu button 5 If you press this you will find all the settings for the camcorder Press the navigation button Right 14 to get to the camera settings Press the navigation button Right 14 once again to reach the setup settings There is another sign to indicate that you are in the setup settings in the top right corner of the screen Example for setting the time and date x To set this corre...

Страница 11: ... in the preview Date Time To set the data and the time 8 3 Photo camera settings Menu item Explanation Single Shot If this option is activated the device takes a single photo Tripple Shot If this option is activated the camera takes 3 photos when triggered once Here the device takes a photo every x seconds The number of seconds is also set here Continuous Self Shot Only one photo is taken after th...

Страница 12: ...xample at MEDIA E DCIM 100MEDIA 10 Displaying films and photos on playback devices You have several options to display your videos and photos x Mini HDMI cable The mini HDMI cable enables you to display videos and photos in full HD resolution on a television or a similar device which supports this resolution x AV cable The AV cable enables you to display both videos and photos and connect to vario...

Страница 13: ...n Automatic Battery operation 3 hours permanent recording Power supply 3 7 V DC Power consumption 350 mA Operating temperature 10 c to 60 c Humidity 15 to 85 Dimensions W x H x D 85 x 50 x 23 mm Weight 81g TVVR11000 remote control Wireless frequency 433 MHz Protection class IP 64 Operating temperature 10 C to 60 C Humidity 15 to 80 Dimensions W x H x D 25 x 31 x 16 mm Weight 26 5g 12 Disposal Devi...

Отзывы: