background image

*Specifications are subject to changes without notice.

9

SYSTEM CONNECTION

●  

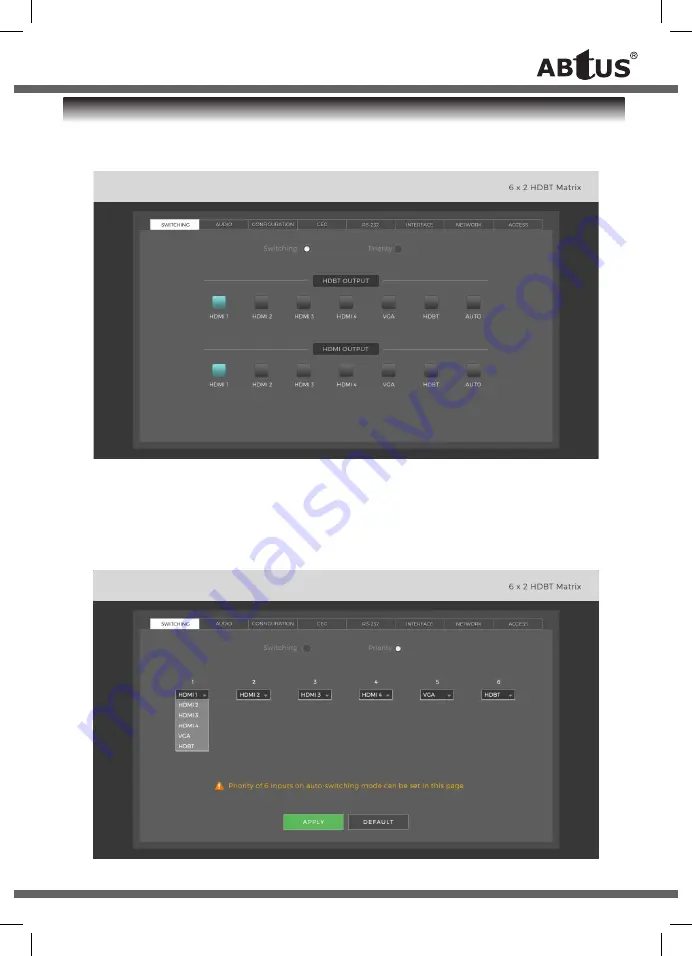
HDBT OUTPUT:

 Select an input source for HDBT output. Click 

AUTO

 to enable/disable auto 

  switching mode.

●  

HDMI OUTPUT:

 Select an input source for HDMI output. Click 

AUTO

 to enable/disable auto    

  switching mode.

●  Set the switching priority for auto switching mode.

Switching Tab

1.1 Signal Switching

1.2 Auto Switching Priority Setting

Содержание MAX-HDBT62MV/P

Страница 1: ...ABtUS SINGAPORE PTE LTD www abtussingapore com ABtUS SIGAPORE PTE LTD www abtussingapore com 4K HDBT 6x2 HDMI 2 0 Matrix Switcher Model MAX HDBT62MV P rev 2021 11Nov 24 ...

Страница 2: ...an switch its source via 5V or TMDS activity at the inputs The MAX HDBT62MV P can be controlled using different protocols such as Web GUI RS232 Ethernet IR and CEC Auto switching capability Supports HDMI Version 2 0 HDCP V2 2 compliant HDBT output supports transmission distance of up to 70m for 4k resolution HDBT output supports transmission distance of up to 100 m for 1080p resolution Uses global...

Страница 3: ...GA input selector HDBT input selector Auto switching mode selector 4 OUTPUT Two buttons with blue LED HDBT output selector HDMI output selector 5 VOLUME Press the volume knob in to toggle among AUDIO 1 and AUDIO 2 output audio control and the corresponding LED will illuminate blue Rotate the knob to increase or decrease the volume of the selected audio Press and hold the knob at least three second...

Страница 4: ...ommand It s de embedded from HDBT output by default AUDIO 2 Connects to audio playback device for audio de embedding The audio output can be de embedded from the HDBT or HDMI output selected via RS232 command It s de embedded from HDMI output by default 3 CONTROL TCP IP Connects to a control device e g PC to control the switcher by GUI RS232 Control Connects to the control device e g PC to control...

Страница 5: ...out notice 5 SYSTEM CONNECTION HDMI In HDMI In HDMI In HDMI In VGA In HDBT In HDMI Out Amplifier Speaker System IR HDBT Transmitter Central Control System Third Party Device LAN Control HDBT Out Audio Out Audio Out ABtUS MAX HDBT62MV P back view ...

Страница 6: ...ttings Note The AUTO LED illuminates blue when the HDMI output or HDBT output is in auto mode When in auto mode the switcher will switch according to the following rules The switcher will switch to the first available active input starting at input 1 to 6 by default The switching priority can be set by RS232 command and GUI New input The switcher will automatically select the new input once detect...

Страница 7: ... receiver to the SYSTEM IR port the switcher can be controlled by the following IR remote 1 Power on off the switcher 2 Select input source 3 Select output channel 4 Audio output control De embedded audio 1 control Mute Volume Down and Volume Up De embedded audio 2 control Mute Volume Down and Volume Up ...

Страница 8: ... 10 Subnet Mask 255 255 255 0 Type 192 168 1 10 in the internet browser it will enter the below log in webpage Default Username admin Default Password admin Type the user name and password and then click Login to enter the section for video switching User Operation Guide Specifications are subject to changes without notice ...

Страница 9: ...nput source for HDBT output Click AUTO to enable disable auto switching mode HDMI OUTPUT Select an input source for HDMI output Click AUTO to enable disable auto switching mode Set the switching priority for auto switching mode Switching Tab 1 1 Signal Switching 1 2 Auto Switching Priority Setting ...

Страница 10: ... 2 to be embedded in HDMI output Click once to select click again to deselect AUDIO DE EMBEDDEDING Select the HDBT output or HDMI output audio to be de embedded through Audio 1 output Select the HDBT output or HDMI output audio to be de embedded through Audio 2 output VOLUME Volume bar Volume down Volume up and Mute buttons User Operation Guide Specifications are subject to changes without notice ...

Страница 11: ... input source Upload user define EDID using the following steps Step 1 Prepare the EDID file bin on the control PC Step 2 Select the user defined option Step 3 Click the black box and then select the EDID file bin accordingly Step 4 Click APPLY to upload the user defined EDID SYSTEM CONNECTION 3 1 EDID Setting ...

Страница 12: ...n HDBT output downscaling is enabled Enable or disable HDMI output upscaling The 1080p input video can be upscaled to 4K output when HDMI output upscaling is enabled Select to enable disable PoC for HDBT output 3 2 Scaling Setting 3 3 PoC Setting User Operation Guide Specifications are subject to changes without notice ...

Страница 13: ... Specifications are subject to changes without notice 13 3 4 Fan Speed Setting OFF Turns off the built in fan of the matrix switcher LOW Sets the fan speed to low High Sets the fan speed to high ...

Страница 14: ...replace IR remote 1 Input Source Control Select the input source which needs to be controlled then press the desired function buttons Select the output display which needs to be controlled then press the desired function buttons 2 Output Display Control 4 CEC Tab User Operation Guide Specifications are subject to changes without notice ...

Страница 15: ...local third party device which is connected to the RS232 port of the switcher HDBT Out Send RS232 commands to remote device via HDBT Set the command format to HEX or ASCII Baud Rate Select the baud rate of the device Supported baud rates 9600 19200 38400 57600 and 115200 Command Ending NULL CR LF or CR LF can be chosen Command Type the desired command in this textbox to be sent ...

Страница 16: ...atrix switcher INPUT Modify the label of input sources OUTPUT Modify the label of outputs Select Static IP or Dynamic Host Configuration Protocol DHCP Modify the static IP Address Subnet Mask and Gateway if required User Operation Guide Specifications are subject to changes without notice ...

Страница 17: ... Specifications are subject to changes without notice 17 SYSTEM CONNECTION 8 Access Tab Credentials Modify the login password Version Shows the GUI and firmware version ...

Страница 18: ...vice e g PC to control the switcher by RS232 commands 2 Pass through control The RS232 Passthrough port is used with the RS232 port of far end HDBaseT receiver to control the third party device e g Projector RS232 commands can also be used to control the unit via TCP IP on port 23 RS232 Commands The command lists are used to control the switcher The RS232 control software e g docklight needs to be...

Страница 19: ...aram1 To param2 SetIP XXX XXX XXX XXX YYY YYY YYY YYY ZZZ ZZZ ZZZ ZZZ Set IP address XXX 0 255 IP ADDRESS YYY 0 255 MASK ZZZ 0 255 GATE SetIP 192 168 1 10 SetIP 192 168 1 10 255 255 255 0 192 168 0 1 GetIP Get the IP address IP 192 168 1 10 GetStatus Get the system status V1 0 0 Video OUT 01 02 IN 01 02 Audio OUT A01 A02 01 02 IN S01 S02 S00 S00 SetPower param Power on off the switcher SetPower pa...

Страница 20: ... screen FF OFF Black screen Outparam 01 02 Null 01 HDBT OUT 02 HDMI OUT Null All outputs SetVideo 01 To 01 SetVideo 01 Video OUT 01 IN 01 OUT 02 IN 02 GetVideo Get the current switching status Video OUT 01 IN 01 OUT 02 IN 02 SetAutoSwitch Outparam Staparam Set the auto switching mode Outparam 01 02 Null 01 HDBT OUT 02 HDMI OUT Null All outputs Staparam On Off On Auto switching mode Default Off Man...

Страница 21: ...S signal SetSignalDetectMode 5V SignalDetect 5V GetSignalDetectMode Get the detect mode of Auto switching GetSignalDetectMode SignalDetect 5V SavePreset Presetparam Staparam Save the current switching status to preset Presetparam 01 10 The number of preset Staparam FF Null FF Clear the preset Null Save the preset SavePreset 01 SavePreset 01 FF SavePreset 01 RecallPreset Presetparam Recall the pres...

Страница 22: ...ftware 9 3 Audio Setting Commands Command Description Command Example and Feedback SetAudioMute Audioparam Staparam Mute Unmute audio output Audioparam A01 A02 Null A01 Output AUDIO 1 A02 Output AUDIO 2 Null Output AUDIO 1 AUDIO 2 Staparam ON FF ON AUDIO OUTPUT DISABLE FF AUDIO NORMAL OUTPUT SetAudioMute A01 ON SetAudioMute A01 FF AudioMute A01 On AudioMute A02 On GetAudioMute Get the audio output...

Страница 23: ... the current audio switching status Audio OUT A01 IN S01 Audio OUT A02 IN S02 Audio OUT 01 IN A01 Audio OUT 02 IN A02 SetOutVOL Audioparam Volparam Set the audio volume Audioparam A01 A02 Null A01 Output AUDIO 1 A02 Output AUDIO 2 Null Output AUDIO 1 AUDIO 2 Volparam 0 60 Volume value SetOutVOL A01 60 OutVOL A01 60 OutVOL A02 60 GetOutVOL Get the output audio volume OutVOL OUT A01 A02 VOL 60 60 9 ...

Страница 24: ...et the EDID of input source EDID IN 01 02 03 04 STA 08 08 08 08 SetUpdateEDID EDIDparam Upgrade the user defined EDID EDIDparam 01 02 01 User defined 1 02 User defined 2 SetUpdateEDID 01 User edid 01 ready please send edid data in 10s SetHDCPMode param1 To param2 Set the HDCP mode of output param1 01 02 01 HDBT OUT 02 HDMI OUT Null All outputs param2 01 05 01 By Src 02 Force HDCP1 4 03 Force HDCP2...

Страница 25: ...aling param Enable Disable auto upscaling function of HDMI output param On Off On Enable Off Disable SetAutoUpScaling On AutoUpScaling On GetAutoUpScaling Get auto upscaling function of HDMI output AutoUpScaling On SetPoC param Enable Disable the PoC of HDBT output param On Off On Enable Off Disable SetPoC On HDBTOutPoC On GetPoC Get the PoC status of HDBT output HDBTOutPoC On 9 5 CEC Control Comm...

Страница 26: ...ecSrcMenu 01 CecSrcMenu 01 SetCecSrcUp Inparam Up arrow button for input source Inparam 01 05 01 HDMI IN1 02 HDMI IN2 03 HDMI IN3 04 HDMI IN4 05 HDBT IN SetCecSrcUp 01 CecSrcUp 01 SetCecSrcDown Inparam Down arrow button for input source Inparam 01 05 01 HDMI IN1 02 HDMI IN2 03 HDMI IN3 04 HDMI IN4 05 HDBT IN SetCecSrcDown 01 CecSrcDown 01 SetCecSrcLeft Inparam Left arrow button for input source In...

Страница 27: ...DMI IN4 05 HDBT IN SetCecSrcBack 01 CecSrcBack 01 SetCecSrcEnter Inparam Enter button for input source Inparam 01 05 01 HDMI IN1 02 HDMI IN2 03 HDMI IN3 04 HDMI IN4 05 HDBT IN SetCecSrcEnter 01 CecSrcEnter 01 SetCecSrcOn Inparam Power on the input source Inparam 01 05 01 HDMI IN1 02 HDMI IN2 03 HDMI IN3 04 HDMI IN4 05 HDBT IN SetCecSrcOn 01 CecSrcOn 01 SetCecSrcOff Inparam Power off the input sour...

Страница 28: ...N4 05 HDBT IN SetCecSrcPause 01 CecSrcPause 01 SetCecSrcPrev Inparam Previous button for the input source Inparam 01 05 01 HDMI IN1 02 HDMI IN2 03 HDMI IN3 04 HDMI IN4 05 HDBT IN SetCecSrcPrev 01 CecSrcPrev 01 SetCecSrcNext Inparam Next button for the input source Inparam 01 05 01 HDMI IN1 02 HDMI IN2 03 HDMI IN3 04 HDMI IN4 05 HDBT IN SetCecSrcNext 01 CecSrcNext 01 SetCecSrcRewind Inparam Rewind ...

Страница 29: ...m Power on the display device Outparam 01 02 01 HDBT OUT 02 HDMI OUT SetCecDisplayOn 01 CecDisplayOn 01 SetCecDisplayOff Outparam Power off the display device Outparam 01 02 01 HDBT OUT 02 HDMI OUT SetCecDisplayOff 01 CecDisplayOff 01 SetCecDisplaySource Outparam Switch the input source for display device Outparam 01 02 01 HDBT OUT 02 HDMI OUT SetCecDisplaySource 01 CecDisplaySource 01 SetCecDispl...

Страница 30: ... or to remote param1 01 02 01 Switcher RS232 control port 02 Remote param2 01 05 01 115200 02 57600 03 38400 04 19200 05 9600 xxxx ASCII string SendChar_01 01 abcdefg abcdefg SendChar_ param1 param2 xx xx Send HEX string to the switcher RS232 control port or to remote via HDBT param1 01 02 01 Switcher RS232 control port 02 Remote param2 01 05 01 115200 02 57600 03 38400 04 19200 05 9600 xx xx HEX ...

Страница 31: ...able 3 Power on the switcher and then the PC will automatically detect a U disk named of BOOTDISK 4 Double click the U disk a file named of READY TXT would be shown 5 Directly copy the latest upgrade file bin to the BOOTDISK U disk 6 Reopen the U disk to check the filename READY TXT whether automatically becomes SUCCESS TXT if yes the firmware was updated successfully otherwise the firmware updati...

Страница 32: ...y Response 20Hz to 20KHz 3dB Max Input Level 1 0Vrms 0 1 L R Level Deviation 0 3dB 1kHz sine at 0dBFS level or max level before clipping Input Impedance 10KΩ AUDIO OUTPUT Audio Output 2 AUDIO 1 2 Audio Output Connector 2 5 pin terminal blocks Frequency Response 20Hz to 20kHz 3dB Max Output Level 2 0 0 1Vrms THD N 0 1 20Hz to 20kHz bandwidth 1 kHz sine at 0dBFS level or max level SNR 80dB 20Hz to 2...

Страница 33: ...mm jacks GENERAL HDMI Version Up to 2 0 HDCP Version Up to 2 2 Bandwidth 18Gbps HDBT Transmission Distance 1080p 60Hz 100 meters 328 feet 4K 60Hz 70 meters 230 feet Operation Temperature 5 to 55 C 23 to 131 F Storage Temperature 25 to 70 C 13 to 158 F Relative Humidity 10 to 90 Non condensing External Power Supply Input AC 100 240V 50 60Hz Output 24V DC 2 71A Power Consumption 45W Max Dimension W ...

Отзывы: