background image


ABT 7100 

– Issue 02 

             7 


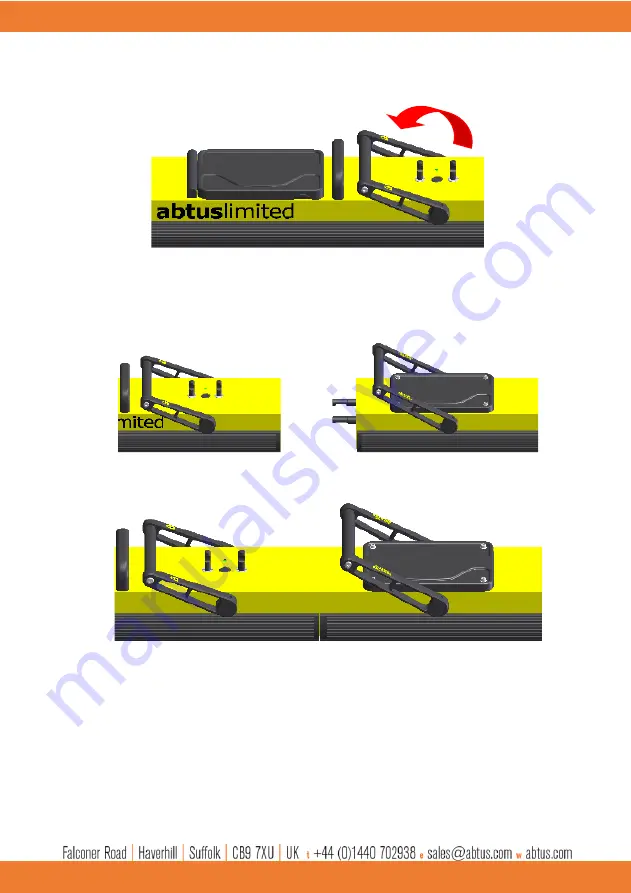
Position the locking lever towards the left as shown in Figure 3. 


Push the two halves together as shown in Figure 4 & Figure 5. 


Figure 3 - Initial Locking Position


Figure 4 - Joining of the Fixed & Rotating Halves


Figure 5 - Two Halves Together


Содержание ABT-7100

Страница 1: ...ABT 7100 Abtus Track Geometry Measurement Device Instruction Manual ...

Страница 2: ... Distance 14 6 5 GPS 14 7 0 Transportation and Storage 14 8 0 Software Introduction 15 8 1 Track Geometry Measurement Device Software 15 8 2 Initial Setup 15 9 0 Before going on track 15 9 1 Check Battery Levels 15 9 2 Check Wireless Connection 15 9 3 Before Each Use 16 9 4 Training and responsibilities 16 10 0 Step by Step Guide to Recording Geometry Measurements on Track 17 10 1 Tools 23 11 0 Tr...

Страница 3: ...f this manual 1 Right Side contains Gauge Retraction Lever A 2 Left Side contains 2x Removable 12V Lithium Ion Batteries B On Off Power Button C Locking Lever D 2 FZ G1 Panasonic Tablet User Manual Charger 3 FZ G1 Panasonic Tablet Holder 4 Battery Charger Accessories 5 TGMD Instruction Manual 6 Transit Bags L A R H 6 6 ...

Страница 4: ...on Track Bag 1 Bag 2 Length 1610 mm to 1700 mm Height 1000 mm Width 720 mm Length 850 mm Height 250 mm Width 450 mm Length 850 mm Height 250 mm Width 345 mm Operating Temperature 10 C to 50 C 4 F to 122 F Environmental Rating IP65 Assembled Battery Life TGMD 2x Lithium Ion Panasonic FZ G1 Tablet Up to 6 hours per battery Up to 11 hours Operating System Windows 64 bit Trolley Connectivity Wi Fi ...

Страница 5: ... Distance Cant SE Twist and Gauge in real time The data is saved as a csv file that you can open in excel Saved data and fault reports can be transferred from the tablet via a USB flash drive or via email The TGMD is designed with the following characteristics This product is used to accurately record Distance Cant SE Twist and Gauge Non conducting The trolley is insulated and therefore does not c...

Страница 6: ...ey are placed square push the wheel arm attachment screw inwards and start tightening the screw in clockwise direction using the knob When tightened there should be no gap between the two parts and they should be secure Repeat the same process for the right hand side wheel arm labelled R and the sprung end side of the trolley Figure 2 Figure 1 Attaching wheel arm to trolley Left side Figure 2 Atta...

Страница 7: ...ion the locking lever towards the left as shown in Figure 3 Push the two halves together as shown in Figure 4 Figure 5 Figure 3 Initial Locking Position Figure 4 Joining of the Fixed Rotating Halves Figure 5 Two Halves Together ...

Страница 8: ...l it firmly snaps into position Before attaching the handle ensure that the locking levers are positioned towards the plunger on the back of the handle block as shown in Figure 7Figure 7 Handle Rotation Plunger Orientation Indication Mark Figure 6 Locked Position Figure 7 Handle Locking Lever Position ...

Страница 9: ...ABT 7100 Issue 02 9 Attach the handle to the TGMD ensuring that the indication marks are aligned as shown in Figure 8 Figure 9 Handle Before Locked levers towards green dot Figure 8 Attaching the Handle ...

Страница 10: ...way from the indication mark green dot as shown in Figure 10 The TGMD comes with a tablet holder for the Panasonic FZ G1 as shown in Figure 11 which is spring loaded for ease of insertion and removal Figure 11 Panasonic FZ G1 Tablet and Holder Figure 10 Handle in its Locked Position ...

Страница 11: ...s been designed with the user in mind The trolley has a rotating handle to prevent the user having to lift and rotate the trolley on track The handle has three locking positions and a position has been added to allow the user to push the trolley in the cess or in areas of limited access To rotate the handle please see Figure 13 Figure 12 Short Double Socket Arm Figure 13 Handle Rotation ...

Страница 12: ...itch and crossing The trolley uses a spring to self align in the running rails the gauge is in its released position when the lever is towards the right as shown in Figure 14 The gauge is in its retracted position when the lever is towards the left as shown in Figure 15 Figure 14 Fully Extended Figure 15 Fully Retracted ...

Страница 13: ...arked with a calibration sticker inside of the battery compartment showing the next annual due date and must be returned to Abtus for annual calibration and maintenance If the trolley is used beyond the calibration due date the performance may be degraded If the equipment becomes defective or if it has an out of date calibration sticker a warning notice should be placed on the device to prevent fu...

Страница 14: ...imum limit on the number of measurements per recording for Gauge SE Twist 50 000 Recording Increment 0 1 0 2 0 25 0 5 1 0 m Accuracy 1 Resolution 10mm 6 5 GPS Accuracy 4 m In sunny clear sky conditions The GPS accuracy varies by time and location thus the user should wait 1 2 minutes to achieve the best accuracy 7 0 Transportation and Storage The TGMD must be transported inside its transportation ...

Страница 15: ...GMD contact Abtus for support 9 0 Before going on track 9 1 Check Battery Levels The TGMD has two removable batteries which are accessed from the lid in the top of the Measurement Device Press the battery indicator button to check the charge of the batteries and charge them if necessary Check the battery levels on the Panasonic FZ G1 Tablet 9 2 Check Wireless Connection Switch on the TGMD and Trac...

Страница 16: ... trolley Check all wheels for flats or grooves If any are found the trolley must be returned to Abtus as this can result in inaccuracies The safety brakes should be functioning correctly The brakes are applied to two of the wheels which can be tested by spinning the wheels and releasing the brake lever on the main handle ensuring that both wheels lock firmly 9 4 Training and responsibilities Only ...

Страница 17: ...on the windows tablet and click Geometry Profiles to set the tolerance parameters Figure 17 You can create a new profile by clicking on the Create New Profile which will open the window shown in Figure 18 Enter the required details and click OK to create the new geometry profile Figure 18 Creating new profile Figure 17 Chaining Geometry Profile ...

Страница 18: ...8 Figure 20 shows the newly Geometry Profile Pressing the Make profile active button will make this profile the active profile used in the succeeding recordings Figure 19 Profile settings Figure 20 Activating the profile ...

Страница 19: ...vel STEP 3 Connect the Windows device to the TGMD Turn on the TGMD and the Windows device Open the TGMD software to see the home screen Click Connect to Wi Fi in the top left corner of the screen The trolley begins to send real time data to the Windows device The Gauge Cant SE are displayed below the Connect to Wi Fi button but they are not recorded Figure 21 Connecting to TGMD ...

Страница 20: ...rding to open the window shown in Figure 23 Input the Operator name Input the Filename Click Start recording The other fields in the window are optional The Counting can be Up or Down depending on the direction of travel and will change the on screen position of the trolley when it is moved Figure 22 Setting the zero position Figure 23 New geometry recording settings ...

Страница 21: ...s which may happen during the recording by pressing the corresponding buttons on the right side of the screen as shown in Figure 24 TGMD software will record the position of the event and the type of event when such a button is pressed Pressing the Type in an event button will open a window as shown in Figure 23 where you are able to type a custom event name and add it to the recording When the re...

Страница 22: ... folder in the software directory C ABT7100 recordings where the user can access the csv reports Figure 27 shows an example of such a report The user is able to view the position at which faults such as Gauge and twist faults occurred where events were recorded as well as various other information An additional fault report is created at the location C ABT7100 faultReports after each geometry reco...

Страница 23: ...ABT 7100 Issue 02 23 10 1 Tools The Track gauge Super elevation and their limits of the track can be shown Figure 27 CSV Report Figure 28 Track Gauge ...

Страница 24: ...ABT 7100 Issue 02 24 The Twist can be shown along with whether it is within allowable limits shown by dotted horizontal blue and red lines Figure 29 Super Elevation Cant Figure 30 Twist Over 3 Meters ...

Страница 25: ...Wi Fi connection on the right side of the Windows taskbar that the device is connected to the trolley Wi Fi Try restarting the trolley and if problem persists try and restart the tablet app Check the connecting pins on the trolley for dust dirt or damage if no connection is being made Negative distance During a recording the current distance displayed is negative When measuring a Track Geometry fa...

Страница 26: ...tes but you can check by connecting the tablet to the internet Open up the TGMD software and click Help followed by Check for updates If an update is available a popup message will alert the user and ask if they would like to proceed with the update Figure 31 Check for updates button ...

Страница 27: ...TGMD meets the following requirements 2014 30 EU Conforms with the essential performance requirements of the Electromagnetic Compatibility Directive EMC Directive and it s amending directives Standard EN50121 4 2014 53 EU Conforms with the essential performance requirements of the Radio Equipment Directive RED Directive and it s amending directives Standard EN300 328 The TGMD also meets the follow...

Отзывы: