background image

Calculator and Calendar

1. Calculator

2. Calendar

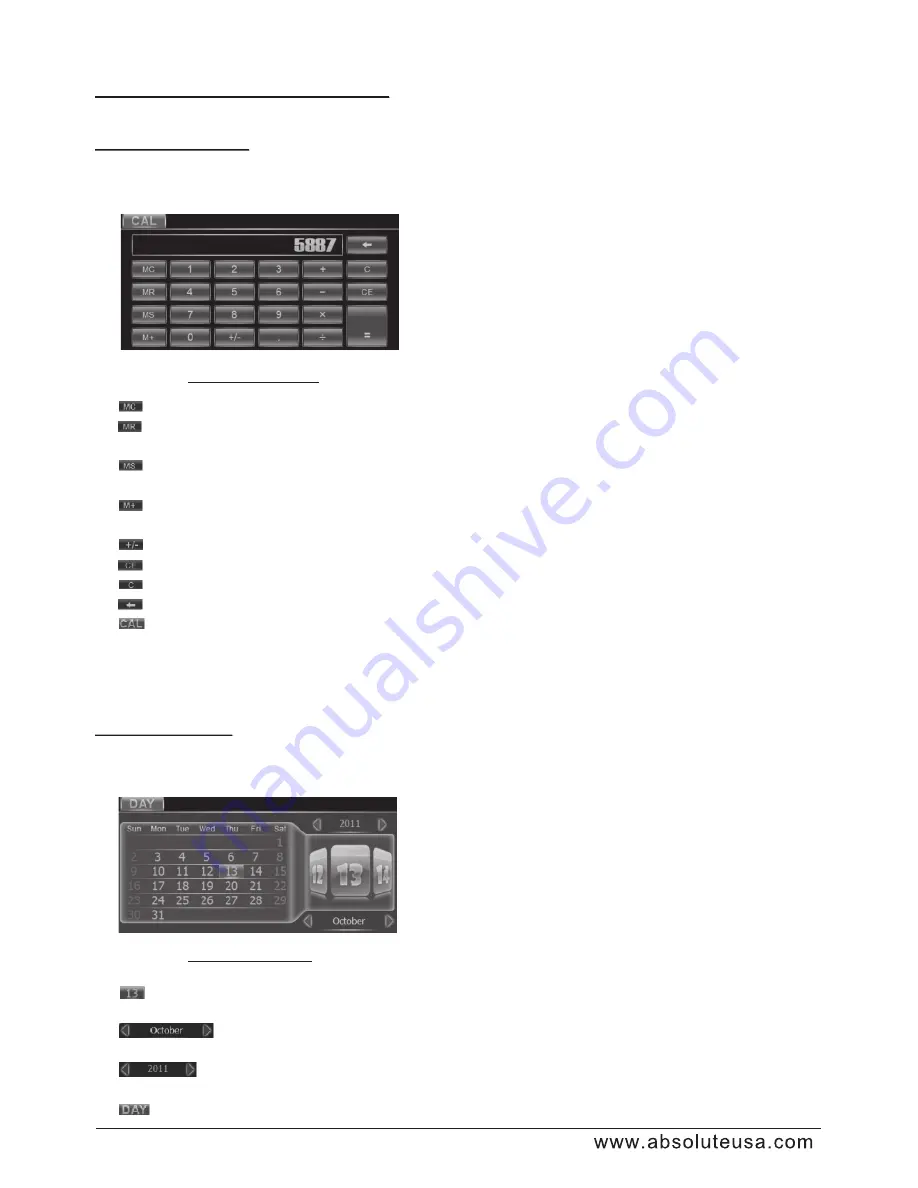
Touch CAL icon in source menu to pop up calculator interface as follows:

: to clear the number in the memory.
: to display the number in the memory as inputting a number during arithmetic

operation.

: to store the current displaying number in the memory and display M in the left

side of the display frame.

: to make the current displaying number and the number in the memory plused

and store it in the memory.

: to change the current displaying number into positive or negative one.
: to clear the current displaying number.
: to reset the calculator to zero.
: to clear the last input digit.
: to exit to source menu.

*

The memory can store only the last number.

Touch DAY icon in source menu to pop up calendar interface as follows:

: to select the desired date.

: to select the desired month.

: to select the desired year.

: to exit to source menu.

Calculator interface

Calendar interface

- 3-

4

Содержание AVH-9000NAV

Страница 1: ...etachable Control Panel Remote Control D Player Control Panel USB Port and AUX Input SD MMC Card Slot AM FM Tun B A2DP AVRCP igital Video Disc Digital PLL ing Radio Built in TV Tuner T compitable GPS Navigation System CAR AUDIO VIDEO SYSTEM USER MANUAL AVH 9000NAV ...

Страница 2: ...of procedures other than those specified herein may result in hazardous radiation exposure Do not open covers and do not repair yourself Refer servicing to qualified personnel This product incorporates copyright protection technology that is protected by U S patents and other intellectual property rights Use of this copyright protection technology must be authorized by Rovi Corporation and is inte...

Страница 3: ...c USB or card 2 Popping up Function Icons board 2 1 Function Icons board of Digital Video VCD MPEG4 Image MP3 WMA 2 2 CD interface 3 Function of controls on the touch screen main unit remote control Region Code Parental Control AUX IN operation Rear View Camera Operation of GPS module 1 GPS Navigation 2 MEDIA PHOTO VIEWER Media operation Photo operation Viewer operation Calculator and Calendar 1 C...

Страница 4: ...g all wires next page Hold the right side of the control panel to pull it upwards a little and then to you for r ing it 3 Remove the PLASTIC FRAME from the chassis see the Installation diagram 4 Insert the 2 KEY PLATES into the grooves at the both sides of the chassis till they click see the Installation diagram 5 Pulling the two KEY PLATES to remove the chassis from the 2 S Bracket H S Bracket H ...

Страница 5: ...GREEN GREEN BLACK REAR LCH SPK AUTO ANTENNA BLUE GROUND B MEMORY BACK UP B IGNITION SWITCH B RED YELLOW BLACK REAR RCH SPK FRONT LCH SPK CHOKE BOX RADIO ANTENNA JACK TV ANTENNA JACK WIRING DIAGRAM NOTE 1 Must use 4 ohms impedance of speakers 2 Before finishing wiring do not attach control panel onto chassis A 3 fter connecting parking Line video on screen of control panel will be displayed only af...

Страница 6: ...t it can work properly Installing according to installation diagram 1 Insert the chassis of the car multi media system into the liding ousing Use the metal strap to fix the rear part of chassis Uninstalling 1 Remove metal strap from 2 Remove plastic from Insert key plate into left and right side of and draw out of sliding housing left right 4 chassis the on next page S Bracket H 2 the chassis the ...

Страница 7: ...e PLASTIC TRIM OUT of the both sides away then insert the two KEY PLATE into left and right side of chassis as above illustration DASH BOARD METAL MOUNTING STRAP HEX NUT SPRING WASHER PLAIN WASHER TAPPING SCREW CONSOLE SLIDE BRACKET HOUSING HEX BOLT SCREWDRIVER TABS KEY PLATE PLASTIC FRAME KEY PLATE ...

Страница 8: ...e the old cell by a new one with polarity side upward as right 3 Insert the cell holder into remote control again as right 1 You should face the emitting window of remote control towards the sensor window of the unit 2 Operation angle for front panel About 30 degree 3 The distance between the emitting window of remote control and the sensor window of the unit 5M leakage may cause damage to remote ...

Страница 9: ...N MODE PAIR AUX IN JACK 2 USB PORT and COVER 3 SEL BUTTON and VOL KNOB 4 REL 5 IR SENSOR WINDOW 6 RESET 7 EJECT 8 POWER BUTTON 9 BAND BUTTON 10 MUTE 11 Disc Slot 12 or CH1 6 BUTTON 13 and BUTTONS 14 SD MMC CARD SLOT 15 LCD SREEN 16 OPEN MONITOR ANGLE BUTTON 17 MICROPHONE 18 GPS CARD SLOT BUTTON 6 14 18 2 3 4 5 7 9 1 11 10 8 12 13 16 15 17 ...

Страница 10: ...TON or FINE V or CH INT NUMBER 0 9 10 or 35 RPT BUTTON 26 BUTTON 27 BUTTON 28 BUTTON or CH ENTER 1 BUTTON 2 MU BUTTON 3 BUTTON 4 MONITOR ANGLE BUTTON 5 BUTTON 6 BUTTON 7 BUTTON 8 BUTTON 9 BUTTON 12 BUTTON 13 BUTTON 14 BUTTON 15 BUTTON POWER MODE TE HANG UP or REDIAL CALL or PAIR MENU or SW or SEARCH SUBTITLE or LO DX or FINE BAND or OSD or SKIP BUTTON A PS or TITLE PBC TOP VOL RDM 10 BUTTON 11 9 M...

Страница 11: ... IN and BT MUSIC p press non CD touch Function Icons board touch Function Icons board the display status of before entering Disc USB Card mode refer to Disc USB Card Operation ouch AUX or TV interface ouch the display status of before entering AUX or TV mode refer to AUX operation and TV operation or CD ouch or DISC the display status of the source menu before entering radio BT music or CD mode re...

Страница 12: ... BT MUSIC BT PHONE USB SD CARD TOOL MEDIA PHOTO VIEWER CAL DAY GAME MINE LINK FIVE CHESS BW CHESS MOLE Touching any place in the middle column and sliding leftwards or rightwards can make the sub icons move leftwards or rightwards and stay at your desired position Touch one icon in the source menu to enter one work source of RADIO DISC USB CARD TV AUX BT MUSIC and others The source menu displays a...

Страница 13: ...em to enter the setting item page The icons on the setting item page descript as follows to next page to previous page to the page that the setting item belongs to Setting Items to set the sub item to increase the value to decrease the value 1 SYSTEM SETTING 1 TV SYSTEM It is for setting the color system for TV 2 BT It is for switching BT mode ON or OFF 3 RESET SYSTEM It is for restoring all user ...

Страница 14: ...ting SWF frequency 5 LOUDNESS It is for setting LOUDNESS mode 6 SOUND EFFECT It is for setting EQ mode 7 TREBLE It is for setting the value of treble 8 BASS It is for setting the value of bass 9 FADE BAL After entering the sub item it displays as right Touching any place in the rectangle except the middle column sets the value of the balance touching any place in the middle column sets the value o...

Страница 15: ...is for setting GPS path to enter GPS navigation mode Please refer to the part of GPS navigation for detailed GPS path setting operatoin 5 TIME SETTING 1 HOUR SET It is for setting the hour of the clock time 2 MINUTE SET It is for setting the minute of the clock time 3 TIME FORMAT It is for setting the time format of the clock time BACKGROUND GPS PATH TIME 1 4 ...

Страница 16: ...ailable or sound is distorted press REL button to detach the control panel and remove it then use the sharp end of a pointed object to press RESET button to reset the program to ero detaching hold the right part of the control panel and pull it upwards a little and then to you it 3 4 immanent 1 RESET button s wrongly on the chassis face z 1 REL button To detach control panel press REL button on co...

Страница 17: ...etween bands of and M 2 and the word FM1 FM2 FM3 M 1 or M 2 will be displayed on screen 3 To search for a station 1 Long or icon can automatically search down for an available station beginning from the current frequency 2 Briefly or icon can manually search down for a your desired beginning from the current frequency 4 To preset and scan all memory stations APS 1 When long ing APS icon the radio ...

Страница 18: ... briefly pressing one of 6 number 1 6 buttons CH1 6 button 1 2 T with CH1 6 button highlight MO button MO DX button P LO DX button To preset a station in a memory bank with CH1 6 button first select a desired band then press CH1 6 button to select a desired memory bank and then search for a desired station finally long press CH1 6 button to store the station in the memory bank o listen to a preset...

Страница 19: ...s then press SKIP button or touch SKIP icon the screen will display SKIP the channel will be skipped for the CH CH buttons and icons TV Operation 1 To enter TV mode MODE button or TV icon When you use MODE button or enu tapping icon to enter TV mode TV t ing any place on touch screen can pop up TV interface as 2 To search and save TV SCAN T ing SCAN icon can search for all available s from the low...

Страница 20: ...evice named BC_HF_V03 as a handfree system for a BT enabled mobile phone p the BT enabled 1 Touch icon on BT PHONE interface in the BT PHONE part or long press PAIR button on remote control or on control panel to display logo then s device car BC_HF_V03 s i 8888 then BC_HF_V03 Confirm it then logo displays all the time finishing pairing and ing or the mobile phone plays music the controls on BT PH...

Страница 21: ...he middle of the top column of the BT PHONE interface touch icon or press button on control panel or press button on remote control touch icon or press button on control panel or on remote control phone touch icon or press or During phone of the car A V system change the phone audio to touch icon or on control panel or press button on remote control During phone talking using the mobile phone if y...

Страница 22: ...m your mobile phone T the car A V system so these icons on the BT MUSIC interface except MUSIC GPS MAP and their buttons on control panel or on remote control are available for audio video playback of your mobile phone during playback But n for icon and buttons and the function of resume playback after pausing or stopping is available only for some mobile phone to display BT to BT 2 When play is p...

Страница 23: ...up into disc slot it will automatically play 1 Handle a disc by its edge do not touch the surface of play side 2 Before inserting disc wipe the disc outwards from the disc center with a clean soft dry lint free cloth Do not use solvents thinner such as petrol benzine cleaner 3 After taking a disc out of disc slot put the disc inside disc case to keep it clean 4 Do not stick paper or tape on the di...

Страница 24: ...tap icon to pop up Function Icons board 2 as next page During MP3 WMA playback tapping any place except folder area track area and MP3 WMA Image MPEG4 icons can pop up Function Icons board 1 same as one of Digital Video VCD MPEG4 Image then tap icon to pop up Function Icons board 2 same as one of Digital Video VCD MPEG4 Image MP3 WMA ID3 To unload the card in card slot use STOP button to stop play...

Страница 25: ...EG4 Image MP3 WMA after loading disc USB card the screen will also display this interface above After a while it will disappear and display video or image or root menu Some the CD interface descript as follows icons on icons on 2 CD interface 2 MUTE icon MUTE button GPS icon refer to the part of the GPS operation MAP icon refer to the part of the GPS operation and icons VOL and VOL buttons VOL kno...

Страница 26: ...n media EG root menu as follows During MP3 WMA playback the root menu above displays all the time chapter on remote control or continuously and long pressing or button When displaying root menu use or button to highlight the current chapter track the current folder or the kind icons If there are no track for a kind icon you can t highlight the kind icon When highlighting a kind icon press ENTER bu...

Страница 27: ...abled track list is displayed on the monitor screen by pressing TITLE PBC button TITLE PBC button During D playback use TITLE PBC button to display title list then use direction buttons to select your desired title and then press ENTER button to open the chapter list of the title During VCD playback use TITLE PBC button to switch PBC mode on or off When PBC mode is switched on it will play from th...

Страница 28: ...D chapter track SN or elapsed time of current chapter track disabled for image When highlighting title SN or chapter track SN use buttons to input desired SN of title or chapter track then ENTER button to play the selected chapter track When highlighting elapsed time of current chapter track disabled for image use buttons to input desired playback time for Digital Video VCD and of the current chap...

Страница 29: ... TITL R P ALL and R P OFF icon and are For CD the ZOOM button is disabled 10 icon or igital Video MPEG4 Image MP3 WMA icon or 1 icon or igital Video touch icon or long press to E A TER E E E E touch icon or long press to E 1 Digital Video For MP3 WMA ZOOM button disabled VCD For CD OSD button is disabled During VCD PBC OFF CD playback RPT button switch repeat mode between R P R P ALL or OFF E REP ...

Страница 30: ...g INT button switches intro mode on or off For D MP3 WMA MPEG4 image INT button disabled button During D playback use button to switch between audio tracks depending on the current playing media 15 button During D playback button switch subtitle languages on or off depending on the current playing media 16 ANGLE button During D playback ANGLE button play in different angles depending on the curren...

Страница 31: ...edia Setup Menu has 4 pages in all When highlighting a page tap the aim page icon or press or button to highlight another page After selecting a page tapping the aim item icon or press or v button to highlight a setup item in the selected page After selecting a setup item tapping the aim value or press button to enter the setup item then press v or button to select a desired value finally press EN...

Страница 32: ...s ENTER button to confirm then it will unlock or lock parental control This setup item is for setting a new rating level of parental control 1 First highlight PASSWORD item to see whether parental control is locked or not If it is in locked mode unlock parental control referring to PASSWORD above 2 Highlight RATING item and press or ENTER button to enter it then use or v button to select your desi...

Страница 33: ...e of audio language depending on current playing media This item is for selecting the type of subtitle language depending on current playing media This item is for selecting the type of menu language depending on current playing media For adjusting brightness of video output For adjusting contrast of video output For adjusting hue of video output For adjusting saturation of video output For adjust...

Страница 34: ...adjusting linear compression ratio If you set it to FULL Peak to Peak value of audio signal is minimum if you set it to OFF Peak to Peak value is maximum DIGITAL SETUP DYNAMIC RANGE DYNAMIC RANGE DIGITAL SETUP E X I T 33 ...

Страница 35: ... of the t multi media s can The reason is that region codes of the multi media used each other igital Video igital Video igital Video igital Video igital Video igital Video igital Video igital Video igital Video igital Video impose this restriction has motivated the Basically a coded D player can play only the discs if its region code is the same D player Otherwise it cannot play the disc note tha...

Страница 36: ...c is higher than the one of the D player the D player cannot play the disc The D movie can be designed so that the D player can play different versions of content of a particular movie according to the different rating levels of parental control Depending on the scenes that are not suitable for children will be cleared or replaced by suitable scenes automatically The rating levels of Parental Cont...

Страница 37: ...d amplifier 1 Use an AV cable to make the car AV system and the AV system connected through of the car AV system and the AV Out of the AV system lay the AV system then use MODE button or to enter A IN mode icons on In A IN mode you can use SEL VOL MUTE EQ and LOUD buttons to adjust MUTE icon MUTE button E GPS icon refer to the part of the GPS operation MAP icon refer to the part of the GPS operati...

Страница 38: ... External iPod operation use the car AV system as monitor and amplifier 1 Use to make the car AV system and the connected through of the car AV system and the of the lay the then use MODE button to enter A IN mode icons on In A IN mode you can use SEL VOL MUTE EQ and LOUD buttons to adjust MUTE icon MUTE button E GPS icon refer to the part of the GPS operation MAP icon refer to the part of the GPS...

Страница 39: ...PUT jack in the rear cabinet of the car AV system and the VIDEO OUTPUT jack of the rear view camera 2 When you change the gear level to the back position the screen of the car AV system will display the actual status behind your car Note the external monitor can not display the actual status behind your car REAR VIEW CAMERA Make the REAR CAMERA SWITCH line in the rear cabinet of the car AV system ...

Страница 40: ... follows Label side facing upward to enter the card in the GPS card slot and select a desired executable navigation map program file generally the extension name of an executable navigation map program file is exe If touching the white rectangle for ticking it it will enter GPS mode automatically after resetting the unit or switching the ignition off and then power on the unit again If touching th...

Страница 41: ...llows to pause or resume playback and to play next or previous track chapter after selecting more than 2 tracks to mute or resume sound to enter full screen mode for MPEG4 or to pause or resume playback for audio and to increase or decrease volume level to enter the track chapter list of current MP3 WMA MPEG4 to exit to source menu Sreen except key board pause or resume playback progress tape touc...

Страница 42: ... photo interface again and display the photo of this file to zoom out the current photo to display the current photo with the scale of 1 1 to zoom in the current photo to display previous photo with the scale of 1 1 to display next photo with the scale of 1 1 to enter full screem mode to exit the photo interface to source menu After loading a GPS card with e book files its extention name are txt t...

Страница 43: ... the information interface of the current e book to viewer interface touch it to open the scroll speed list and then touch one of them to set it touch it to open the font size list and then touch one of them to set it to pop up the word color setting interface to pop up the background color setting interface to confirm the setting and exit to viewer interface to exit to view interface R slide bar ...

Страница 44: ...ake the current displaying number and the number in the memory plused and store it in the memory to change the current displaying number into positive or negative one to clear the current displaying number to reset the calculator to zero to clear the last input digit to exit to source menu The memory can store only the last number Touch DAY icon in source menu to pop up calendar interface as follo...

Страница 45: ...erface as above Touch FIVE CHESS icon in source menu to pop up FIVE CHESS game interface as follows Touch BW CHESS icon in source menu to pop up BW CHESS game interface as above Touch MOLE icon in source menu to pop up MOLE game interface as follows 5 MOLE MINE game interface LINK game interface FIVE CHESS game interface BW CHESS game interface MOLE game interface 4 4 ...

Страница 46: ...C Ensure that you have inserted a disc into the disc slot Check whether disc is inserted with label side upwards Check whether disc is bent Check whether disc is stained or scratched badly Ensure that disc format is compatible to the player Ensure that temperature inside the car is not too high If so cool off until the ambient temperature returns to normal Insert another disc into the disc slot RE...

Страница 47: ...dB JIS Wow and Flutter Below measurable limits Monitor Screen Size 7 Inch Wide Resolution 1440 X 234 dots Color System NTSC PAL Format TV System NTSC PAL SECAM TV Sensitivity 45dB V CH25 in average B specification V1 2 Class 2 B profile supporte Headset Handsfree and A2DP AVRCP profiles Range of frequency 2 4GHz Spectrum Specification and design are subject to modification without notice due to im...

Страница 48: ......

Страница 49: ......

Страница 50: ......

Страница 51: ......

Страница 52: ......

Страница 53: ......

Отзывы: