


EN
EN
P. 14 - P
. 15
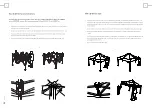
YOU ONLY HAVE TO FIT THE ROOF CANVAS ONCE, WHEN YOU SET UP THE TENT FOR THE FIRST TIME.
AFTER THAT, YOU CAN STOW THE TENT WITH THE ROOF ATTACHED.
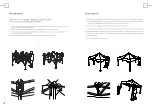
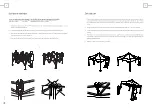
1. With two people, hold the centre of the scissor element on the short side of the frame and walk backwards until the pole in
the centre raises slightly.
2. Place the roof canvas over the frame so that the corners of the roof align with the corners of the frame.
3. Affix the roof canvas to each of the tent’s legs with the two strips of Velcro. Ensure that the PVC protective cap on the inside
of the roof is not doubled over.
4. Affix the point(s) of the roof to the pole(s) using the small cap inside the roof canvas.
Fitting the roof canvas
1.
3.
2.
4.
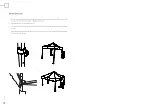
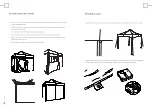
Setting up the tent
1. With two people, hold the centre of the scissor element on the short side of the frame and walk further backwards. Pull the
tent fully open. With the larger sizes (3 x 6, 4 x 6 and 4 x 8) it can sometimes be slightly more difficult to click the roof frame
together. In that case, it is advisable to push the tent upwards beneath the central pole(s).
2. Place your foot on the baseplate and push the roof frame for each leg up until it clicks into place.
3. Push the tension straps on the inside of the roof through the square opening and secure them. Tension the straps tightly.
4. With two people, lift one side of the tent up and pull on the pin near the bottom of the legs. Slide the legs out until you hear a
click. Do this either on one short side or one long side of the tent, but never with two diagonally opposite legs.
5. Repeat step 4 on the other side of the tent.
1.
3.
2.
4.


