background image


6

HARDWARE CONNECTION 

Note: Before you starting hardware connection, you are advised to find  an appropriate 
location to place the Access Point. Usually, the best place for the Access Point is at the 
center of your wireless network, with line of straight to all your wireless stations. Also, 
remember to adjust the antenna; usually the higher the antenna is placed, the better will 
the performance be.  
 

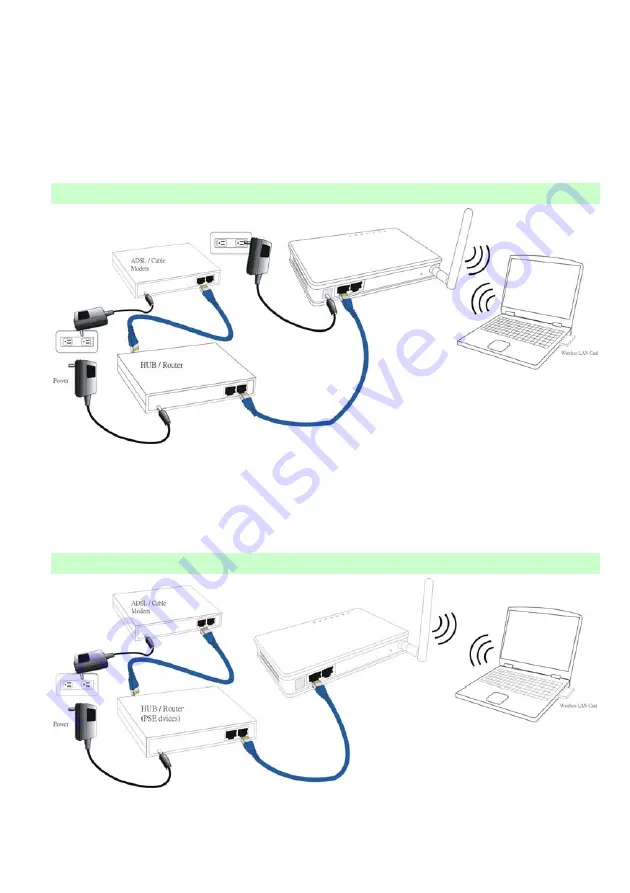
Connection of using the included Power adapter: 


1. 

Connect to your local area network:

 connect a 

Ethernet cable

 to one of the 

Ethernet

 port (LAN1 or LAN2) of this Wireless Access Point, and the other end to a 

hub, switch, router, or another wireless access point. 

2. 

Power on the device

: Connect the included AC power adapter to the Wireless Access 

Point’s power port and the other end to a wall outlet.


Connection of using PoE: 


The hardware connection is basically the same as using a power adapter to supply power 
to your wireless access point, except for a different power origin it gains. With PoE, your 

Содержание WAP257mnl

Страница 1: ...802 11 b g Access Point User s Guide...

Страница 2: ...r is connected Consult the dealer or an experienced radio TV technician for help CAUTION Any changes or modifications not expressly approved by the grantee of this device could void the user s authori...

Страница 3: ...CCESS POINT MODEUT 8 TUWDS REPEATER MODEUT 8 TU CLIENT MODE INFRASTRUCTURE UT 9 TU CLIENT MODE AD HOC UT 9 TUWDS BRIDGE MODEUT 9 TUConfigurationUT 10 TULOGINUT 10 TUSTATUSUT 11 TUSystemUT 11 TUStatist...

Страница 4: ...re double assured The web based management utility is provided for easy configuration that your wireless network connection is ensured to be always solid and hassle free Features Two LAN ports for Wir...

Страница 5: ...2 Application Example 1 Example 2...

Страница 6: ...vice N A 2 Status Red Turns solid red when the device is booting After booting successfully the light will be turned off Link Act Green Turns solid green when wireless interface is turned on Receiving...

Страница 7: ...2 Rear Panel Connection Ports Port button Functions A 12V DC Connects the power adapter plug B LAN2 PoE 48V Connects to Ethernet C LAN1 Connects to Ethernet D Factory RESET Press for less than 5 secon...

Страница 8: ...5 Factory Default Settings Setting Wireless Access Point Device Name Wireless AP SSID Default value 802 11g AP Channel 11 WEP Default value Disabled IP Address 192 168 1 254...

Страница 9: ...Connection of using the included Power adapter 1 Connect to your local area network connect a Ethernet cable to one of the Ethernet port LAN1 or LAN2 of this Wireless Access Point and the other end to...

Страница 10: ...N LED will even blink if there is traffic The Link Act LED will be on in static when wireless interface is turned on If the Status LED glows after self test it means this Wireless Access Point fails o...

Страница 11: ...acturer as described in the following sections Access Point Mode When acting as an access point this device connects all the stations PC notebook with wireless network adapter to a wired network All s...

Страница 12: ...kets from wired end to wireless interface You can share files and printers between wireless stations PC and laptop with wireless network adapter installed WDS Bridge Mode The WDS Wireless Distributed...

Страница 13: ...owing HTTP 192 168 1 254 The configuration menu is divided into four categories Status Wireless TCP IP and Other settings Click on the desired setup item to expand the page in the main navigation page...

Страница 14: ...de There are four modes supported Access Point Client Ad hoc and Infrastructure WDS Bridge and WDS repeater The default mode is Access Point If you want to change to bridge mode please go to Wireless...

Страница 15: ...he data throughput on the wireless link Associated Clients Displays the total number of clients associated to this AP You can have up to 64 clients to associate to this Access Point BSSID BSSID displa...

Страница 16: ...by so doing you won t be able to make wireless connection with this Access Point in the network you are located In other words this device will not be visible by any wireless station Band You can choo...

Страница 17: ...the channel range to have Wireless Access Point automatically survey and choose the channel with best situation for communication The number of channels supported depends on the region of this Access...

Страница 18: ...ntication key can join the network By default IEEE 802 11 wireless devices operate in an Open System network Wired Equivalent Privacy WEP data encryption is used when the wireless devices are configur...

Страница 19: ...on a suspect hidden station this station and its Access Point will use a Request to Send RTS The station will send an RTS to the Access Point informing that it is going to transmit the data Upon recei...

Страница 20: ...oisy network environment the performance will be decreased Broadcast SSID Select enabled to allow all the wireless stations to detect the SSID of this Access Point IAPP IAPP Inter Access Point Protoco...

Страница 21: ...s from being eavesdropped by unrelated people there may be a significant degradation of the data throughput on the wireless link Encryption None Encryption is set to None by default If Use 802 1x Auth...

Страница 22: ...TKIP If WPA is selected users will have to select the Authentication modes between Enterprise RADIUS and Personal Pre shared Key Pre shared Key Pre Shared Key serves as a password Users may key in a...

Страница 23: ...ted to the network Authentication RADIUS Server Port Enter the RADIUS Server s port number provided by your ISP The default is 1812 IP Address Enter the RADIUS Server s IP Address provided by your ISP...

Страница 24: ...You may enter up to 20 characters as a remark to the previous MAC Address Apply Changes Press to save the new settings on the screen Reset Press to discard the data you have entered since last time yo...

Страница 25: ...t Mask Enter the information provided by your system manager Default Gateway Enter the information provided by your system manager DHCP Select Disable Client or Server from the pull down menu Disable...

Страница 26: ...network when WDS is enabled and there are multiple active paths between stations S Clone MAC Address You can specify the MAC address of your Access Point to replace the factory setting Apply Change P...

Страница 27: ...ion page click on Other and click Upgrade Firmware to enter the Upgrade Firmware window Enter the new firmware s path and file name i e C FIRMWARE firmware bin Or click the Browse button find and open...

Страница 28: ...Save Settings to File Click SAVE to save the current configuration to file When prompted the upper left screen select Save this file to disk and the upper right screen will prompt you a dialog box to...

Страница 29: ...26 Reset Click to restore the default configuration U...

Страница 30: ...er of this Access Point New Password Set your new password Password can be up to 30 characters long Password can contain letter number and space It is case sensitive Confirm Password Re enter the new...

Страница 31: ...28 Enable Log Select System all or Wireless only Apply Changes Press to save the new settings on the screen Refresh Click to refresh the screen Clear Click to clear the current setting...

Отзывы: