background image

Introducing the BIOS 


User’s Manual 

3-5 

to use the CCMOS jumper to erase the parameters of the original CPU and to enter BIOS 
Setup to set up CPU parameters again. 

Attention 

After setting up the parameters and leaving the BIOS SETUP, and having verified that the system can 
be booted, do not press the Reset button or turn off the power supply. Otherwise the BIOS will not 
read correctly, the parameters will fail and you must enter 

SOFT MENU

 II

 again to set up the 

parameters all over again. 

CPU VCore Voltage: 

Two options are available: Std. Vcore 

(

 Raising. The default setting is 

Std. Vcore.

 You can changes the 

CPU Vcore voltage here. If you choose the 

Raising

, the CPU Vcore voltage will raising about 3% higher 

than the standard CPU Vcore voltage. This settings is for some compatibility issue, if you do not have any 
issue for that, please keep the default setting. 


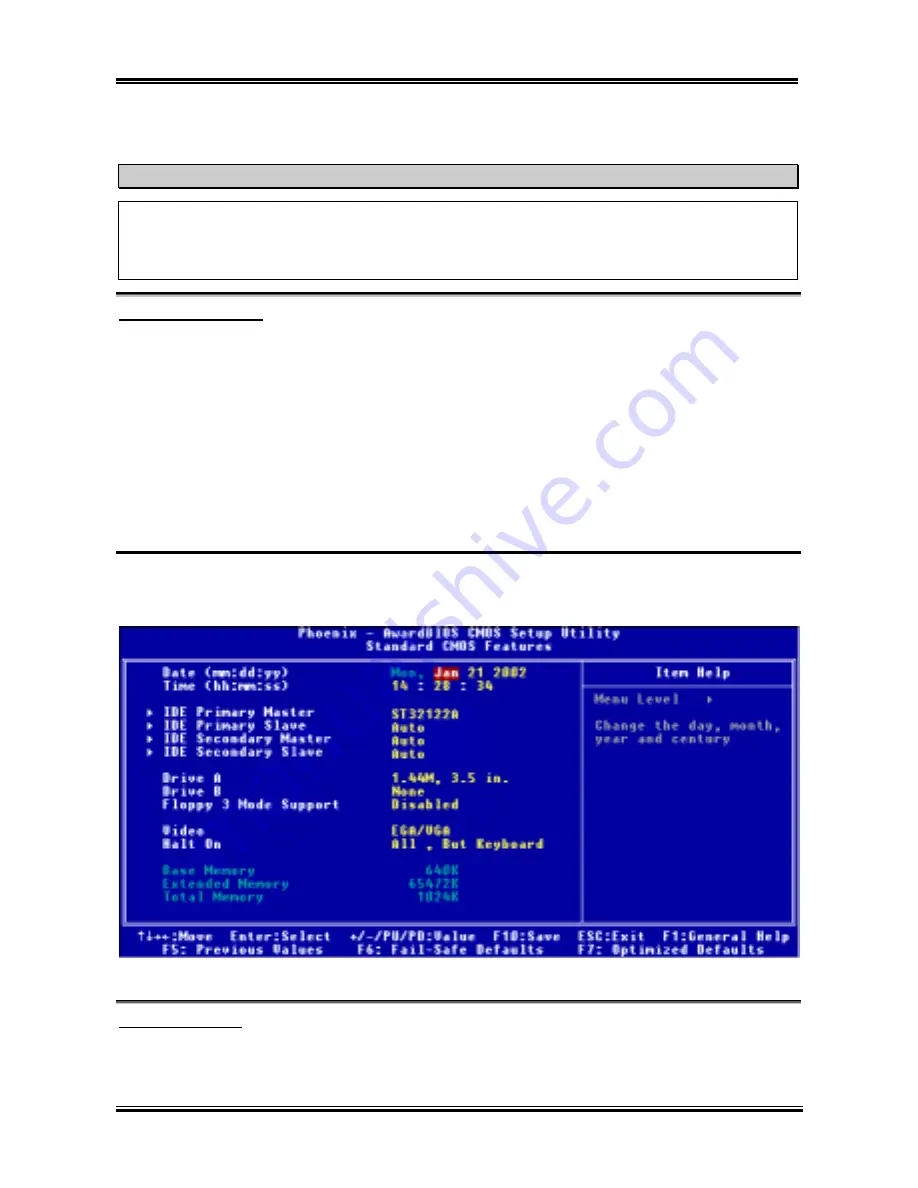
3-2.  Standard CMOS Features Setup Menu 

This contains the basic configuration parameters of the BIOS. These parameters include date, hour, VGA 
card, floppy disk and HDD settings. 


Figure 3-3A. Standard CMOS Setup Screen Shot 

Date (mm:dd:yy): 

You can set the date in this item: month (mm), date (dd) and year (yy). 

Содержание NV7-133R

Страница 1: ...cidental or consequential damages arising from any defect or error in this manual or product Product names appearing in this manual are for identification purpose only and trademarks and product names or brand names appearing in this document are the property of their respective owners This document contains materials protected under International Copyright Laws All rights reserved No part of this...

Страница 2: ......

Страница 3: ...ADVANCED BIOS FEATURES SETUP MENU 3 9 3 4 ADVANCED CHIPSET FEATURES SETUP MENU 3 12 3 5 INTEGRATED PERIPHERALS 3 14 3 6 POWER MANAGEMENT SETUP MENU 3 19 3 7 PNP PCI CONFIGURATIONS SETUP MENU 3 24 3 8 PC HEALTH STATUS 3 27 3 9 LOAD FAIL SAFE DEFAULTS 3 28 3 10 LOAD OPTIMIZED DEFAULTS 3 28 3 11 SET PASSWORD 3 28 3 12 SAVE EXIT SETUP 3 29 3 13 EXIT WITHOUT SAVING 3 29 CHAPTER 4 RAID SETTING GUIDE 4 1...

Страница 4: ...NV7 133R APPENDIX C USB 2 0 DRIVERS INSTALLATION FOR WINDOWS 2000 C 1 APPENDIX D BIOS UPDATE GUIDE D 1 APPENDIX E TROUBLESHOOTING NEED ASSISTANCE E 1 APPENDIX F HOW TO GET TECHNICAL SUPPORT F 1 ...

Страница 5: ...provides two IDE channels IDE3 IDE4 that also support Ultra DMA 133 specifications and it allows for four additional IDE devices in your computer system It can give you high performance and efficiency data transfer rate through the IDE channels This also means that your computer in total can connect up to eight IDE devices IDE1 IDE4 This allows for maximum expandability for future hardware demands...

Страница 6: ...ry Three 184 pin DIMM slots support PC 1600 and PC 2100 DDR SDRAM modules Supports up to 1 5 GB maximun memory capacity 64 128 256 512MB DDR SDRAM Supports unbuffered Non ECC type DDR DIMM 4 System BIOS SOFT MENU II technology can easily set the processor parameters Award Plug and Play BIOS supports APM and DMI Supports Advanced Configuration Power Interface ACPI Write Protect Anti Virus function ...

Страница 7: ... Supply must meet ATX 2 03 specification with ATX12V1 Power connector Your ATX power supply 5V standby power must be able to provide at least a 720mA current capacity PCI slot 3 shares IRQ signals with the HPT 372 IDE controller supports Ultra DMA 133 The driver for HPT 372 IDE controller supports IRQ sharing with other PCI devices But if you install a PCI card that doesn t allow IRQ sharing with ...

Страница 8: ...herboard Two 80 wire 40 pin ribbon cable for master and slave Ultra DMA 133 Ultra DMA 100 Ultra DMA 66 or Ultra DMA 33 IDE devices One ribbon cable for 3 5 floppy disk devices One compact disc for support drivers and utilities One USB cable For USB 2 0 used One user s manual for the motherboard One floppy disk of HPT 372 drivers One CA 20 back panel plate with cables One I O shield ...

Страница 9: ...Introduction of NV7 133R Features User s Manual 1 5 1 4 Layout Diagram for NV7 133R Figure 1 1 NV7 133R motherboard component location ...

Страница 10: ...Chapter 1 NV7 133R 1 6 ...

Страница 11: ...ds please remember to turn the ATX power supply switch off fully turn the 5V standby power off or take the power cord off Otherwise you may cause the motherboard components or add on cards to malfunction or be damaged User Friendly Instructions Please read our instructions carefully and follow them step by step Our objective is to enable the novice computer user to perform the installation by hims...

Страница 12: ... you can easily fix the processor firmly into position Figure 2 1 shows you what the socket A looks like and how to open the lever The socket A has more pins than the socket 7 Therefore a Pentium level processor cannot be inserted into a socket A When you raise the lever you have to loosen the socket lock Please raise the lever to the end and prepare to insert the processor Next you need to align ...

Страница 13: ... and cause circuit damage break socket hooks or damage the die on the top of processor Please follow the sequence metioned below Do Not inverse the sequence Otherwise you may have a situation like the photo on the left Because of the design of the CPU socket the left side hooks are not as strong as the right side hooks If you follow our suggestions you will prevent your processor and socket from d...

Страница 14: ...therboard back into the chassis When all above procedures done you can connect the ATX power cable to the motherboard If you have different types of heatsink kit please refer to the manual that came with the heatsink kit The left photo shows another type of heatsink fix plate design The install sequences are still the same from right side to left side Just remember that We strongly recommand you t...

Страница 15: ... up and there are only slots this means you can only attach the motherboard with spacers Take the tip of the spacers and insert them into the slots After doing this to all the slots you can slide the motherboard into position aligned with the slots After the motherboard has been positioned check to make sure everything is OK before putting the casing back on Figure 2 4 shows you the way to affix t...

Страница 16: ...DR SDRAM DIMM PC1600 PC2100 64 MB 1 5 GB Generally installing DDR SDRAM modules to your motherboard is an easy thing to do You can refer to Figure 2 5 to see what a 184 pin PC 1600 PC 2100 DDR SDRAM module looks like Unlike installing SIMMs DIMMs may be snapped directly into the socket Note Certain DDR DIMM sockets have minor physical differences If your module doesn t seem to fit please do not fo...

Страница 17: ...he first pin We will show you all of the connectors headers and switches here and tell you how to connect them Please pay attention and read the entire section for necessary information before attempting to finish all of the hardware installation inside the computer chassis Figure 2 7 shows you all of the connectors and headers that we ll discuss in the next section you can use this diagram to vis...

Страница 18: ...e Power supply designed for Pentium 4 processor use It s a newly designed ATX12V1 12VDC power with 300W 20A 5VDC capacity at least for heavily loaded system and 720mA 5VSB at least for supporting some special features Attach the connector from the power supply to the ATXPWR1 and ATX12V1 connectors here Remember you have to push the connector from the ATX power supply firmly to the end with the ATX...

Страница 19: ...g a voltage meter you will find that the live wire slot will register a higher voltage If you reverse the polarity of AC plug it may affect the life of computer equipment or cause an electric shock when you touch the computer chassis We suggest that you plug the computer AC plug to a three hole wall outlet for better safety and to avoid electric shock 2 CPUFAN1 CHAFAN1 PWRFAN1 and EXTFAN1 headers ...

Страница 20: ...onnectors This connector is reserved for the system management bus SM Bus The SM Bus is a specific implementation of an I 2 C bus I 2 C is a multi master bus this means that multiple chips can be connected to the same bus and each one can act as a master by initiating a data transfer If more than one master simultaneously tries to control the bus an arbitration procedure decides which master gets ...

Страница 21: ...e additional USB port plugs Each connector can provides two additional USB plugs Which means total you can get two additional USB plugs from each connector You can use the special USB port expansion cable to connect it the cable come with the metal plate can fixed on the back panel of computer chassis The USB1 is for USB 1 1 devices connection and USB2 USB3 are for USB 2 0 devices connection Note ...

Страница 22: ...position After that you can reboot your system and ensure that your system is working fine 8 FPIO1 Headers The Headers for Chassis s Front Panel Indicators and Switches FPIO1 are for switches and indicators for the chassis s front panel there are several functions that come from this header You have to watch the pin position and the orientation or you may cause LED do not light up Figure below sho...

Страница 23: ...ED Headers There is a specific orientation for pins 1 through 3 Insert the three threaded power on LED cable to this header Check to make sure the correct pins go to the correct connectors on the motherboard If you install them in the wrong direction the power LED light will not illuminate correctly Note Watch the power LED pin position and orientation For the PN1 and PN2 pin s count name list ple...

Страница 24: ...r right and rear left channel It also provides one digital S PDIF input and one digital S PDIF output connector Another two USB connectors on CA 20 are provided for use for USB headers Please refer the description of USB1 on item 6 Note Watching the pin position and the orientation 10 CD1 and AUX1 Headers CD Audio and Auxiliary audio signal input headers These connectors connect to the audio outpu...

Страница 25: ...longer length of ribbon cable to the IDE port on motherboard and the other two ends gray and black connector at the shorter length of the ribbon cable to the connectors on hard drives NV7 133R s built in HighPoint HPT 372 chipset gives you the capability to support Ultra DMA 133 It provides two IDE channels IDE3 IDE4 that also support Ultra DMA 133 specifications and it allows for four additional ...

Страница 26: ...on IDE1and IDE2 an Ultra DMA 66 cable is required A red mark on a wire typically designates the location of pin 1 You need to align the wire pin 1 to the IDE connector pin 1 before inserting the wire connector into the IDE connector Figure 2 9 NV7 133R back panel connectors Figure 2 9 shows the NV7 133R back panel connectors these connectors are for connection to outside devices to the motherboard...

Страница 27: ... sure your operating system supports this feature and you may need to install an additional driver for individual devices In Please refer to your device user s manual for detailed information 18 10 100 Mb LAN Port Connector This motherboard provides one built in 10 100 Mb LAN port this jack is for connecting the RJ 45 cable from the local area network hub to your computer We suggest you use the ca...

Страница 28: ...u can connect the plug from the microphone to this connector Do not connect other audio or signal sources to this connector 20 MIDI GAME Port Connector You can connect your joystick game pad or other simulation hardware device DIN 15 pin plugs to this connector Please refer to the further connection notes of the device s user s manual for further detailed information Note This chapter contains man...

Страница 29: ...sh and sometimes you will even not be able to boot the computer after it has crashed We recommend that you do not change the parameters inside the BIOS unless you are very familiar with them If you are not able to boot your computer anymore please refer to the section CCMOS1 Header in Chapter 2 to see how to discharge the CMOS date When you start the computer the BIOS program controls it The BIOS ...

Страница 30: ...rsion may change periodically However most of the functions covered in this manual will work We suggest that you go to our WEB site often to see if there are new manual releases Then you can check the newly updated BIOS items Computer Knowledge CMOS Data Maybe you have heard somebody saying that his or her CMOS DATA was lost What is the CMOS Is it important The CMOS is the memory used to store the...

Страница 31: ... to display all the items that can be chosen for that option Figure 3 2 CPU SOFT MENU II CPU Name Is AMD Athlon tm XP AMD Athlon tm AMD Duron tm CPU Internal Frequency This item will show the processor internal clock speed for your reference CPU EXT CLK CPU AGP Twelve options are available 100 133 102 103 105 138 142 146 149 152 153 157 The default setting is 100 You can increase the CPU FSB clock...

Страница 32: ... be used for engineering testing only not for normal applications If you use non specification settings for normal operation your system may not be stable and may effect system reliability Also we do not guarantee the stability and compatibility for settings that are not within specification and any damage of any elements on the motherboard or peripherals is not our responsibility Solution in case...

Страница 33: ...all over again CPU VCore Voltage Two options are available Std Vcore Raising The default setting is Std Vcore You can changes the CPU Vcore voltage here If you choose the Raising the CPU Vcore voltage will raising about 3 higher than the standard CPU Vcore voltage This settings is for some compatibility issue if you do not have any issue for that please keep the default setting 3 2 Standard CMOS F...

Страница 34: ...using a HDD is to run FDISK and then FORMAT the drive Most current HDDs have already been subjected to low level format at the factory so you can probably skip this operation Remember though the primary IDE HDD must have its partition set to active within the FDISK procedure If you are using an old HDD that is already formatted auto detection can t detect the correct parameters You may need to do ...

Страница 35: ... we recommend you use this mode Currently the BIOS can support the INT 13h extension function enabling the LBA mode to support hard disk drive capacities exceeding 8 4 GB Large Mode When the number of cylinders CYLs of the hard disk exceeds 1024 and DOS is not able to support it or if your operating system does not support LBA mode you should select this mode Auto Just let the BIOS detect your HDD...

Страница 36: ...ons are available None 360K 5 25 in 1 2M 5 25in 720K 3 5 in 1 44M 3 5 in 2 88M 3 5 in Floppy 3 Mode Support Four options are available Disabled Driver A Driver B Both The default setting is Disabled 3 Mode floppy disk drives FDD are 3 1 2 drives used in Japanese computer systems If you need to access data stored in this kind of floppy you must select this mode and of course you must have a 3 Mode ...

Страница 37: ... BIOS Features Setup Upper Screen Figure 3 4B Advanced BIOS Features Setup Lower Screen Virus Warning This item can be set to Enabled or Disabled the default setting being Disabled When this feature is enabled if there is any attempt from a software or an application to access the boot sector or the partition table the BIOS will warn you that a boot virus is attempting to access the hard disk CPU ...

Страница 38: ...First Boot Device the default setting is HDD 0 Third Boot Device Description is same as the First Boot Device the default setting is LS120 Boot Other Device Two options are available Disabled or Enabled The default setting is Enabled This setting allows the BIOS to try to boot devices other than the three which are listed in the above First Second and Third Boot Devices If you set to Disabled the ...

Страница 39: ... the BIOS setup menu SYSTEM When you choose System a password is required each time the computer boots up If the correct password is not given the system will not start To disable security select Set Supervisor Password at main menu and then you will be asked to enter password Do not type anything and just press the Enter key and it will disable security Once security is disabled the system will b...

Страница 40: ... number you can enter is 0 the maximum number you can enter is 15 The default setting is 0 Small Logo EPA Show Two options are available Disabled or Enabled The default setting is Disabled If you set to Enabled when computer reboot then you can see the EPA logo on the up right corner of the screen 3 4 Advanced Chipset Features Setup Menu The Chipset Features Setup Menu is used to modify the conten...

Страница 41: ...xecuting speed via the L2 cache You must check your VGA adapter manual to find out if any compatibility problems will occur AGP Aperture Size Five options are available 32MB 64MB 128MB 256MB 512MB Back to 32MB The default setting is 64MB This option specifies the amount of system memory that can be used by the AGP device The aperture is a portion of the PCI memory address range dedicated for graph...

Страница 42: ...5 Integrated Peripherals In this menu you can change the onboard I O device I O port address and other hardware settings Figure 3 6A Integrated Peripherals Menu Upper Screen Figure 3 6B Integrated Peripherals Menu Middle Screen ...

Страница 43: ...tra DMA Ultra DMA is a DMA data transfer protocol that utilizes ATA commands and the ATA bus to allow DMA commands to transfer data at a maximum burst rate of 100 MB sec Disable If you encounter the problem of using Ultra DMA devices you can try to set this item to Disabled Auto When you select Auto the system automatically determines the optimal data transfer rate for each IDE device Default This...

Страница 44: ...s item the USB Keyboard Support and USB Mouse Support items will disappear in Integrated Peripherals menu USB Keyboard Support Two options are available OS BIOS The default setting is OS If your operating system supports a USB keyboard please set it to OS Only in some situations such as in a pure DOS environment that does not support a USB keyboard should you set it to BIOS USB Mouse Support Two o...

Страница 45: ...e sector read write If your IDE hard drive supports block mode most new drives do select Enabled for automatic detection of the optimal number of block read writes per sector the drive can support Power ON Function Six options are available Password Hot KEY Mouse Left Mouse Right Any KEY BUTTON ONLY Keyboard 98 The default setting is BUTTON ONLY KB Power ON Password This item let you set the passw...

Страница 46: ... Half duplex mode permits transmission in only one direction at a time Use IR Pins Two options are available RxD2 TxD2 and IR Rx2Tx2 The default setting is IR Rx2Tx2 If you choose RxD2 TxD2 your motherboard must support a COM port IR KIT connection Otherwise you can only choose the IR Rx2Tx2 to use the IR header on your motherboard to connect your IR KIT Please use the default setting Note The set...

Страница 47: ...lable Disabled 201 209 Default setting is 201 You can choose the game port I O base address in this item to meet the need for game requirement Midi Port Address Four options are available Disabled 330 300 290 Default setting is 330 You can choose the MPU 401 I O address in this item to meet the need for MIDI device requirement Midi Port IRQ Two options are available 5 10 The default setting is 5 Y...

Страница 48: ...ystem direct control over the power management and Plug and Play functions of a computer The ACPI functions are always Enabled If you want ACPI functions to work normally you should notice two things One is your operating system must support ACPI as of now only Microsoft Windows 98 SE Windows 2000 Windows ME and Windows XP supports these functions The second thing is that all devices and add on ca...

Страница 49: ...Devices that are not being used can be turned off The operating system uses information from applications and user settings to put the system as a whole into a low power state The table below describes which devices or specific events can wake the computer from specific states Table 3 6 1 Wake Up Device and Events These device events can wake up the computer from this state Power switch Sleeping m...

Страница 50: ...e compatible with the current Power Resource states Only devices which solely reference Power Resources which are in the ON state for a given device state can be in that device state In all other cases the device is in the D3 off state Devices that are enabled to wake the system and that can do so from their current device state can initiate a hardware event which transitions the system state to S...

Страница 51: ...wo options are available Disabled or Enabled The default setting is Disabled When you set this item to Enabled then when system into the suspend status the HDD power will shutdown Soft Off by PWR BTTN Two items available Delay 4 Sec or Instant Off The default setting is Instant Off It is activated when the user presses the power button for more than four seconds while the system is in the working ...

Страница 52: ... DMA I O port memory information of the system This is a specification and a feature specific to the Plug Play BIOS Resources Controlled By When resources are controlled manually assign each system interrupt as one of the following types depending on the type of device using the interrupt Legacy devices compliant with the original PC AT bus specification require a specific interrupt such as IRQ4 f...

Страница 53: ...BIOS to preview VGA Status and to modify the information delivered from the Feature Connector of the VGA card to the MPEG Card This option can set the display inversion to black after you have used the MPEG card Assign IRQ For VGA Two options are available Disabled or Enabled The default setting is Enabled Name the interrupt request IRQ line assigned to the USB VGA ACPI if any on your system Activ...

Страница 54: ...m the VIA VT8233 chipset INT means PCI slot IRQ signals and devices please refer to the table below SIGNALS PCI Slot 1 PCI Slot 2 PCI Slot 3 PCI Slot 4 PCI Slot 5 PIRQ_0 Assignment INT A INT D INT C INT B INT A PIRQ_1 Assignment INT B INT A INT D INT C INT B PIRQ_2 Assignment INT C INT B INT A INT D INT C PIRQ_3 Assignment INT D INT C INT B INT A INT D USB 2 0 used PIRQ_0 PIRQ_1 and PIRQ_3 Note If...

Страница 55: ...temperature exceeds the settings value system will force to shutdown to protect the processor not overheat CPU Warning Temperature Eight options are available Disabled 50 122 53 127 56 133 60 140 63 145 66 151 70 158 The default setting is Disabled You can set the processor warning temperature here If the processor temperature exceeds the settings value the system will give you an alarm message or...

Страница 56: ...Optimized Defaults Y N N Pressing Y loads the default values that are factory settings for optimal performance system operations 3 11 Set Password Set Password Can enter but do not have the right to change the options of the setup menus When you select this function the following message will appear at the center of the screen to assist you in creating a password ENTER PASSWORD Type the password u...

Страница 57: ...d will be required both at boot and at entry to Setup If set to Setup prompting only occurs when trying to enter Setup 3 12 Save Exit Setup Pressing Enter on this item asks for confirmation Save to CMOS and EXIT Y N Y Pressing Y stores the selections made in the menus in CMOS a special section of memory that stays on after you turn your system off The next time you boot your computer the BIOS conf...

Страница 58: ...Chapter 3 NV7 133R 3 30 ...

Страница 59: ...oring RAID 0 1 operation For the striping operation the identical drives can read and write data in parallel to increase performance The Mirroring operation creates a complete backup of your files Striping with Mirroring operation offers both high read write performance and fault tolerance although requiring 4 hard disks in order to do so 4 2 RAID SETUP on the NV7 133R Enter Advanced BIOS Features...

Страница 60: ...r to confirm the selection Press Esc to return to top menu NOTE If you want to create a RAID 0 striping array or RAID 0 1 array all data in your hard disk will first be erased Please backup the hard disk data before creating a RAID array If you want to create a RAID 1 mirroring array please be sure which hard disk is the source disk and which one is the destination disk If you make a mistake you m...

Страница 61: ...nd and same model when defining a RAID array Striping RAID 0 for Performance This item is recommended for high performance usage Requires at least 2 disks Mirror RAID 1 for Data Security This item is recommended for data security usage Requires at least 2 disks Striping Mirror RAID 0 1 This item is recommended for data security and high performance usage Allows Mirroring with a Strip Array Require...

Страница 62: ...ns 4K 8K 16K 32K and 64K Start Creation Process After you have made your selection choose this item and press Enter to start creation 4 3 2 OPTION 2 Delete RAID This item allows you to remove a RAID Array on this IDE RAID controller card Note After you have made and confirmed this selection all the data stored in the hard disk will be lost The entire partition configuration will be deleted too 4 3...

Страница 63: ... In the menu zone of the pop up subinterface select 2 Select Spare Drive None and press Enter to confirm 5 In the validated channel status zone select the spare disk to be added and press Enter to confirm 4 3 5 OPTION 5 Remove Spare Disk These are the steps to remove the spare disk 1 In the menu zone select 5 Remove Spare Disk and press Enter to confirm 2 The 1 Select Mirror Array None item appear...

Страница 64: ...ote This item will appear when necessary not always appear Use the up down arrow to select the menu option to Set Boot Disk and press Enter In the Channel Status select the channel you would like to set as bootable disk and press Enter an asterisk appears in the parentheses to indicate that the channel has been selected ...

Страница 65: ...drive It should execute the program automatically If not you can go to the CD location and execute the execution file at the main directory of the CD After it has been executed you will see the screen below Step 2 Move the cursor to HPT 37X RAID Driver and click on it You will go to the next screen Step 3 The InstallShield Wizard shows up and it will go to the next screen for a while Step 4 You wi...

Страница 66: ...lick Finish to end the installation Step 8 Choose Yes I want to restart my computer now in the check box and click Finish restart your computer to finish the driver update Step 9 The Digital Signature Not Found menu appears Click Yes to continue Step 10 Go to the Control Panel System Properties Device Manager Now you can see that the driver is installed under the item of SCSI and RAID controllers ...

Страница 67: ...t you to press F6 key to specify an additional device Press F6 key and let Windows continue on with setup It will continue to scroll through various device listings for several minutes It will then prompt you to press the S key to add a device 2 Press S key and insert the HPT 372 driver diskette Press Enter when prompted and allow Windows 2000 to install the HPT 372 drivers 3 Windows 2000 will con...

Страница 68: ...5 4 Chapter 5 NV7 133R ...

Страница 69: ...ction in a Windows environment making it easier and more user friendly than creating the RAID function in BIOS mode Please insert the NV7 133R CD into your CD ROM drive It should execute the program automatically If not you can go to the CD location and execute the execution file from the main directory of the CD After it is executed you will see the screen shot below Step 1 Move the cursor to HPT...

Страница 70: ...will start copying files You can see the percentage bar on the screen Step 8 When the installation is completed choose Yes I want to restart my computer now in the check box and click Finish to end the setup Step 9 After the system restart you can run this RAID Administrator program show at above The RAID Administrator screen then pops up Note that a shortcut icon appears in the tool bar This is u...

Страница 71: ...ut each HDD The screen below shows you how to get more detailed information about RAID You can choose the Help folder and then choose the Index to read more information about RAID operation settings etc Note The RAID Administrator main screen will show you the RAID Administrator software version information as this version will be different according the CD version you get It doesn t matter which ...

Страница 72: ...6 4 Chapter 6 NV7 133R ...

Страница 73: ...the service pack 2 SP2 or latest service pack to get the best system performance You can download SP2 at Microsoft WEB site Note Details of the Windows 2000 operating system will not be mentioned in this manual If you have any problems with Windows 2000 installation operations or settings please refer to your Windows 2000 user s manual or other databases provided by Microsoft Corporation Insert th...

Страница 74: ...may change the drivers or change the CD version If happened the version may different with this picture but the install process won t be change at all Step 5 When the installation is complete the installer will ask you to restart your computer We suggest that you choose Yes I want to restart my computer now then click the Finish button to restart your computer to finish the driver updates Step 6 P...

Страница 75: ...NVIDIA nForce Chipset Drivers Installation for Windows 2000 User s Manual A 3 Step 7 When OS restart you can then check the Device Manager to see that the devices are properly installed ...

Страница 76: ...Appendix A NV7 133R A 4 ...

Страница 77: ...t in permanent damage to the PC Once any item is out of its normal range a warning message will pop up and remind the user to take proper measures The following description will tell you how to install the Winbond hardware doctor and use it Insert the nForce series CD into your CD ROM drive It should execute the program automatically If not you can go to the CD location and execute the execution f...

Страница 78: ...welcome screen and its dialogue box will appear Click the Next button to go on Now you can choose the destination location where you want to install the drivers We suggest that you use the default folder as the destination location After checking the folder click Next button ...

Страница 79: ...Next button Program will start to install drivers the system needs The wizard will starting install the program file The installer will show the install progress percentage When the installation is complete the installer will ask you to restart your computer We suggest that you choose Yes I want to restart my computer now then click the Finish button to restart your computer to finish the driver u...

Страница 80: ... called Winbond Hardware Doctor Click it and you will be able to see the screen below This screen shows the hardware monitor system screen It shows information about system temperature voltages and fan speed Some items can let you set the warning range you can optimize values by setting them in accordance your system ...

Страница 81: ...ce is not properly installed Click on it then click the mouse right key Choose the Properties then click the mouse left key to go on next step Please insert the nForce series CD into your CD ROM drive It should execute the program automatically If not you can go to the CD location and execute the execution file from the main directory of the CD After it is executed you will see the screen shot bel...

Страница 82: ...utton to go on Step 6 Installer will start copying the necessary files into your computer When completing the upgrade device driver we suggest that you choose Yes I want to restart my computer now then click the Finish button to restart your computer to finish the driver updates Step 7 Check the Device Manager to see that the USB controller device is properly installed ...

Страница 83: ...You can find it on one slot or at the back of the motherboard Each motherboard always has the label at the same place as shown in the photo below You will find the model name and version on the white sticker 2 Know the current BIOS ID For example in this case the current BIOS ID is 00 If you already have the latest BIOS no any update action is necessary If your BIOS is not the latest BIOS go on to...

Страница 84: ... to our Web site and choose the correct BIOS file and download it 4 Double click the download file it will self extract to bin file 5 Make a bootable floppy disk and copy the necessary files onto it You may make a floppy disk bootable either in Explorer or in the DOS prompt mode ...

Страница 85: ... 3 User s Manual After formatting and transferring the system to the floppy disk copy two files into it One is the BIOS flash utility awdflash exe and the other is the decompressed BIOS binary file 6 Boot off floppy disk ...

Страница 86: ...ty can t be completed under a Windows 95 98 or Windows NT Windows 2000 Windows XP Windows ME environment you must be in a pure DOS environment You should check which BIOS file is to be used with your motherboard don t flash with the wrong BIOS file Otherwise you may cause system malfunctions Note During the updating the progress will be measured by white blocks The last four blue blocks of the fla...

Страница 87: ... form Fax this form to your dealer or to the company where you bought the hardware in order to benefit from our technical support You can refer to the examples given below Example 1 With a system including motherboard with processor DDR DRAM etc HDD CD ROM FDD graphic adapter MPEG 2 card SCSI adapter audio card etc After the system is assembled if you cannot boot up check the key components of the...

Страница 88: ...IGH C PLUGPLAY DWCFGMG SYS LASTDRIVE Z Restart the system If the system starts and does not reset you can be sure that the problem is due to the Sound Card Driver Write down the Sound Card model motherboard model BIOS identification number on the technical support file refer to main instructions and describe the problem in the space provided We will show you how to fill the Technical Support Form ...

Страница 89: ...the Brand space write Pioneer in the Specifications space write DVD 16 9 System Memory DDR SDRAM Indicate the brand and specifications DDR DIMM of your system memory Examples Density Description Module Components Module Part Number CAS Latency Speed MHz For example In the Brand space write Micron in the Specifications space write Density 128MB Description SS 16 Megx72 2 5V ECC Gold Module Componen...

Страница 90: ...e build a striping array Then create a mirror array by these two striping arrays See Chapter 4 for detailed information 1 Press Ctrl H to setup configuration 2 Choose item 1 to Create RAID 3 Choose item 1 to set Array Mode as Striping and Mirror RAID 0 1 4 Choose item 2 to Select Disk Drives There are two striping arrays built automatically and you only have to enter twice 5 Choose item 4 to Start...

Страница 91: ...characteristic thus may somewhat decrease the RAID performance 2 If you have two drives do connect them on two different channels as master drive please 3 When attach drives to the RAID card do make sure the master slave jumper settings are correct please If there is only one drive on one channel cable do set it as master or single drive 4 Do always use 80 conductor cables please 5 Don t connect a...

Страница 92: ...tact Person Fax Number 3 E mail Address Model Name BIOS ID Part Number Motherboard PCB Version Driver Version OS Applications Hardware Name Brand Specifications Processor Type Hard Disk Drive IDE1 IDE2 CD ROM Drive IDE1 IDE2 System Memory DDR DRAM Add On Card Problem Description ...

Страница 93: ...written and thorough manual It is full of information that doesn t only pertain to motherboards The CD ROM included with your board will have the manual as well as drivers If you don t have either one go to the Program Download Area of our website or FTP server 2 Download latest BIOS software or drivers Please go to our Program Download area on our website to check to see if you have the latest BI...

Страница 94: ...d don t have the resources to serve every end user However we will try to do our best to help every customer Please also remember that for many of our technical support team English is a second language you will have a better chance of getting a helpful answer if your question can be understood in the first place Be sure to use very simple concise language that clearly states the problem avoid ram...

Страница 95: ...ty Problems to ABIT Because of tremendous number of email messages we receive every day we are forced to give greater weight to certain types of messages than to others For this reason any compatibility problem that is reported to us giving detailed system configuration information and error symptoms will receive the highest priority For the other questions we regret that we may not be able to rep...

Страница 96: ...F 4 Appendix F NV7 133R ...

Отзывы: