background image

12 

Guida Rapida Dell'Installazione 

Guida Rapida Dell'Installazione 

Per maggiori e dettagliate informazioni su questa scheda madre si prega di fare riferimento alla versione 
integrale del Manuale utente. Questa guida all’installazione veloce è intesa per costruttori esperi di 
sistemi. Se questa è la prima volta che si cerca di installare un sistema, si consiglia di leggere, innanzi 
tutto, la versione integrale del manuale oppure di chiedere aiuto ad un tecnico per l’installazione. 

Installare il dispersore di calore CPU ed il gruppo della ventolina 

Questa scheda madre fornisce una presa “Socket 478” 
ZIF (

Z

ero 

I

nsertion 

F

orce – forza d’inserimento zero) 

per installare il processore Intel

®

 Pentium

®

 4. Il 

processore acquistato dovrebbe essere fornito di 
dispersore di calore e ventolina per il raffreddamento. 
In caso contrario acquistare un dispersore di calore 
specifico per la presa Socket 478 Pentium

®

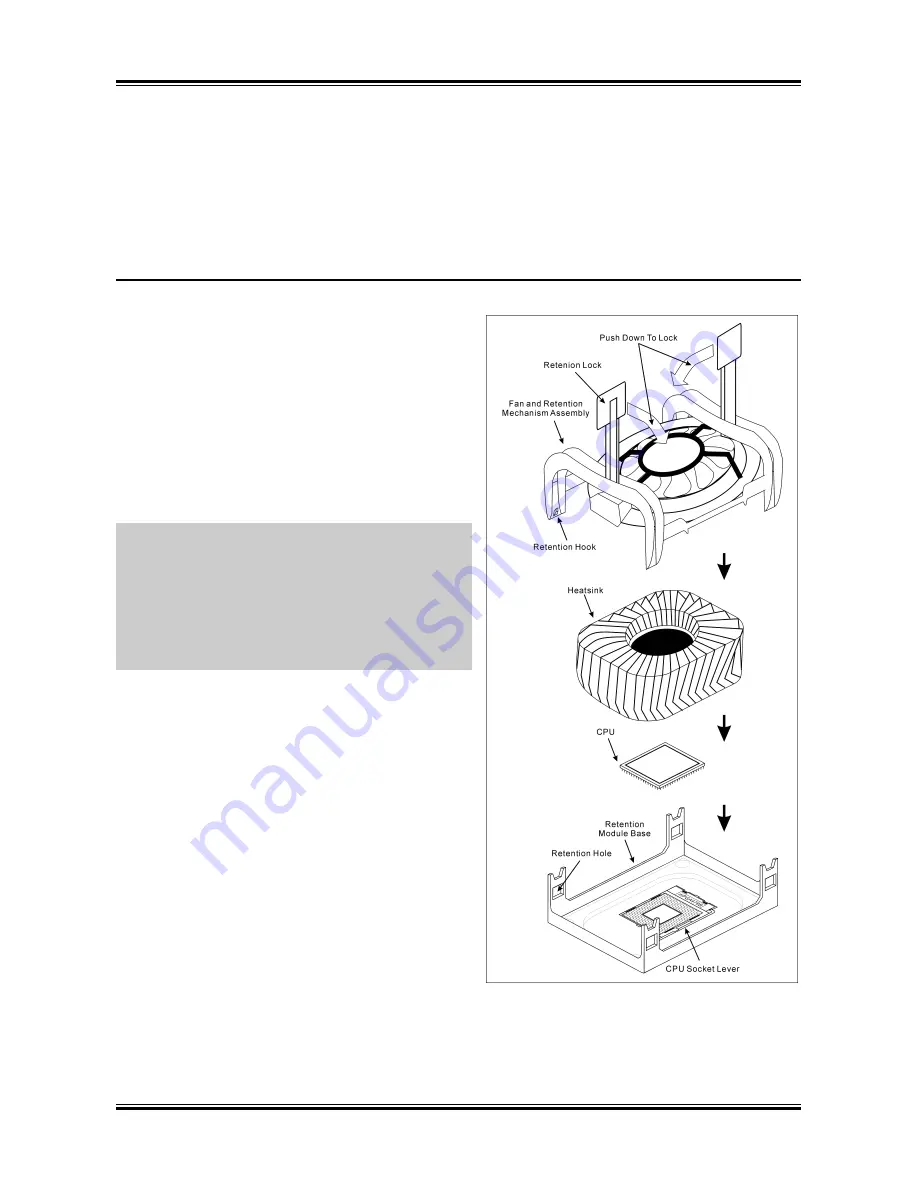
1.  Ubicare la presa ZIF a 478 pin sulla scheda madre. 

Stringere la base del modulo di trattenimento 
sulla scheda madre. 

Attenzione:

 Se si impiega un telaio progettato 

specificatamente per il processore Pentium

®

 4, si 

prega prestare attenzione all’ubicazione delle 
guarnizioni metalliche o degli spaziatori, nel caso in 
cui siano già installati sul telaio. Assicurarsi di non 
permettere alle guarnizioni metalliche od agli 
spaziatori di entrare in contatto con il cavo o con le 
parti del circuito sul PCB. 

2. Tirare di lato la leva della presa CPU, 

allontanandola dalla presa; poi sollevarla di 90 
gradi. Inserire la CPU con l’orientamento corretto. 
Non sforzare per inserire la CPU poiché si adatta 
solamente in un dato orientamento. Chiudere la 
leva della presa trattenendo la CPU. 

3.  Mettere il dispersore di calore a faccia in giù sulla 

CPU finché la copre completamente. 

4.  Mettere la ventolina ed il gruppo del meccanismo 

di trattenimento sul dispersore di calore. 
Assicurarsi che tutti i quattro fermi di 
trattenimento, su ciascun lato della ventolina e del 
gruppo del meccanismo di trattenimento, scattino 
in posizione nei fori ti trattenimento. 

5.  Spingere verso il basso i fermi di trattenimento su 

entrambi i lati della ventolina e del gruppo del meccanismo di trattenimento per fissarli con la base 
del modulo di trattenimento. 

6.  La ventolina, il gruppo del meccanismo di trattenimento e la base del modulo di trattenimento ora 

dovrebbero essere fissati gli uni agli altri trattenendo al loro interno il dispersore di calore. 

IS-10 / IS-11 / IS-12 

Содержание IS-10 Intel Pentium 4 System Board Socket...

Страница 1: ...IS 10 IS 11 IS 12 Socket 478 System Board User s Manual 4200 0383 02 Rev 1 00...

Страница 2: ...all the manufacturer be liable for direct indirect special incidental or consequential damages arising from any defect or error in this manual or product Product names appearing in this manual are for...

Страница 3: ...ink Supporting Base 2 3 2 4 System Memory 2 4 2 4 1 Memory Configuration Table 2 4 2 4 2 Installing and Removing Memory Modules 2 5 2 5 Connectors Headers and Switches 2 6 2 5 1 ATX Power Connectors 2...

Страница 4: ...2 Advanced BIOS Features 3 6 3 3 Advanced Chipset Features 3 8 3 4 Integrated Peripherals 3 10 3 5 Power Management Setup 3 17 3 6 PnP PCI Configurations 3 19 3 7 PC Health Status 3 21 3 8 Load Fail S...

Страница 5: ...1 1 User s Manual User s Manual...

Страница 6: ...2 Zero Insertion Force ZIF Socket 478 Intel Pentium 4 CPU CPU Pentium 4 Socket 478 1 Socket 478 Pentium 4 2 90 3 4 5 6 IS 10 IS 11 IS 12...

Страница 7: ...3 PCB 1 DIMM 2 DIMM 3 DIMM 4 DIMM DIMM DIMM DIMM 5 DIMM DIMM DIMM SCSI AGP ATX12V ATX ATX12V BIOS BIOS User s Manual...

Страница 8: ...4 CD CPU ZIF Socket 478 Intel Pentium 4 CPU CPU Pentium 4 Socket 478 1 478 ZIF Pentium 4 PCB 2 CPU 90 CPU CPU CPU CPU 3 CPU 4 4 5 6 IS 10 IS 11 IS 12...

Страница 9: ...5 RAM 1 DIMM 2 DIMM 2 3 4 DIMM DIMM 5 DIMM 2 1 1 SCSI AGP ATX12V ATX12V BIOS BIOS Setup User s Manual...

Страница 10: ...uiertes Geh use verwenden achten Sie bitte auf die Lage der Metallbolzen bzw Abstandhalter wenn sie schon im Geh use installiert sind Achten Sie darauf dass kein Kontakt zwischen Metallbolzen bzw Abst...

Страница 11: ...es pa t nur in eine Richtung hinein 5 Zum Ausbau der Module dr cken Sie die beiden Auswurflaschen auf dem Steckplatz nach au en zusammen und ziehen das Modul heraus Anschl sse Sockel Schalter und Ada...

Страница 12: ...te m re Serrez la Base du Module de R tention sur la carte Attention Si vous utilisez un ch ssis sp cialement con u pour Pentium 4 veuillez faire attention l emplacement des Clous en M tal ou des Espa...

Страница 13: ...ger les composants lectroniques de l ordinateur ou des cartes optionnelles Avant de commencer ces proc dures assurez vous de bien d charger toute l lectricit statique en touchant rapidement un objet m...

Страница 14: ...10 ZIP Socket 478 Intel Pentium 4 Pentium 4 Socket 478 1 478 ZIF Pentium 4 2 90 3 4 5 6 IS 10 IS 11 IS 12...

Страница 15: ...11 1 DIMM 2 3 4 5 DIMM SCSI AGP ATX12V ATX ATX12V BIOS BIOS Setup User s Manual...

Страница 16: ...prestare attenzione all ubicazione delle guarnizioni metalliche o degli spaziatori nel caso in cui siano gi installati sul telaio Assicurarsi di non permettere alle guarnizioni metalliche od agli spaz...

Страница 17: ...mponenti elettronici del computer o delle schede Prima di iniziare queste procedure assicurarsi di avere scaricato completamente l elettricit statica toccando brevemente un oggetto metallico con massa...

Страница 18: ...14 IS 10 IS 11 IS 12...

Страница 19: ...ockets Supports 2 DIMM Single Dual Channel DDR 400 333 266 memory Max 2GB AGP Integrated Intel Extreme Graphics 2 Accelerated Graphics Port connector supports AGP 8X 4X 0 8V 1 5V Serial ATA 2 channel...

Страница 20: ...Connectors 1x PS 2 Keyboard 1 x PS 2 Mouse 1x Printer Port 1 x COM Port 1x VGA Port 1x AUDIO Connector Rear Left Rear Right Center Subwoofer S PDIF Output Mic In Line In Front Left Front Right 2x USB...

Страница 21: ...Introduction 1 3 1 2 Layout Diagram User s Manual...

Страница 22: ...wer Connector CD1 AUX1 Internal Audio Connectors CPUFAN1 SYSFAN1 AUXFAN1 Fan Connectors DIMM1 DIMM2 DDR DIMM Slots FDC1 Floppy Disk Drive Connector FP 1394 1 FP 1394 2 Additional IEEE1394 Port Headers...

Страница 23: ...he wall outlet before installing the board or changing any settings 2 Ground yourself properly by wearing a static safety wrist strap before removing the board from the antistatic bag 3 Hold the board...

Страница 24: ...board and the chassis base 3 Place all the studs or spacers needed on the chassis base and have them tightened 4 Line up all the screw holes on the board with those studs or spacers on the chassis 5...

Страница 25: ...e location of Metal Studs or Spacers if they are already installed on the chassis Be careful not let the Metal Studs or Spacers contact the printed circuit wire or parts on the PCB 2 Pull the CPU sock...

Страница 26: ...th each other with the heatsink inside ATTENTION Do not forget to set the correct bus frequency and multiple for your processor 2 4 System Memory This system board provides two 184 pin DDR DIMM slots...

Страница 27: ...nto the slots until the ejector tabs at both sides of the slot automatically snaps into the mounting notch Do not force the DIMM module in with extra force as the DIMM module only fit in one orientati...

Страница 28: ...power off the computer and unplug the AC power cord before adding or removing any peripheral or component Failing to so may cause severe damage to your system board and or peripherals Plug in the AC p...

Страница 29: ...led in your system The CPU must be kept cool by using a powerful fan with heatsink The system is capable of monitoring the speed of the CPU fan CPUFAN1 CPU Fan SYSFAN1 System Fan 1 AUXFAN1 Auxiliary F...

Страница 30: ...the CMOS memory Pin 1 2 shorted default Normal operation Pin 2 3 shorted Clear CMOS memory ATTENTION Turn the system power off first including the 5V standby power before clearing the CMOS memory Fail...

Страница 31: ...Slot This slot supports an optional AGP graphics card up to AGP 4X mode only Please refer to our Web site for more information on graphics cards ATTENTION This motherboard does not support 3 3V AGP c...

Страница 32: ...tion HLED Pin 1 3 Connects to the HDD LED cable of chassis front panel RST Pin 5 7 Connects to the Reset Switch cable of chassis front panel SPK Pin 15 17 19 21 Connects to the System Speaker cable of...

Страница 33: ...extension cable provided with the chassis To use the audio connector at rear panel disconnect the extension cable attach the jumpers back at pin 5 6 and pin 9 10 default setting Pin Pin Assignment Pin...

Страница 34: ...der These headers each provides 2 additional USB 2 0 ports connection through an USB cable designed for USB 2 0 specifications Pin Pin Assignment Pin Pin Assignment 1 VCC 2 VCC 3 Data0 4 Data1 5 Data0...

Страница 35: ...ecific implementation of an I2 C bus I2 C is a multi master bus which means that multiple chips can be connected to the same bus and each one can act as a master by initiating a data transfer If more...

Страница 36: ...Port Headers These headers each provide one additional IEEE1394 port connection through an extension cable and bracket Pin Pin Assignment Pin Pin Assignment 1 TPA0 2 TPA0 3 GND 4 GND 5 TPB0 6 TPB0 7...

Страница 37: ...Hardware Setup 2 15 2 5 10 Internal Audio Source Connectors These connectors connect to the audio output of internal CD ROM drive or add on card User s Manual...

Страница 38: ...e end of the ribbon cable into the FDC1 connector The colored edge of the ribbon cable should be aligned with pin 1 of FDC1 connector 2 Install the other end s of ribbon cable into the disk drive conn...

Страница 39: ...nector Ultra ATA 66 ribbon cables Connect the single end blue connector at the longer length of ribbon cable to the IDE port on system board and the other two ends gray and black connector at the shor...

Страница 40: ...2 18 Chapter 2 2 5 13 Serial ATA Connectors These connectors are provided to attach one Serial ATA device at each channel via Serial ATA cable IS 10 IS 11 IS 12...

Страница 41: ...Setup 2 19 2 5 14 CPU Core Voltage Selector This header uses a jumper to adjust the CPU core voltage Pin 1 2 shorted default Normal operation Pin 2 3 shorted Raise the CPU core voltage by 0 1V User s...

Страница 42: ...Sub Center Subwoofer Connects to the center and subwoofer channel in the 5 1 channel audio system S PDIF Out This connector provides an S PDIF out connection through optical fiber to digital multimed...

Страница 43: ...e memory count begins and then the following message appears on the screen Press DEL to run setup If this message disappears before you respond restart the system by pressing Ctrl Alt Del keys or by p...

Страница 44: ...te mm dd yy This item sets the date you specify usually the current date in the format of Month Date and Year Time hh mm ss This item sets the time you specify usually the current time in the format o...

Страница 45: ...e sure you fully understand the meaning of the parameters Refer to the manual provided by the device manufacturer to get the settings right Access Mode This item selects the mode to access your IDE de...

Страница 46: ...acity 1 2M 5 25 in 5 25 inch AT type high density drive 1 2MB capacity 720K 3 5 in 3 5 inch double sided drive 720KB capacity 1 44M 3 5 in 3 5 inch double sided drive 1 44MB capacity 2 88M 3 5 in 3 5...

Страница 47: ...rrors but disk error All But Disk Key The system boot will stop for all errors but disk or keyboard error Base Memory This item displays the amount of base memory installed in the system The value of...

Страница 48: ...the hard disks detected can be selected for the booting sequence to boot up system This item functions only when there is the option of Hard Disk in any one of the First Second Third Boot Device items...

Страница 49: ...operating system according to the sequence of the drive selected Set Boot Other Device to Enabled if you wish to boot from another device other than these three items Boot Up NumLock Status This item...

Страница 50: ...module you are using The default setting By SPD configures these four items by reading the contents in the SPD Serial Presence Detect device The EEPROM on the memory module stores critical parameter...

Страница 51: ...can be used by the AGP device The aperture is a portion of the PCI memory address range dedicated for graphics memory address space Init Display First This item selects to initialize AGP or PCI Slot...

Страница 52: ...3 10 Chapter 3 3 4 Integrated Peripherals Onboard IDE Device Click Enter key to enter its submenu IS 10 IS 11 IS 12...

Страница 53: ...rd IDE 2 controller Onboard S ATA Controller This item determines the function for on chip Serial ATA Disabled Disable the Serial ATA controller Auto Allows the Serial ATA controller to be arranged by...

Страница 54: ...aster OnChip IDE 1 and IDE 2 controller enabled IDE 1 Master IDE 1 Slave SATA1 serves as IDE 1 Master SATA2 serves as IDE 1 Slave OnChip IDE 1 controller disabled IDE 1 Slave IDE 1 Master SATA1 serves...

Страница 55: ...lect BIOS for using USB keyboard in DOS environment or OS in OS environment USB Mouse Support This item allows you to select BIOS for using USB mouse in DOS environment or OS in OS environment AC97 Au...

Страница 56: ...on Password Use a password to power on the system select this option then press Enter Enter your password You can enter up to 5 characters Type in exactly the same password to confirm and then press...

Страница 57: ...nables or disables the onboard FDD controller Onboard Serial Port 1 This item determines which I O addresses the onboard Serial Port 1 controller will access Auto The system automatically select an I...

Страница 58: ...allel Port Allows bi directional parallel port operation at maximum speed ECP Extended Capabilities Port Allows bi directional parallel port operation at a speed faster than the normal mode s data tra...

Страница 59: ...is in the S3 STR Suspend To RAM state This item can only be configured if the ACPI Suspend Type field is set to S3 STR Soft Off by PWR BTTN This item selects the method of powering off your system Hol...

Страница 60: ...you would like the Soft Off PC to power on in the Date of Month Alarm and Time hh mm ss Alarm items However if the system is being accessed by incoming calls or the network Resume On Ring LAN prior t...

Страница 61: ...ll automatically be set as Disabled NOTE The ESCD Extended System Configuration Data contains the IRQ DMA I O port memory information of the system This is a specification and a feature specific to th...

Страница 62: ...3 20 Chapter 3 IRQ Resources Click Enter key to enter its submenu This item sets each system interrupt to either PCI Device or Reserved IS 10 IS 11 IS 12...

Страница 63: ...pop up or a warning alarm to sound when an abnormal condition occurs you must install the Hardware Doctor utility This utility is included in the Driver Utility CD that came packed with this motherboa...

Страница 64: ...cess to the computer itself The Supervisor Password is used to protect the stored CMOS options from being changed by unauthorized users 3 11 Set User Password This option protects the BIOS configurati...

Страница 65: ...ed within the Drivers Utilities CD that came packaged with your board The display shown in the following figure should appear after inserting this CD into your CD ROM drive if not enter My Computer CD...

Страница 66: ...stall the audio driver for Windows Operating System LAN Driver Install the LAN driver for Windows Operating System USB 2 0 Driver Install the USB 2 0 driver for Windows Operating System Manual View th...

Страница 67: ...s have the best quality and compatibility In case you need service or technical support please understand the constraint we have and always check with the reseller who sold the product to you first To...

Страница 68: ...ted and sold the system to you They should know best what your system configuration is and your problem They should have reasonable return or refund policies How they serve you is also a good referenc...

Страница 69: ...x 44 1438 226333 sales abitcomputer co uk technical abitcomputer co uk Germany Benelux Belgium Netherlands Luxembourg Denmark Norway Sweden Finland and Switzerland AMOR Computer B V ABIT s European Of...

Страница 70: ...er France SARL Tel 33 1 5858 0043 Fax 33 1 5858 0047 http www abit fr All other territories not covered above please contact Taiwan Head Office When contacting our headquarters please Note we are loca...

Страница 71: ...ges we receive every day we are forced to give greater weight to certain types of messages than to others For this reason any compatibility problem that is reported to us giving detailed system config...

Страница 72: ...one Number Contact Person Fax Number E mail Address Model BIOS ID Motherboard Model No DRIVER REV OS Application Hardware Name Brand Specifications CPU HDD IDE1 IDE2 CD ROM Drive IDE1 IDE2 System Memo...

Отзывы: