background image

AI IP Camera Quick Start Guide 


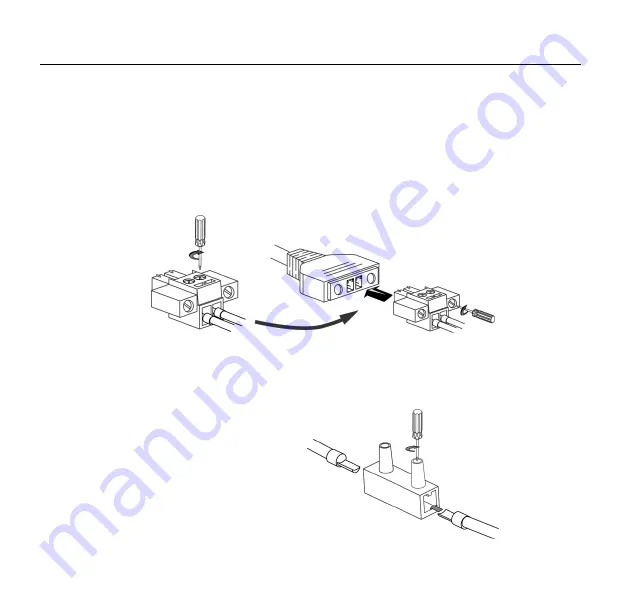
2.12-2 Power cable connection


Connect the ground cable to ground the device, and then connect the power cable. If 
crimp terminals are not used, the wire thickness cannot exceed 1.5mm², and the length 
cannot exceed 25m. If crimp terminals are used, the wire can be up to 0.75mm² for a 15 
m length of wiring or up to 1.0mm² if 20 m is required. Longer wiring is not supported. 
The ground impedance cannot exceed 5 ohms. 


2.12-3 Ground cable installation 
Please connect ground cable of camera to ground. 


Содержание VS12100 2M

Страница 1: ...AI Vue 2MP ANPR Bullet Network Camera Quick Start Guide Model VS12100 VS12112 with 4G version ...

Страница 2: ... Camera Quick Start Guide 1 1 Accessing via Web Browser Default IP address User name Password https 192 168 0 11 admin AbAi Camera1 1 2 Appearance Description The overview of the bullet camera is shown below ...

Страница 3: ...g terminal support 0 75mm2 and 1 0mm2 cable 2 Allen wrench M4 1 Star wrench T20 1 Waterproof connector for network cables 1 Quick Start Guide 1 Desiccant packet Optional 3 Expansion tube 4 Tapping screw 4 Sun shield cover 1 Screw and washer assembled for sun shield cover 1 4G Antenna for the 4G version VS12112 only 2 ...

Страница 4: ...e interface work together to form the alarm output ALARM_IN GND Alarm input interface There may be multiple alarm interfaces For a given number of interfaces n they are numbered for example ALARM_IN0 ALARM_IN1 ALARM_INn Each one connects to the GND connection to form a single alarm input 4 AUDIO IN AUDIO OUT AUDIO_GND Audio input output interface and audio ground interface 5 ALARM_OUT ALARM_REF Al...

Страница 5: ...ple alarm interfaces For a given number of interfaces n they are numbered for example ALARM_IN0 ALARM_IN1 ALARM_INn Each one connects to the GND connection to form a single alarm input 6 UART RX UART TX GND UART TX RX interface 7 RS485 RS485 A B interface Cable interface 1 2 3 4 5 6 7 ...

Страница 6: ...AI IP Camera Quick Start Guide 2 Installation 2 1 Note 2 1 1Make sure the device in the package is in good condition and all the assembly parts are included You will need the following ...

Страница 7: ...AI IP Camera Quick Start Guide 2 2 Caution Please do not lift a camera by its cable Please do not open the front cover ...

Страница 8: ...AI IP Camera Quick Start Guide 2 3 Bottom cover of the camera removes Use a Philips screwdriver to remover the bottom cover of camera Then you can see the Reset button and SD card slot ...

Страница 9: ...m cover of camera To restore the camera to factory settings and software reboot the camera you need to press and hold the reset button 5 10 seconds To restore the camera to factory settings and hardware reboot the camera you need to press and hold the reset button more than 10 seconds Reset Button ...

Страница 10: ...ent of the device and format the Micro SD card For details see the Configuration Guide Please refer to figure 2 5 insert the memory card to memory card slot on the rear housing of the camera Use Phillips screws 2 to remove the bottom cover of camera and insert the SD card During SD card installation you are advised to turn the camera maintenance window downward and insert the SD card into the SD c...

Страница 11: ...amera installation Please remove the dirt on the waterproof rubber strip and you need to avoid catching the fall prevention rope or other foreign objects finally make sure tighten the screw before locking the bottom cover of the camera Tighten the screw ...

Страница 12: ...AI IP Camera Quick Start Guide 2 7 Sun shield cover Please use Philips screwdriver to install the sun shield cover as shown below And move to your need position ...

Страница 13: ...TE module and SIM Card for the 4G version Please use Security Trox T20 screwdriver to remove six pieces of screws Then you can open the top housing and install the 4G LTE module into the PCB and insert the SIM Card SIM Card 4G LTE Module ...

Страница 14: ...he LTE module inserted correctly Please install the thermal PAD to dissipate the heat and tighten the screw Install the antenna connector to link the antenna For left side Antenna For right side Antenna For GPS Antenna Thermal PAD Tighten the screw ...

Страница 15: ... Antenna and GPS Antenna for the 4G version Before install the 4G antenna please remove the sun shield cover first Then install the 4G antenna adapter into the antenna plug next install the 4G antenna Antenna adapter 4G Antenna GPS Antenna ...

Страница 16: ...S Antenna Please remove the release paper of 3M tape and clean the surface of the housing Then stick the GPS antenna with hand for 10 seconds to make sure it sticks adequately Finally screw in the GPS connector Clean the surface GPS connector ...

Страница 17: ...Camera Quick Start Guide 2 10 Remove the Anti moisture Sticker Before mounting the camera onto its install position please remove the anti moisture sticker in the first place to get the air vent start working ...

Страница 18: ...unting The suggested mounting height is over 3 meters at least The right height and angle of camera is important to ensure image quality The figure of the camera is installation requirements for concept and reference only 3 8m 8 22m Tilt Angle 20 ...

Страница 19: ... 2 Use a 5mm drill bit to drill four 35mm deep holes in the positions marked by the drilling sticker Use a hammer to carefully drive the white plastic expansion tubes into the holes Step 3 Connect the external cabling to camera pigtails insulate the connections see Cable Connections and feed the cabling through the cable entry on the wall Fasten the tapping screws Make sure the cable outlet at the...

Страница 20: ...ep 4 Loosen the three hex socket bolts and adjust the camera to the required angle Then re tighten the screws and adjust the position of the sunshield Adjust the angle of the camera Tighten 3 hex socket head cap screws after adjustment ...

Страница 21: ...s well as Then use 4 screws to mount the junction box on to the wall Step 2 Use 4 screws to fix the camera onto the cover of junction box Then clip the safety rope of the cover of the junction box to the bottom of the junction box Thread the cables through the junction and attach them to the camera pigtails Finally tighten the screws to fix the cover onto the junction box in place ...

Страница 22: ...h the installation holes on the mounting bracket Then use 3 hose clamps to affix and install the pole mount bracket to the pole Step 2 Place the junction box on the pole mount bracket such that the arrows of bottom point to the ground as well as Then use 4 screws to mount the junction box on to the pole mount bracket Ø 165mm 216mm ...

Страница 23: ...o the cover of junction box Then clip the safety rope of the cover of the junction box to the bottom of the junction box Thread the cables through the junction and attach them to the camera pigtails Finally tighten the screws to fix the cover onto the junction box in place ...

Страница 24: ... the device take care to avoid connecting strong current cables to weak current interfaces or you will damage your device The tail of cable must be cut if it cannot pass through the wall please keep the label on tail of cable And please make sure to use insulating tape and waterproof tape to insulate and waterproof all tail of cable to avoid short circuits and water leakage Wrap all pigtail cables...

Страница 25: ... are not used the wire thickness cannot exceed 1 5mm and the length cannot exceed 25m If crimp terminals are used the wire can be up to 0 75mm for a 15 m length of wiring or up to 1 0mm if 20 m is required Longer wiring is not supported The ground impedance cannot exceed 5 ohms 2 12 3 Ground cable installation Please connect ground cable of camera to ground ...

Страница 26: ...75mm2 for a 15m length of wiring or up to 1 0mm2 if 20m is required Longer wiring is not supported The ground impedance cannot exceed 5 ohms 2 12 5 Network cable installation Connect the network cable Mount the number O ring for the waterproof connector onto the network cable port and install the remaining components of the waterproof connector in the sequence shown below The waterproof connectors...

Страница 27: ...ee layers from bottom to top from top to bottom and from bottom to top again 3 Stretch the insulation tape evenly to twice its original length Then apply it for three layers from bottom to top from top to bottom and from bottom to top again to up Finally tie the upper and lower ends with cable ties Then use cable ties to secure the both ends 4 Cover the rest of the cabling in a conduit or with pro...

Страница 28: ...e the existing desiccant bag The 3 rectangular objects inside the camera housing 3 1 Identification of Desiccant Bag s Functionality The remained functionality of the desiccant bag can be identified by the color of the silica gel beads among the desiccant which are Bright Yellow Dry Light Green Some moisture is absorbed ...

Страница 29: ...e desiccant bag please follow the steps mentioned in the following sections and the procedures should be done by the engineering staff 3 2 Replace the Desiccant Bag Step1 Open the camera and locate the desiccant bags The desiccant bags will be close to the frame or housing depending on the camera model ...

Страница 30: ...nts Step3 Open the aluminum foil pack included in the camera box The desiccant bag is included inside it Step4 Stick a double sided tape on desiccant bag Pull the adhesive tape cover in order to attach the desiccant bag to the camera Note Some of desiccant bags already stick a double side tape so just remove the tape cover then attach the desiccant bag to the housing ...

Страница 31: ... old ones Be sure to press them tightly so that they won t fall after Step6 Put back the cover of the camera as soon as the bags are replaced If you leave the housing open too long the desiccant bag will start absorbing water from the environment Step7 Be sure the cover is closed tightly ...

Страница 32: ...d waterproofing measures have been taken to protect cables installed in humid environments and the drip loops are in correct positions YES NO The camera can power on normally YES NO You can access the camera web portal using the IP address you configured YES NO On the camera web portal you can view live video from camera YES NO You can view the surveillance from camera web pages and the image is c...

Страница 33: ...AI IP Camera Quick Start Guide Declaration of toxic and hazardous substances in electronic and electrical products ...

Страница 34: ... device complies with part 15 of the FCC Rules Operation is subject to the following two conditions 1 this device may not cause harmful interference and 2 this device must accept any interference received including interference that may cause undesired operation ...

Отзывы: