background image

FEC

9 Entretien et nettoyage

BAL.0533.0 • 2019-11-15

FR - 17


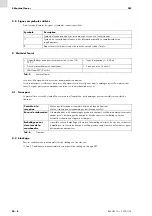
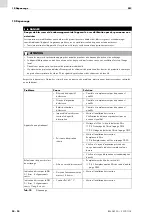
Vérifiez les éléments suivants :

Durée de vie des balais 

La durée de vie des balais est d'environ 800 h. Après chaque remplacement de balais, la durée de vie diminue de 30 %. 
Les balais peuvent être remplacés deux fois maximum. Ensuite, il faut remplacer le moteur.

Chaque jour

Chaque mois

Chaque année

• Contrôle visuel :

Dispositif d'aspiration ou 
composants du dispositif 
endommagés ?

• Contrôle visuel de la cartouche 

filtrante :
Filtre non étanche ? (flocons de 
poussière ou colmatages sur les 
ouvertures de sortie d'air)

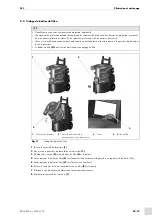
9.4 Remplacement du filtre à la 
page FR-20

• Contrôle visuel :

Retirez la poussière de la 
carcasse de turbine à l'aide d'un 
aspirateur industriel approprié ou 
d'un chiffon humide jetable.

• Contrôle visuel :

Câbles endommagés ?

• Contrôle visuel  du filtre de sortie 

d'air :
Filtre non étanche ?

9.4.3 Remplacement du filtre de 
sortie d'air à la page FR-22

• Contrôle de l’étanchéité du bac

• Contrôle de la hauteur de 

remplissage du bac collecteur

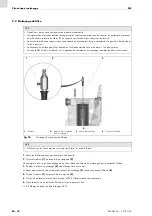
9.3 Vidage du boîtier de filtre à la 
page FR-19

• Contrôle visuel du mât filtrant FEC :

Filtre non étanche ?

9.4.4 Remplacement du mat 
filtrant FEC à la page FR-23

• Contrôle visuel

Les joints sont-ils endommagés?

• Usure des balais

Durée de vie des balais à la 

page FR-17

Tab. 9

Intervalles d'entretien
Содержание FEC

Страница 1: ...W E L D E R S W O R L D www binzel abicor com DE Betriebsanleitung EN Operating instruction FR Mode d emploi ES Manual de instrucciones FEC DE Absaugger t EN Fume extraction system FR Dispositif d as...

Страница 2: ...DE 5 2 6 Netzanschluss Sicherheitshinweise DE 6 2 7 Warn und Hinweisschilder DE 6 2 8 Angaben f r den Notfall DE 6 3 Produktbeschreibung DE 6 3 1 Technische Daten DE 7 3 2 Abk rzungen DE 7 3 3 Typens...

Страница 3: ...ngen 115 V und 230 V erh ltlich Diese Betriebsanleitung beschreibt nur das FEC Das Absaugger t FEC darf nur mit Original ABICOR BINZEL Ersatzteilen betrieben werden 1 1 Kennzeichnung Das Produkt erf l...

Страница 4: ...en beurteilen und m gliche Gefahren erkennen kann in Deutschland siehe TRBS 1203 Halten Sie andere Personen vom Arbeitsbereich fern Beachten Sie die Arbeitssicherheitsvorschriften des jeweiligen Lande...

Страница 5: ...T Bezeichnet eine m glicherweise sch dliche Situation Wenn sie nicht gemieden wird k nnen leichte oder geringf gige Verletzungen die Folge sein HINWEIS Bezeichnet die Gefahr dass Arbeitsergebnisse bee...

Страница 6: ...N F3G1 5 verwendet werden 2 7 Warn und Hinweisschilder Am Produkt befinden sich folgende Warn und Hinweisschilder Diese Kennzeichnungen m ssen immer lesbar sein Sie d rfen nicht berklebt verdeckt berm...

Страница 7: ...halldruckpegel LpA1 1Gemessen nach H llk rperverfahren gem DIN EN ISO 3744 gemessen bei Mindestvolumenstrom Messunsicherheit L rm ca 4 dB A 76 dB A Gewicht 25 kg Abma e lxbxh 590 425 825 Tab 1 Allgeme...

Страница 8: ...en und Aufz hlungen Querverweissymbol verweist auf detaillierte erg nzende oder weiterf hrende Informationen 1 Handlungsschritt e im Text die der Reihenfolge nach durchzuf hren sind Absaugger t mit Ne...

Страница 9: ...ienfeld wird die Einschaltautomatik ein bzw ausgeschaltet 6 2 1 Einschaltautomatik auf Seite DE 12 GEFAHR Brandgefahr Beim Aufstellen und Betreiben des Absaugger tes ist Folgendes zu beachten Das Absa...

Страница 10: ...nd f r Betrieb ok Filter Excellent Filter sauber Tab 7 Bedienelemente 1 2 3 4 5 6 GEFAHR Verletzungsgefahr durch unerwarteten Anlauf F r die gesamte Dauer von Wartungs Instandhaltungs Montage bzw Demo...

Страница 11: ...ben Sie die Komponenten nicht ber Personen oder andere Ger te hinweg Tragen Sie Ihre pers nliche Schutzausr stung Sicherheitsschuhe mit Stahlkappen Schutzhandschuhe Geh rschutz Verweisen Sie unbeteili...

Страница 12: ...d startet den Absaugvorgang automatisch 1 Massekabel 4 in die integrierte Start Stopp Automatik 6 legen 2 Massekabel 4 auf der einen Seite mit der Stromquelle und auf der anderen Seite z B mit dem Sch...

Страница 13: ...4 verbinden 2 Stromzange ber das Massekabel oder das Schlauchpaket legen 3 Am Bedienfeld Taste A Auto 1 dr cken Sobald der Schwei vorgang beginnt startet auch der Absaugvorgang Taste Beschreibung I P...

Страница 14: ...2 Abluftgitter 3 Abluftschlauch Abb 8 Separater Abluftschlauch 1 2 3 WARNUNG Stromschlag Gef hrliche Spannung durch fehlerhafte Kabel berpr fen Sie alle spannungsf hrenden Kabel und Verbindungen auf o...

Страница 15: ...einer Kante dass das Geh use nicht aufsetzt da dadurch am Geh use Besch digungen auftreten k nnen Richten Sie den Ansaugschlauch des Absaugger tes nicht auf Personen und reinigen Sie damit keine Kleid...

Страница 16: ...ie alle elektrischen Verbindungen WARNUNG Stromschlag Gef hrliche Spannung durch fehlerhafte Kabel berpr fen Sie alle spannungsf hrenden Kabel und Verbindungen auf ordnungsgem e Installation und Besch...

Страница 17: ...sel auf Seite DE 20 Sichtpr fung des Turbinenraums Staub im Turbinenraum ggf Staub mit einem geeigneten Industriesauger oder einem feuchten Einwegtuch entfernen Sichtpr fung der Kabelverbindungen Kabe...

Страница 18: ...lieferten Staubsammelbeutel entleeren 9 3 Filtergeh use entleeren auf Seite DE 19 HINWEIS berpr fen und tragen Sie Ihre pers nliche Schutzausr stung Die pers nliche Schutzausr stung besteht aus Schutz...

Страница 19: ...Staubsammelbeutel nach den rtlichen Bestimmungen entsorgen 8 Verschlussdeckel 1 wieder aufsetzen HINWEIS berpr fen und tragen Sie Ihre pers nliche Schutzausr stung Die pers nliche Schutzausr stung be...

Страница 20: ...flage 4 aus Paket von neuer Filterpatrone zum Schutz auf das Saugaggregat legen VORSICHT berpr fen und tragen Sie Ihre pers nliche Schutzausr stung Die pers nliche Schutzausr stung besteht aus Schutza...

Страница 21: ...se 1 ragt Filterbeutel liegen der neuen Filterpatrone bei ber die Filterpatrone 3 st lpen 5 Wenn sich die Filterpatrone 3 komplett im Filterbeutel befindet diesen verschlie en Die Entsorgung erfolgt n...

Страница 22: ...uben 2 am Deckel 1 montieren 8 Absaugger t einschalten HINWEIS berpr fen und tragen Sie Ihre pers nliche Schutzausr stung Die pers nliche Schutzausr stung besteht aus Schutzanzug Schutzbrille Atemschu...

Страница 23: ...4 mit dem Inbusschl ssel l sen 4 Das Abdeckgitter 3 abnehmen 5 Die Filtermatte 2 entnehmen 6 Die gereinigte bzw neue Filtermatte 2 einsetzen 7 Das Abdeckgitter 3 aufsetzen 8 Die vier Befestigungsschr...

Страница 24: ...aus Schutzanzug Schutzbrille Atemschutzmaske Klasse P3 Schutzhandschuhen und Sicherheitsschuhen St rung Ursache Behebung Ger t ist nicht funktionsbereit Ger tekomponente defekt Pr fen und Austauschen...

Страница 25: ...orgt werden Die der Entsorgung der Staubsammelbeutel entspricht den Sonderm llbestimmungen und darf nicht in die Kanalisation gelangen oder zusammen mit Hausm ll entsorgt werden Beachten Sie die entsp...

Страница 26: ...altplan 230 V 50 Hz 2 1 N W1 H07RN F M1 230V 1 1KW M 1 PE Q1M 3 3 1 3 5 F1M ETA 10A 6 2 4 PE 3 0 N 3 0 L1 3 0 3 4 2 1 3 3 PE L1 PE PE 450 750V 3G1 5 W2 LFLEX CLASSIC 110 300 500V 3G0 75 GNYE MGH Netza...

Страница 27: ...7 6 5 4 3 8 1 10 9 11 14 12 13 15 X3 X5 X4 X2 2 8 N 2 8 PE 2 PE 3 1 PE PE L N tr ge 1A F1 H Q B N A optional 24V GND Dig OUT 24V 24V 12V GND GND GND SIG SIG GND 0V DC 3 A1 A2 F1M 2 4 LFLEX CLASSIC 13...

Страница 28: ...lan 115 V 50 60 Hz M 1 M1 120V 1 1KW 60Hz 2 1 PE Q1M 3 3 1 3 5 F1M ETA 10A 6 2 4 PE 3 0 N 3 0 L1 3 0 3 4 2 1 3 3 PE PE W2 LFLEX CLASSIC 110 500V 3G1 5 GNYE MGH Turbine N W1 H07RN F PE L1 450 750V 3G1...

Страница 29: ...EX CLASSIC 130 H 300 500V 3x0 5 GND 12V Hirschmann 4 polig B1 FEC SGH Out1 4 24V DC 14 13 2 2 4 3 5 Q1M Motorsch tz 7 6 8 9 X3 Q Dig OUT GND 0V DC 3 A1 A2 F1M 2 4 2 8 L1 X1 2 Spannungsversorgung 5 4 3...

Страница 30: ...instructions for the mains connection EN 6 2 7 Warning and notice signs EN 6 2 8 Emergency information EN 6 3 Product description EN 6 3 1 Technical data EN 7 3 2 Abbreviations EN 7 3 3 Nameplate EN...

Страница 31: ...onnection voltages of 115 V and 230 V These operating instructions only describe the FEC The FEC fume extraction system may be operated only with original ABICOR BINZEL spare parts 1 1 Marking This pr...

Страница 32: ...ble dangers in Germany see TRBS 1203 Keep other people out of the work area Please observe the occupational health and safety regulations of the relevant country Ensure the work area is well lit and k...

Страница 33: ...ied With natural ventilation this is the case if the work area volume is at least 200 m e g surface of 58 m multiplied by room height of 3 5 m CAUTION Describes a potentially harmful situation If not...

Страница 34: ...must always be legible They may not be covered obscured painted over or removed 2 8 Emergency information In the event of an emergency immediately disconnect the following supplies Electrical power s...

Страница 35: ...und pressure level LpA1 1Measured according to the enveloping surface method according to DIN EN ISO 3744 measured at minimum volume flow uncertainty of measurement of noise approx 4 dB A 76 dB A Weig...

Страница 36: ...Symbol Description Bullet symbol for instructions and lists Cross reference symbol refers to detailed supplementary or further information 1 Step s described in the text to be carried out in successi...

Страница 37: ...on the control panel 6 2 2 Automatic starting functions on page EN 13 DANGER Risk of fire Before installing and operating the fume extraction system please observe the following The extraction of weld...

Страница 38: ...r Status for operation is OK Filter Excellent Filter is clean Tab 7 Control elements 1 2 3 4 5 6 DANGER Risk of injury due to unexpected start The following instructions must be followed during all ma...

Страница 39: ...onents above persons or other devices Wear your personal protective equipment safety shoes with steel toe caps protective gloves ear protectors Send bystanders out of the danger zone Note the weight o...

Страница 40: ...omatically starts the fume extraction process 1 Lay the ground cable 4 in the integrated automatic Start Stop system 6 2 Connect the ground cable 4 on one end to the power source and on the other end...

Страница 41: ...assembly in the current clamp 3 Press the A Auto button 1 on the control panel The fume extraction system starts automatically when the welding process starts Button Description I Power Manual 0 Erro...

Страница 42: ...am on page EN 26 1 Mounting screws 4 pieces 2 Air exhaust louver 3 Exhaust air hose Fig 8 Separate exhaust air hose 1 2 3 WARNING Electric shock Dangerous voltage due to defective cables Check all liv...

Страница 43: ...x 25 C CAUTION Risk of injury Damage from improper use Be sure that the housing does not make contact if you pass over edging because damage to the housing could occur Do not point the suction hose at...

Страница 44: ...supply Disconnect all electrical connections WARNING Electric shock Dangerous voltage due to defective cables Check all live cables and connections for proper installation and damage Replace any damag...

Страница 45: ...air outlets 9 4 Changing the filter on page EN 20 Visual inspection Dust in the turbine area Remove dust using an industrial vacuum cleaner or a damp disposable cloth Visual inspection Cable connecti...

Страница 46: ...ing in the supplied dust collecting bag Fig 11 Emptying the filter housing on page EN 19 NOTICE Check and wear your personal protective equipment Personal protective equipment consists of protective c...

Страница 47: ...g 2 and seal it 7 Dispose of the dust collecting bag in accordance with local regulations 8 Put the cap 1 back on NOTICE Check and wear your personal protective equipment Personal protective equipment...

Страница 48: ...ousing 1 forward 4 Place the protective underlay 4 in the package with the new filter cartridge on the extraction system CAUTION Check and wear your personal protective equipment Personal protective e...

Страница 49: ...lter housing 1 a few centimeters place the filter bag supplied with the new filter cartridge over the filter cartridge 3 5 Once the filter cartridge 3 is completely in the filter bag close the bag Dis...

Страница 50: ...er 1 7 Screw the mounting screws 2 in the cover 1 8 Switch on the fume extraction system NOTICE Check and wear your personal protective equipment Personal protective equipment consists of protective c...

Страница 51: ...onto its back 3 Loosen the four mounting screws 4 with the Allen key 4 Remove the cover grille 3 5 Remove the FEC filter pad 2 6 Insert the cleaned or new FEC filter pad 2 7 Mount the cover grille 3 8...

Страница 52: ...ass P3 respiratory mask protective gloves and safety shoes Fault Cause Troubleshooting Unit is not ready for operation Device component defective Have it checked and replaced Extraction system defecti...

Страница 53: ...st collecting bags is subject to special waste regulations The dust must not enter sewage systems or be disposed of together with normal household waste Observe the local and official regulations 12 3...

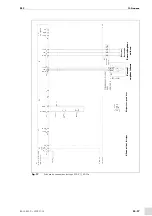
Страница 54: ...diagram 230 V 50 Hz 2 1 N W1 H07RN F M1 230 V 1 1 KW M 1 PE Q1M 3 3 1 3 5 F1M ETA 10 A 6 2 4 PE 3 0 N 3 0 L1 3 0 3 4 2 1 3 3 PE L1 PE PE 450 750 V 3G1 5 W2 LFLEX CLASSIC 110 300 500 V 3G0 75 GNYE MGH...

Страница 55: ...1 10 9 11 14 12 13 15 X3 X5 X4 X2 2 8 N 2 8 PE 2 PE 3 1 PE PE L N slow blow 1 A F1 H Q B N A Optional 24 V GND Dig OUT 24 V 24 V 12 V GND GND GND SIG SIG GND 0 V DC 3 A1 A2 F1M 2 4 LFLEX CLASSIC 130...

Страница 56: ...15 V 50 60 Hz M 1 M1 120 V 1 1 KW 60 Hz 2 1 PE Q1M 3 3 1 3 5 F1M ETA 10 A 6 2 4 PE 3 0 N 3 0 L1 3 0 3 4 2 1 3 3 PE PE W2 LFLEX CLASSIC 110 500 V 3G1 5 GNYE MGH Turbine N W1 H07RN F PE L1 450 750 V 3G1...

Страница 57: ...IC 130 H 300 500 V 3x0 5 GND 12 V Hirschmann 4 pole B1 FEC SGH Out1 4 24 V DC 14 13 2 2 4 3 5 Q1M Motor contactor 7 6 8 9 X3 Q Dig OUT GND 0 V DC 3 A1 A2 F1M 2 4 2 8 L1 X1 2 Power supply 5 4 3 1 X2 2...

Страница 58: ...cordement lectrique FR 6 2 7 Plaques indicatrices et d avertissement FR 6 2 8 Instructions concernant les situations d urgence FR 6 3 Description du produit FR 6 3 1 Caract ristiques techniques FR 7 3...

Страница 59: ...sponible pour une tension de r seau de 115 V et 230 V Ce mode d emploi d crit seulement le FEC Le dispositif d aspiration FEC ne doit tre utilis qu avec des pi ces d tach es ABICOR BINZEL d origine 1...

Страница 60: ...ersonnes l cart de la zone de travail Respectez les directives relatives la s curit du travail du pays concern Veillez ce que la zone de travail soit bien clair e et propre Respectez les r gles du pay...

Страница 61: ...e est donc suffisante si le volume d air dans la zone de travail s l ve au moins 200 m par ex une surface de 58 m avec une hauteur de 3 5 m ATTENTION Signale un risque ventuel qui s il n est pas vit p...

Страница 62: ...oujours tre lisibles Ils ne doivent pas tre recouverts ou retir s 2 8 Instructions concernant les situations d urgence En cas d urgence coupez imm diatement les alimentations suivantes Alimentation le...

Страница 63: ...iveau de pression acoustique LpA moyen1 1mesur sur une surface entourant la source de bruit selon DIN EN ISO 3744 avec un d bit volumique minimum et une incertitude de mesure du bruit de 4 dB A 76 dB...

Страница 64: ...le de renvoi faisant r f rence des informations d taill es compl mentaires ou suppl mentaires 1 tapes num r es dans le texte et devant tre ex cut es dans l ordre Dispositif d aspiration avec raccordem...

Страница 65: ...age FR 12 DANGER Risque d incendie Les points suivants doivent tre respect s lors de l installation et l utilisation du dispositif d aspiration L aspiration de la fum e de soudage lors du soudage des...

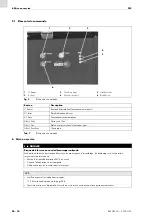
Страница 66: ...ermettant le fonctionnement Filter Excellent Filtre propre Tab 7 l ments de commande 1 2 3 4 5 6 DANGER Risque de blessure en cas de d marrage inattendu Pendant toute la dur e des travaux d entretien...

Страница 67: ...de personnes ou d autres appareils Portez votre quipement de protection individuelle chaussures de s curit avec embouts en acier gants de protection protections auditives loignez toute personne de la...

Страница 68: ...d marre automatiquement 1 Placez le c ble de masse 4 sur le syst me automatique Marche Arr t int gr 6 2 Raccordez le c ble de masse 4 d un c t avec la source de courant et de l autre c t par exemple a...

Страница 69: ...sur le c ble de masse ou le faisceau 3 Appuyez sur le bouton A Auto 1 du panneau de commande D s que vous commencez le processus de soudage le processus d aspiration d marre aussi Bouton Description...

Страница 70: ...4 pi ces 2 Grille d a ration 3 Tuyau de sortie d air Fig 8 Tuyau de sortie d air s par 1 2 3 AVERTISSEMENT Risque de choc lectrique Tension dangereuse en pr sence de c bles d fectueux Veillez ce que...

Страница 71: ...ulation incorrecte Lors de passage sur un bord veillez ce que le bo tier n entre pas en contact avec celui ci car cela pourrait endommager le bo tier Ne dirigez pas le tuyau d aspiration du dispositif...

Страница 72: ...reuse en pr sence de c bles d fectueux Veillez ce que tous les c bles et raccordements sous tension soient correctement install s et ne soient pas endommag s Remplacez les pi ces endommag es d form es...

Страница 73: ...ouvertures de sortie d air 9 4 Remplacement du filtre la page FR 20 Contr le visuel Retirez la poussi re de la carcasse de turbine l aide d un aspirateur industriel appropri ou d un chiffon humide je...

Страница 74: ...u bo tier de filtre la page FR 19 AVIS Contr lez et portez votre quipement de protection individuelle L quipement de protection individuelle comprend les v tements de protection des lunettes de protec...

Страница 75: ...le sac poussi re conform ment aux dispositions locales 8 Replacez le couvercle de fermeture 1 AVIS Contr lez et portez votre quipement de protection individuelle L quipement de protection individuell...

Страница 76: ...ction 4 du paquet contenant la nouvelle cartouche filtrante sur le groupe d aspiration pour le prot ger ATTENTION Contr lez et portez votre quipement de protection individuelle L quipement de protecti...

Страница 77: ...du bo tier de filtre 1 mettez le sac poussi re fourni avec la cartouche filtrante sur la cartouche filtrante 3 5 Une fois que la cartouche filtrante 3 se trouve enti rement l int rieur du sac poussi...

Страница 78: ...cle 1 8 Mettez le dispositif d aspiration sous tension AVIS Contr lez et portez votre quipement de protection individuelle L quipement de protection individuelle comprend les v tements de protection d...

Страница 79: ...de fixation 4 l aide de la cl six pans 4 Retirez la grille de protection 3 5 Retirez le m t filtrant 2 6 Ins rez le m t filtrant 2 nettoy ou neuf 7 Replacez la grille de protection 3 8 Ins rez les qua...

Страница 80: ...bl me Cause Solution Appareil non op rationnel l ments du dispositif d fectueux Contr le et remplacement par du personnel qualifi Groupe d aspiration d fectueux Contr le et remplacement par du personn...

Страница 81: ...gales pour d chets sp ciaux et la poussi re ne doit pas parvenir dans les canalisations ou tre limin e avec les ordures m nag res Respectez les dispositions locales et administratives 12 3 Emballages...

Страница 82: ...ectrique 230 V 50 Hz 2 1 N W1 H07RN F M1 230 V 1 1KW M 1 PE Q1M 3 3 1 3 5 F1M ETA 10 A 6 2 4 PE 3 0 N 3 0 L1 3 0 3 4 2 1 3 3 PE L1 PE PE 450 750 V 3G1 5 W2 LFLEX CLASSIC 110 300 500 V 3G0 75 GNYE MGH...

Страница 83: ...6 5 4 3 8 1 10 9 11 14 12 13 15 X3 X5 X4 X2 2 8 N 2 8 PE 2 PE 3 1 PE PE L N Action 1 A F1 H Q B s o en option 24 V GND Dig OUT 24 V 24 V 12 V GND GND GND SIG SIG GND 0 V c c 3 A1 A2 F1M 2 4 LFLEX CLA...

Страница 84: ...ue 115 V 50 60 Hz M 1 M1 120 V 1 1 KW 60 Hz 2 1 PE Q1M 3 3 1 3 5 F1M ETA 10 A 6 2 4 PE 3 N 3 L1 3 3 4 2 1 3 3 PE PE W2 LFLEX CLASSIC 110 500 V 3G1 5 GNYE MGH Turbine N W1 H07RN F PE L1 450 750 V 3G1 5...

Страница 85: ...H 300 500 V 3x0 5 GND 12 V Hirschmann 4 p les B1 FEC SGH Out1 4 24 V c c 14 13 2 2 4 3 5 Q1M Disjoncteur protecteur 7 6 8 9 X3 Q Dig OUT GND 0 V c c 3 A1 A2 F1M 2 4 2 8 L1 X1 2 Alimentation lectrique...

Страница 86: ...n a la red ES 6 2 7 Se ales indicadoras y de advertencia ES 6 2 8 Indicaciones para emergencias ES 6 3 Descripci n del producto ES 6 3 1 Datos t cnicos ES 7 3 2 Abreviaturas ES 7 3 3 Placa de identifi...

Страница 87: ...115 V y 230 V Este manual de instrucciones describe nicamente el FEC El extractor de humos FEC debe utilizarse exclusivamente con piezas de recambio originales de ABICOR BINZEL 1 1 Etiquetado El prod...

Страница 88: ...evaluar los trabajos que se le encargan y detectar posibles peligros en Alemania consulte la normativa TRBS 1203 El resto de las personas debe mantenerse alejado del rea de trabajo Respete las normati...

Страница 89: ...ilaci n natural ser suficiente cuando el volumen del rea o espacio de trabajo sea como m nimo de 200 m p ej una superficie de 58 m por una altura de 3 5 m ATENCI N Indica una situaci n posiblemente da...

Страница 90: ...s deben estar siempre visibles No se deben tapar con otros adhesivos ni recubrir pintar o eliminar 2 8 Indicaciones para emergencias En caso de emergencia interrumpa inmediatamente los siguientes sumi...

Страница 91: ...presi n sonora LpA promedio1 1Medido seg n el m todo de control en una superficie de medici n envolvente de acuerdo con DIN EN ISO 3744 con caudal m nimo incertidumbre de medici n del ruido aprox 4 dB...

Страница 92: ...la p gina ES 7 S mbolo Descripci n S mbolo de enumeraci n para indicaciones de manejo y enumeraciones S mbolo de remisi n a informaci n detallada complementaria o adicional 1 Pasos de acci n que deben...

Страница 93: ...dido autom tico en la p gina ES 12 PELIGRO Riesgo de incendio Durante el montaje y la operaci n del extractor de humos se debe observar lo siguiente No est permitido extraer humos de soldadura en el c...

Страница 94: ...to para operaci n Filter Excellent Filtro limpio Tab 7 Elementos de manejo 1 2 3 4 5 6 PELIGRO Riesgo de lesiones por arranque inesperado Lleve a cabo las acciones siguientes durante todos los trabajo...

Страница 95: ...de personas u otros aparatos Lleve puesto su equipo de protecci n individual zapatos de protecci n con puntera de acero guantes de protecci n y protecci n para los o dos Expulse de la zona de peligro...

Страница 96: ...n 1 Coloque el cable de tierra 4 en el sistema autom ticio de arranque y parada integrado 6 2 Conecte el cable de tierra 4 por un lado a la fuente de corriente y por el otro lado p ej a la mesa de so...

Страница 97: ...dor del cable de tierra o del ensamble de cables 3 Presione el bot n A Auto 1 en el cuadro de manejo En cuanto comience con el proceso de soldadura se inicia tambi n el proceso de aspiraci n Bot n Des...

Страница 98: ...ornillos de montaje 4 uds 2 Rejilla de extracci n 3 Manguera de extracci n Fig 8 Manguera de extracci n independiente 1 2 3 ADVERTENCIA Electrocuci n Cables defectuosos pueden ocasionar peligro de alt...

Страница 99: ...decuada Procure que la carcasa no choque contra bordes pronunciados al desplazarla ya que podr an producirse desperfectos en la carcasa No dirija la manguera de aspiraci n del extractor de humos hacia...

Страница 100: ...s ADVERTENCIA Electrocuci n Cables defectuosos pueden ocasionar peligro de alto voltaje Compruebe que todos los cables y las conexiones est n instalados correctamente y que no est n da ados Sustituya...

Страница 101: ...del filtro en la p gina ES 20 Examen visual Polvo en la turbina Si fuera necesario eliminar el polvo con una aspiradora industrial adecuada o con un trapo h medo de un solo uso Examen visual Est n da...

Страница 102: ...ra polvo suministrada 9 3 Vaciado de la carcasa del filtro en la p gina ES 19 AVISO Revise su equipo de protecci n individual antes de pon rselo El equipo de protecci n individual est compuesto por un...

Страница 103: ...a bolsa para polvo de acuerdo con las disposiciones locales 8 Monte de nuevo la tapa de cierre 1 AVISO Revise su equipo de protecci n individual antes de pon rselo El equipo de protecci n individual e...

Страница 104: ...l filtro 1 4 Coloque la l mina de protecci n 4 del paquete del nuevo filtro de cartucho sobre el grupo de aspiraci n ATENCI N Revise su equipo de protecci n individual antes de pon rselo El equipo de...

Страница 105: ...ltro 1 coloque la bolsa del filtro suministrada con el nuevo filtro de cartucho sobre el filtro de cartucho 3 5 Cuando el filtro de cartucho 3 est completamente dentro de la bolsa del filtro cierre la...

Страница 106: ...rnillos de montaje 2 de la tapa 1 8 Conecte el extractor de humos AVISO Revise su equipo de protecci n individual antes de pon rselo El equipo de protecci n individual est compuesto por un traje de pr...

Страница 107: ...s de montaje 4 con la llave Allen 4 Retire la rejilla protectora 3 5 Extraiga la estera de filtro 2 6 Coloque la estera de filtro 2 limpia o una nueva 7 Coloque la rejilla protectora 3 8 Inserte los c...

Страница 108: ...de protecci n Aver a Causa Eliminaci n El equipo no funciona Componente del aparato defectuoso Comprobar y cambiar por personal t cnico cualificado Grupo de aspiraci n defectuoso Comprobar y cambiar p...

Страница 109: ...eliminaci n de residuos t xicos El polvo no debe llegar al sistema de desag e o eliminarse junto con la basura normal Observe las disposiciones locales y oficiales en vigor 12 3 Embalajes ABICOR BINZE...

Страница 110: ...l ctricas 230 V 50 Hz 2 1 N W1 H07RN F M1 230 V 1 1 KW M 1 PE Q1M 3 3 1 3 5 F1M ETA 10 A 6 2 4 PE 3 0 N 3 0 L1 3 0 3 4 2 1 3 3 PE L1 PE PE 450 750 V 3G1 5 W2 LFLEX CLASSIC 110 300 500 V 3G0 75 GNYE MG...

Страница 111: ...7 6 5 4 3 8 1 10 9 11 14 12 13 15 X3 X5 X4 X2 2 8 N 2 8 PE 2 PE 3 1 PE PE L N Lento 1 A F1 H Q B N D Opcional 24 V GND Dig OUT 24 V 24 V 12 V GND GND GND SIG SIG GND 0 V CC 3 A1 A2 F1M 2 4 LFLEX CLAS...

Страница 112: ...s 115 V 50 60 Hz M 1 M1 120 V 1 1 KW 60 Hz 2 1 PE Q1M 3 3 1 3 5 F1M ETA 10 A 6 2 4 PE 3 0 N 3 0 L1 3 0 3 4 2 1 3 3 PE PE W2 LFLEX CLASSIC 110 500 V 3G1 5 GNYE MGH Turbina N W1 H07RN F PE L1 450 750 V...

Страница 113: ...30 H 300 500 V 3x0 5 GND 12 V Hirschmann 4 polos B1 FEC SGH Out1 4 24 V CC 14 13 2 2 4 3 5 Q1M Protecci n del motor 7 6 8 9 X3 Q Dig OUT GND 0 V CC 3 A1 A2 F1M 2 4 2 8 L1 X1 2 Alimentaci n de tensi n...

Страница 114: ...BAL 0533 0 2019 11 15 Notizen Notes Notes Notas FEC Notizen Notes Notes Notas...

Страница 115: ...FEC Notizen Notes Notes Notas BAL 0533 0 2019 11 15 Notizen Notes Notes Notas...

Страница 116: ...E C H N O L O G Y F O R T H E W E L D E R S W O R L D w w w b i n z e l a b i c o r c o m Alexander Binzel Schweisstechnik GmbH Co KG Kiesacker 35418 Buseck GERMANY T 49 64 08 59 0 F 49 64 08 59 191...

Отзывы: