


XIO USER MANUAL | 2106424MNAB |
199
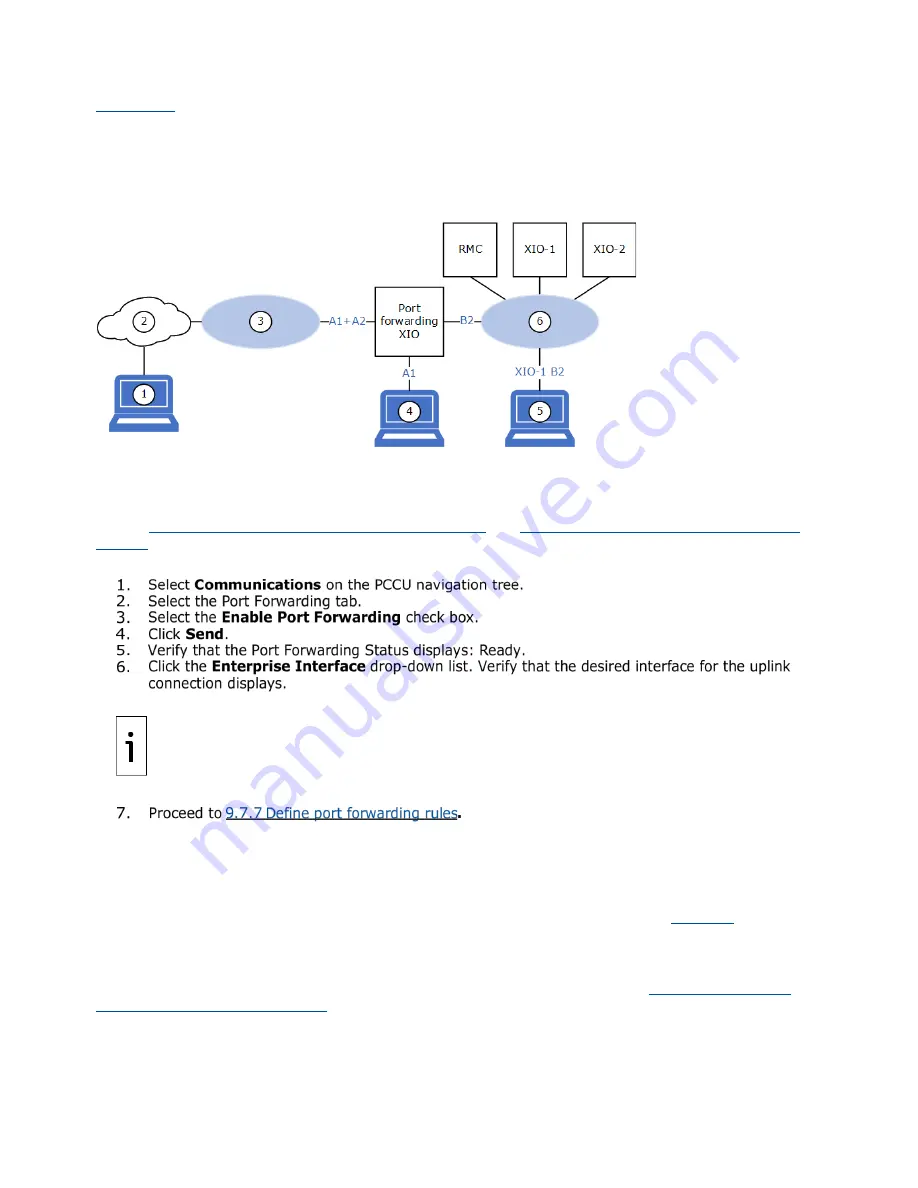
shows a logical diagram of the networks associated with the A1+A2 interface (network 3) and
the B2 interface (network 6). The operator (see laptop 4) can connect to the port forwarding XIO on port
A1 and access only that XIO. To access the other devices, the operator (see laptop 5) connects to an
available port on one of the other XIOs (for example, XIO-1 port B2). The RMC, XIO-1, and XIO-2 are
configured in 2- and 4- port switch modes. All of their Ethernet interfaces are associated with a single
logical network (6).
Figure 9-16: Logical network diagram when A-Network ports are used for WAN connection
9.7.6
Enable port forwarding
This procedure assumes that the required XIO Ethernet interfaces are correctly configured and enabled on
the Network tab. Port forwarding is available only when the default 4-port switch mode is disabled. See
9.5 Enterprise and industrial (3-network) support
9.6 Enterprise and industrial (4 Network)
for instructions to disable the XIO 4-port switch mode and configure the Ethernet interfaces.
To enable Port Forwarding:
IMPORTANT NOTE:
Only enabled Ethernet interfaces display in the
Enterprise Interface
list.
If the interface you plan to use as uplink does not display, go to the Networking tab, verify
configuration, and set to enable.
Any of the XIO Ethernet interfaces, A1+A2 (if combined), A1, A2, B1 or B2, can be used as the
Enterprise interface for connection to the customer network on the WAN. The selection depends
on the customer configuration and field requirements.
9.7.7
Define port forwarding rules
In the Port Forwarding tab’s
Port Forwarding Rules
table, define rules for each device that the XIO will
forward traffic for. There could be several rules or table entries for a single destination device. For
example, if forwarding traffic to access several services on a single device, each service will need its own
entry on the table. Add as many rules as needed to ensure access to those devices.
ports assigned to PCCU, Device Loader and SSH/SFTP in each Totalflow device. PCCU and device loader
access is normally required. SSH/SFTP access is normally reserved for advanced users and should not be
enabled if not needed.
This procedure provides configuration steps for the example described in section
ports for WAN (uplink) connection
. Adapt steps to your specific configuration requirements. Click
Help
on
the Port Forwarding screen for additional details.
Содержание XIO-00
Страница 54: ...54 XIO USER MANUAL 2106424MNAB Figure 4 24 Default XIO Interface configuration ...
Страница 115: ...XIO USER MANUAL 2106424MNAB 115 Figure 6 17 Configure attached device type Figure 6 18 Configure COM port ...
Страница 131: ...XIO USER MANUAL 2106424MNAB 131 Figure 7 7 RBAC select XIO Figure 7 8 RBAC confirm XIO selection ...
Страница 132: ...132 XIO USER MANUAL 2106424MNAB Figure 7 9 Add User in Security Editor Figure 7 10 Type user name and password ...
Страница 140: ...140 XIO USER MANUAL 2106424MNAB Figure 7 18 PuTTYgen Key Generator Key blank field Figure 7 19 New public key ...
Страница 146: ...146 XIO USER MANUAL 2106424MNAB Figure 7 28 Type private key passphrase password Figure 7 29 Unknown host key warning ...
Страница 147: ...XIO USER MANUAL 2106424MNAB 147 Figure 7 30 FileZilla New Site window ...
Страница 148: ...148 XIO USER MANUAL 2106424MNAB Figure 7 31 Open the Flash AppData ssh directory ...
Страница 149: ...XIO USER MANUAL 2106424MNAB 149 Figure 7 32 Upload public key from laptop to device ...
Страница 150: ...150 XIO USER MANUAL 2106424MNAB Figure 7 33 Verify public key upload is complete ...


