
9.
Commissioning
8.
Status LED behavior
10.
Identification label
11.
Characteristics and technical data
Commissioning
VSN300 WIFI LOGGER CARD-Quick Installation Guide EN-Rev D
EFFECTIVE 2015-19-06
© Copyright 2015 ABB. All Rights Reserved.
Specifications subject to change without notice.
Assembly Instructions (continued)
VSN300 WIFI LOGGER CARD
Communication
Inverter interface
Hyperlink (CAN@1 Mbps + RS485@115 kBaud) / Legacy (Serial link TTL @ 19.2 KBaud)
User interface
Wi-Fi Certified™ IEEE 802.11 b/g/n (2,4 GHz)
Communication Protocols
LAN/WAN protocols
HTTPS, DHCP, NTP, SSL, SSH, XML, Modbus TCP (Sunspec)
Monitoring
Web user interface (WUI)
Integrated
Local monitoring
Wirelessly allowed via any Wi-Fi
®
device connecting the integrated WUI or running Plant Viewer for Mobile
Remote monitoring
Plant Portfolio Manager
®
/ Plant Viewer™ / Plant Viewer for mobile
Data Logging Specifications
Data sampling rate
High frequency data sampling (less than 1 minute average)
Local data storage
Log data for 30 days based on 15-minute intervals
Upgradeability
Remotely via Aurora Vision
®
Plant Management Platform / locally via integrated Web User Interface
(1)
Advanced functionalities
Remote O&M operations
Inverter’s parameter setting
(2)
/ inverter’s firmware upgrade
(2)
Smart grid functionalities
Grid control power-management enabled
(2)
Power Supply
DC power consumption
~ 2W
Environmental Parameters
Ambient temperature range
[-20; +85]°C
Environmental protection
IP 20
Relative humidity
<85% Non-condensing
Mechanical Parameters (per unit)
Dimensions (H x W x D)
97mm x 46mm x 16mm (3.81’ x 1.81’ x 0.63’)
Weight
0.06 lbs (26g)
Mounting system
Inverter’s expansion slot
Compliance
Marking
CE / RCM / Wi-Fi Certified™
Emissions
47 CFR FCC Part 15 Subpart C, EN 55022 Conducted and radiated emission
Immunity
EN55024
1. Available from FW version FW 1.8.x
2. Check for availability
Remark. Features not specifically listed in the present datasheet are not included in the product
Provisioning of the VSN300 WIFI LOGGER CARD via Web Browser
The first configuration of the VSN300 can also be performed using a smartphone or a tablet running the Mobile App Plant Viewer for Mobile.
The provisioning or local monitoring is only going to work during daylight hours when the inverter has DC power.
1. Turn on the inverter by physically connecting the AC and DC voltages. The VSN300 WIFI LOGGER CARD will automatically power up and after 60 seconds,
acts as an access point, detectable by a tablet, smartphone or PC.
2. Activate the Wi-Fi connection on the tablet/smartphone/PC and
connect it to the WLAN network established by the WIFI LOGGER
CARD, ABB-SSSSSS-PPPP-WWYY, where:
SSSSSS = Inverter serial number
PPPP = Inverter part number
WW=Week of production of the inverter
YY=Year of production of the inverter
3. Type the default IP address 192.168.117.1 in an internet browser
4.
Insert all the information required by the configuration wizard:
4a. Select the language
4b. Verify that the time zone of the installation site is correct or insert if it is missing.
4c. The VSN300 is able to operate in two different modes of operation:
• “AP mode” (access point): in this mode is enabled local monitoring only. The card behaves like an
“access point” generating a wireless network to which the user can connect to monitor its inverter / PV
plant locally, through the Plant Viewer Mobile App for Mobile or through direct access to the Web User
Interface (WUI) built-in card;
• “Station Mode”: this mode is used to send data to the cloud platform, Aurora Vision, allowing remote
access. Select the “Home” WLAN network and connect the VSN300 and insert the password to enable
this mode. In this operation mode two different methods of assigning an IP address can be selected:
DHCP or static.
“Station Mode” operation mode combined with DHCP IP address assigning method are strongly recom
-
mended in most installations.
4d. When the VSN300 WIFI LOGGER CARD is connected to the “Home” network, the IP address
assigned to the VSN300 will be displayed by the wizard. Take note of this IP address, as it will be
used in the commissioning procedure below.
ATTENTION: be advised that the IP address just assigned to VSN300 is foundamental to conti-
nue the installation wizard. Please take note of it before continuing.
The device used to perform the commissioning of the VSN300 must be connected to the “Home”
WLAN network before continuing the configuration process described in the next steps.
Contact us
www.abb.com/solarinverters
-
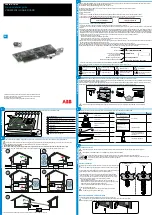
Install the card by inserting the connection terminals in the dedicated connector on the inverter board. The connection on the inverter board can be composed
of one (A) or two (B) different connectors depending on the inverter model.
During this step, confirm that all the terminals are correctly aligned. Any terminal misalignment may result in damage to the card and/or to the inverter.
J1
U8
U3
U11
U7
J2
1
2
23
24
A
B
J1
U8
U3
U11
U7
J2
1
2
23
24
Installation with
single connector
Installation with
double connector
-
Tighten the locking screw to attach the card to the inverter (this screw secures the mounting bracket to the anchor point on the inverter) and tie the antenna
connection cable to the hole on the mounting bracket using the cable tie:
J1
U8
U3
U11
U7
J2
1
2
23
24
J1
U8
U3
U11
U7
J2
1
2
23
24
J1
U8
U3
U11
U7
J2
1
2
23
24
1
2
3
-
Special note for installation on inverter equipped with arc fault device:
In these type of inverter is necessary to install a standoff (supplied with the equipment) under the mechanical mounting bracket.
J1
U8
U3
U11
U7
J2
1
2
23
24
J1
U8
U3
U11
U7
J2
1
2
23
24
Installation with arc
fault connection board
-
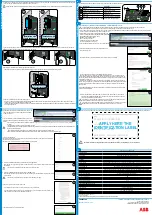
At the end of installation phase, apply the following labels:
-
FCC Label. This label is supplied with the VSN300 WIFI LOGGER CARD and must be appiled near the Regulatory label of the inverter. The FCC label
contains the FCC ID of the VSN300 WIFI LOGGER CARD.
-
Identification label. This label is necessary to remember all the identification data of VSN300 WIFI LOGGER CARD and it should be applied in the dedicated
area (see paragraph 10).
4a
5
2
3
5. Switch the Wi-Fi connection of the tablet/smartphone/PC to the
“Home” WLAN network to which the VSN300 WIFI LOGGER
CARD is connected.
6. Type the IP address previously obtained in step 4d. of the con-
figuration wizard (in this example 192.168.0.100) on an internet
browser.
If for any reason you lost the IP address assigned to the VSN300 (step 4d) you can continue the configuration wizard by executing one of the two following
operations:
-. Using VSN300’s host name in place of just assigned IP address
Further information about host name associated to VSN300 are provided in the product manual available on ABB website (www.abb.com/solarinverters monito-
ring and communication section)
-. Recovering the just assigned IP address by consulting the “Home” Wi-Fi router’s internal configuration pages.
Please consult the documentation related to the “Home” Wi-Fi router for further details on how to access its configuration pages.
7. Fill in the site information
These values are the same for all cards on the site and are shared with Aurora Vision
®
from which it is possible
to update these values at a later time.
If the data are not in the correct format a warning message will be displayed
8. Create the credentials (the password is not mandatory) of the
guest
user
Users who log in as a “guest” can open and view the contents of your site. However, they will not be able to make
any changes
Take note of the credentials you decide to use for the guest user login.
9. Create the credential (User Name and Password) of the
admin
user
Users who log in as an “admin” can open and view the contents of your site. Additionally, they can make changes
to your settings.
Take note about the credentials you decide to use for the admin user login.
10. End of the procedure. The system is now setup.
If you already have an Aurora Vision
®
account click “done” and go to next step.
If you do not have an Aurora Vision
®
account, check the box “Yes, I want to register” and click on “done”. You
will be redirected to the Plant Viewer registration procedure
11. Insert the Aurora Vision
®
access credentials.
6
9
11
This label is necessary to remember all the identification data of VSN300 WIFI LOGGER CARD and it should be applied in the dedicated area shown below.
ABB
VSN300 WIFI LOGGER CARD
SN: YYWWSSSSSS
MAC: XX:XX:XX:XX:XX:XX
PRODUCT KEY: XXXX - XXXX - XXXX - XXXX
APPLY HERE THE
IDENTIFICATION LABEL
Save these instructions! The information on the above label will be used by Technical Service in case of problems.
The VSN300 WIFI LOGGER CARD is equipped with 3 status LEDs that can behaves as follows:
LED
LED Behavior
Description
D
Blinking
Card powered
E
F
Flashing green and yellow, together
Initializing Data Partition
E
F
Alternating green and yellow, flashing
Start-up phase
E
Solid green
Attached to WLAN
F
Solid yellow
Provisioning Access Point Enabled
E
F
Both green and yellow flash together 3 times
Inverter Serial Number Acquired
J1
U8
U3
U11
U7
J2
1
2
23
24
U8
U3
U11
U7
D
E
F
4d
8
4b
7
10
4c