background image

20

INSTRUCTION HANDBOOK

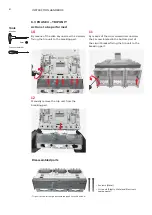
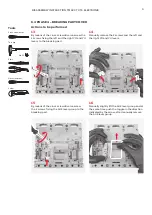
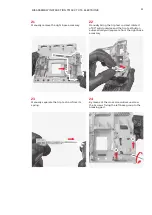
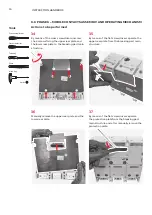
6.7 PHASE 7 – BREAKING PART CASE

52

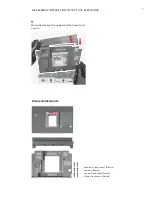
By means of the torx key unscrew the 3 screws 
fixing the arc runners to the breaking part 
case.

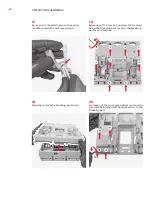
54

By means of the torx key unscrew the 6 screws 
located in the back part of the breaking part 
case.

53

Manually remove the 3 arc runners.

55

Manually remove the protections.

Actions to be performed

Torx key

No. 30

Cutter

Tools 

Содержание TMAX XT XT6 ELECTRONIC

Страница 1: ... INSTRUCTION HANDBOOK 1SDH002300A1001 ECN000285442 TMAX XT XT6 ELECTRONIC Disassembly instructions ...

Страница 2: ......

Страница 3: ... must be worn 2 SAFETY NOTES Before proceeding with any disassembly operation it s mandatory to put the circuit breaker in open position Disassembly operations of circuit breakers must be performed by qualified and skilled personnel in the electrical field IEV 195 04 01 person with relevant education and experience to enable him or her to perceive risks and to avoid hazards which electricity can c...

Страница 4: ...king part 3 Mobile contacts assembly Mounted in the middle of the breaking part 1 Sensors cover Mounted in the trip unit 1 Trip coil Mounted in the trip unit 1 Trip unit printed circuit board Mounted in the trip unit 1 Sensors assembly Mounted in the trip unit 1 Current sensors joints Mounted on the sensors assembly 2 6 DISASSEMBLY PROCESS Circuit breakers disassembly process is constituted by a s...

Страница 5: ...ert the flat screwdriver as shown in the picture and unhook the cap kits from the circuit breaker 2 Insert the flat screwdriver as shown in the picture and unhook the cap kits and their plugs from the circuit breaker Actions to be performed 5mm Disassembled parts 12 screws and related washers Metal 6 cap kits Plastic and Metal SEPARATE TREATMENT Thermoplastics containing brominated flame retardant...

Страница 6: ...ewdriver unscrew the 6 screws fixing the upper and the lower front covers to the circuit breaker main structure 6 Insert the flat screwdriver as shown in the picture and slightly push the screwdriver as shown by the arrow in order to raise up and to unhook the aesthetic front cover from circuit breaker main structure operation must be performed even on the other side of the circuit breaker Actions...

Страница 7: ...y instruction TMAX XT XT6 ELECTRONIC 9 Manually remove the upper and the lower front covers 1 aesthetic front cover Plastic 6 screws Metal 1 upper front cover Plastic 1 lower front cover Plastic Disassembled parts ...

Страница 8: ...he breaking part 11 By means of the cross screwdriver unscrew the 2 screw located in the bottom part of the circuit breaker fixing the trip unit to the breaking part Actions to be performed Tools Disassembled parts 2 screws Metal 1 trip unit Plastic Metal and Electronic components Allen key 4mm Cross screwdriver Trip unit will be furtherly disassembled see Phases 6 8 and 6 9 ...

Страница 9: ...he cross screwdriver unscrew the 2 screws fixing the AUE lever group to the breaking part 14 Manually remove the 2 screws and the left and the right YO and YU levers 16 Manually slightly lift the AUE lever group and at the same time push the toggle in the direction indicated by the arrow after manually remove the AUE lever group Actions to be performed Tools Cross screwdriver Torx key No 25 Pliers...

Страница 10: ... cross screwdriver unscrew the 4 screws fixing the right base accessory to the breaking part 17 By means of the pliers remove the spring mounted inside the AUE lever group 18 By means of the torx key unscrew the 9 screws fixing the breaking part cover to the breaking part main structure ...

Страница 11: ...ly separate the trip test rod from its spring 22 Manually bring the trip test rod and rotate it of 90 anticlockwise and the trip test button automatically will separate from the right base accessory 24 By means of the cross screwdriver unscrew the 3 screws fixing the left base group to the breaking part ...

Страница 12: ...at both sides of the breaking part cover 28 By means of the cutter start removing the label located on the breaking part cover and manually complete the operation 25 Manually remove the left base group 26 By means of the pliers remove the 3 grids located in the upper part of the breaking part cover ...

Страница 13: ... 1 springs Metal 1 right base accessory Plastic and Metal SEPARATE TREATMENT Thermoplastics containing brominated flame retardants 1 trip test rod Plastic SEPARATE TREATMENT Thermoplastics containing brominated flame retardants 1 left base group Plastic and Metal SEPARATE TREATMENT Thermoplastics containing brominated flame retardants 3 grids Metal 2 shock absorbers Rubber 1 label Adhesive paper 1...

Страница 14: ...ss screwdriver unscrew the screw fixing the toggle extension to the toggle holder 31 Manually remove the toggle protection and the toggle holder 30 Manually remove the toggle extension 32 By means of the pliers remove the toggle base Actions to be performed Cross screwdriver Pliers Tools ...

Страница 15: ...ion Plastic SEPARATE TREATMENT Thermoplastics containing brominated flame retardants 1 toggle protection Plastic SEPARATE TREATMENT Thermoplastics containing brominated flame retardants 1 toggle holder Plastic SEPARATE TREATMENT Thermoplastics containing brominated flame retardants 1 toggle base Plastic 3 arching chambers Metal and GP0 3 ...

Страница 16: ...structure 36 Manually remove the upper rear plate and the lower rear plate 35 By means of the flat screwdriver separate the upper rear plate from the breaking part main structure 37 By means of the flat screwdriver separate the protection plate from the breaking part main structure and after manually remove the protection plate Actions to be performed Cross screwdriver Allen key 4mm Pliers Tube ke...

Страница 17: ...ep 42 By means of the flat screwdriver push out from the breaking part main structure the 3 dowels 39 By means of the tube key unscrew the 4 nuts located in the rear part of the breaking part main structure 41 By means of the cross screwdriver unscrew the 2 screws located at both sides of rear part of the breaking part main structure 43 By means of the allex key unscrew the 6 screws located in the...

Страница 18: ...avity let the nuts and washers connected with screws removed at previous step fall down from the breaking part main structure 45 Lift the breaking part main structure and let the I3 assemblies separate from the breaking part main structure by gravity 47 By means of the allen key unscrew the 3 screws located in the bottom part of the breaking part main structure 49 Manually lift the mobile contacts...

Страница 19: ... 6 3 screws Metal 1 rear upper plate Plastic 1 rear lower plate Plastic 1 protection plate Plastic 4 3 nuts Metal 4 2 3 washers Metal 3 dowels Plastic SEPARATE TREATMENT Thermoplastics containing brominated flame retardants 3 benzings Metal 3 I3 assemblies Metal 3 plates Metal 1 mobile contacts assembly Plastic and Metal SEPARATE TREATMENT Thermoplastics containing brominated flame retardants 2 le...

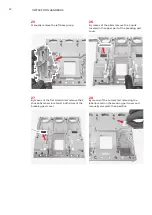
Страница 20: ...rew the 3 screws fixing the arc runners to the breaking part case 54 By means of the torx key unscrew the 6 screws located in the back part of the breaking part case 53 Manually remove the 3 arc runners 55 Manually remove the protections Actions to be performed Torx key No 30 Cutter Tools ...

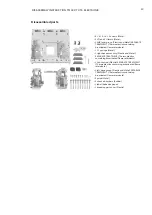
Страница 21: ...and after manually complete the removal 57 By means of the cutter start removing the label located on side of the circuit breaker case and manually complete the operation Disassembled parts 3 6 screws Metal 3 arc runners Metal 3 protections Vulcanized fiber 3 main fixed contacts Metal 1 label Adehsive paper 1 breaking part case Plastic ...

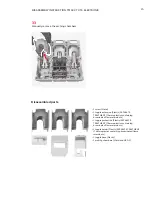
Страница 22: ... located on the trip unit frontal and by means of the pliers complete the operation 61 By means of the torx key unscrew the 2 screws fixing the trip unit frontal to the trip unit main structure 59 By means of the cutter start removing the label with protection functions settings located on the trip unit frontal and manually complete the operation Actions to be performed Torx key No 8 Cutter Tools ...

Страница 23: ...embly instruction TMAX XT XT6 ELECTRONIC 62 Manually remove the trip unit frontal Disassembled parts 1 trip unit transparent protection Plastic 2 labels Adhesive paper 2 screws Metal 1 trip unit frontal Plastic ...

Страница 24: ...rewdriver unscrew the screw fixing the trip coil to the trip unit main structure 64 By means of the torx key size 8 unscrew the 2 screws fixing the sensors cover to the trip unit main structure 66 Manually remove the sensors cover 68 By means of the pliers unhook the connector connecting the trip coil to the trip unit printed circuit board Actions to be performed Cross screwdriver Flat screwdriver...

Страница 25: ... trip unit main structure 73 Manually remove the sensors assembly from the trip unit case 70 Manually remove the trip coil protection located in the trip coil housing 72 By means of the flat screwdriver slightly push the sensors assembly in order to remove them from their housing 74 Manually remove the 2 sensors joints mounted on the sensors assembly ...

Страница 26: ...UCTION HANDBOOK 75 By means of the torx key size 20 unscrew the 6 screws located in the bottom part of the trip unit main structure 77 Manually remove the 3 plates 76 Manually remove the 3 lower fixed contacts ...

Страница 27: ...rd Plastic Metal and Electronic components SEPARATE TREATMENT Printed circuit board 1 sensors assembly Plastic Metal and Mixture SEPARATE TREATMENT Printed circuit board 2 sensors joints Plastic SEPARATE TREATMENT Thermoplastics containing brominated 3 fixed contacts Metal 3 plates Metal 1 trip unit case Plastic 7 ENERGY CONSUMPTION FOR CIRCUIT BREAKERS DISASSEMBLY Since all disassembly operations...

Страница 28: ... Copyright 2022 ABB All rights reserved Specifications subject to change without notice ABB SACE A division of ABB S p A L V Breakers Via Pescaria 5 24123 Bergamo Italy Phone 39 035 395 111 Fax 39 035 395 306 433 abb it lowvoltage ...

Отзывы: