I N S TA L L AT I O N
15
—
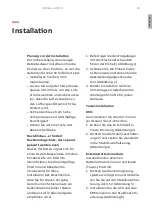
Installation
Planning before the installation
To ensure a long service life, install
the unit in a position where any
danger to the UPS is minimized:
• Install the UPS indoors.
• Leave 50 cm of space on each side
of the cabinet to allow cooling
airflow and ensure that the
circulation of air to the ventilation
slits is not obstructed.
• Avoid excessively high
temperatures and excessive
moisture.
• Make sure that the surface is solid
and flat.
Rack mount installation – requires
rack mounting kit, to be purchased
separately
This procedure is suitable for
19-inch rack cabinet installation
with a minimum depth of 800 mm.
Identify the final position and keep
2U spacing for this installation.
Note that you already installed a rail
kit to the rack cabinet for this
operation, and 1U is recommended
for this job:
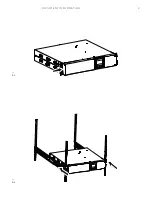
1. Install the ear bracket onto the
unit using the M4 flathead
screws (figure 1).
2. Slide the unit into the rail kit and
make sure to tighten the rack-
mounting screw (figure 2).
3. If installing additional UPS units,
repeat the steps above for each
cabinet
Tower installation
UPS:
To install the UPS in a vertical
(tower) position:
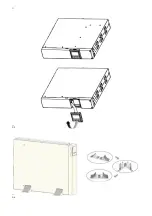
1. Rotate the LCD model to tower
direction. (figure 3).
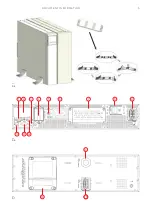
2. Set up the stabilizer bracket then
put the unit into the stabilizer
bracket. (figure 4)
External battery modules:
To install the external battery
module in a vertical (tower)
position:
1. Set up the extension plate as
below and install it on the UPS
stabilizer bracket. (figure5)
2. Install the UPS and EBM
individually into the stabilizer
bracket. (figure 5)
3. Connect to the UPS with the
battery power cable (refer to rack
position installation).
Note:
It is recommended that this
unit be installed to UPS’s righthand
side. If installing an additional unit,
E
N
G
L
ISH
Содержание PowerValue 11 RT G2
Страница 1: ... QUICK GUIDE PowerValue 11 RT G2 6 10 kVA ...
Страница 3: ...DOCUMENT INFORMATION 3 01 02 ...
Страница 4: ...4 03 04 ...
Страница 5: ...DOCUMENT INFORMATION 5 10 11 12 2 4 5 6 7 8 9 1 3 14 11 15 13 05 06 07 ...
Страница 6: ...6 ...
Страница 8: ...8 ...
Страница 38: ...38 POWERVALUE 11 RT G2 6 10 KVA KURZANLEITUNG D E U T S C H ...
Страница 54: ...54 POWERVALUE 11 RT G2 6 10 KVA GUIDE DE RÉFÉRENCE R APIDE FR ANÇAIS ...
Страница 70: ...70 POWERVALUE 11 RT G2 6 10 KVA GUIDA R APIDA I TA L I A N O ...
Страница 86: ...86 POWERVALUE 11 RT G2 6 10 KVA GUÍA R ÁPIDA E S PA Ñ O L ...
Страница 102: ...102 POWERVALUE 11 RT G2 6 10 KVA GUIA DE CONSULTA R ÁPIDA P O R T U G U Ê S ...
Страница 118: ...118 POWERVALUE 11 RT G2 6 10 KVA PIK AOPAS S U O M I ...
Страница 176: ...176 POWERVALUE 11 RT G2 6 10 КВ А КРАТКОЕ РУКОВОДСТВО Р У СС К И Й ...
Страница 192: ...192 POWERVALUE 11 RT G2 6 10 KVA SKRÓCONY PODRĘCZNIK P O L S K I ...
Страница 193: ... 速成指南 PowerValue 11 RT G2 6 10 kVA 重要安全须知 194 安装 199 操作 201 排故 203 中 文 ...
Страница 198: ...198 POWERVALUE 11 RT G2 6 10 KVA 速成指南 注意 要完全断开 UPS 请按关闭按钮 请等到 UPS 处于旁路模式或后备模式时 再将 UPS 从市电断开 注意 随意操作开关可能会导致掉电或设备损坏 中 文 ...
Страница 222: ...222 POWERVALUE 11 RT G2 6 10 KVA Σ ΎΝΤΟΜΟΣ ΟΔΗΓΌΣ Ε Λ Λ Η Ν Ι Κ Ά ...


