background image

2600T Series | 

 OI/JDF200-EN Rev. E   13

7 Operation

8 7 Operation

8.1 7.1 Configuration of the field indicator using the 

optional integral LCD with keypad (menu-controlled)

The integral LCD is connected on the field indicator electronic 
board. It can be used to visualize the process measured 
variables as well as to configure the display.

In addition, diagnostic information is provided. To access the 
functionality of the LCD an activation procedure needs to be 
carried out. The keypad activation procedure is the same for 
the TTG (Trough The Glass) version and the conventional LCD.

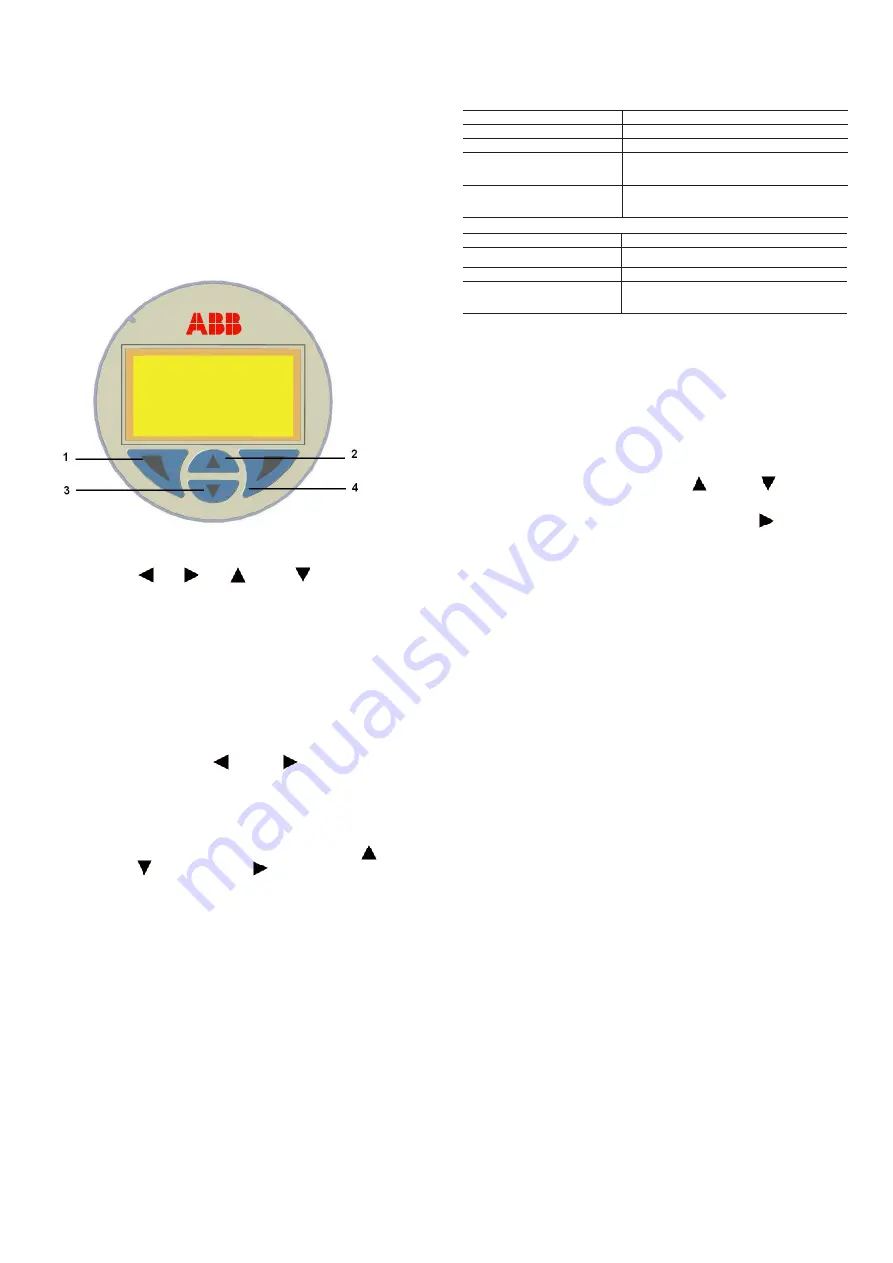
Figure 8: Display keypad

The keys (1) 

, (4) 

, (2) 

and (3) 

are available for the 

menu-controlled configuration.

  — The menu / submenu name is displayed above in the LCD  
   display.

  — The number/line of the currently selected menu item is    
    displayed in the upper right of the LCD display.

  — A scroll bar is located on the right edge of the LCD  


    display which shows the relative position of the currently   
    selected menu item within the menu.

  — Both of the keys (1) 

 and (4) 

can have various  


functions. 


    The meaning of these buttons is displayed below in the    
    LCD display above the respective button.

  — You can browse through the menu or select a number    
    within a parameter value using both keys (2) 


    and (3) 

. The button (4) 

 selects the desired menu    

   item.

Button (1) functionalities

Meaning

Exit

Exit menu

Back

Back one submenu

Cancel

Exit without saving the selected parameter 
value

Next

Select next position for entering numerical val-
ues or letters

Button (4) functionalities

Meaning

Select

Select submenu/parameter

Edit

Edit parameter

Ok

Save selected parameter and display stored 
parameter value

8.2 7.2 Conventional LCD (L1 option) 

Gain access to the display by unscrewing the windowed cover. 
Please observe the Hazardous area prescription before 
proceeding with the cover removal. For activation, see 
instructions below.

8.3 7.3 LCD menu structure

The LCD menu is divided in the following sections which can 
be selected by acting on the keys (2) 

 and (3) 

 , once on 

the display the desired sub-menu icon will be visualized, 
confirm your selection with the [SELECT] key (4) 

 . 

Follow the instruction on the screen to perform the 
configuration of the different parameters.

Содержание JDF200

Страница 1: ...troduction Model JDF200 field indicator provides simple and low cost remote indication of a process variable on an easy to read meter ensuring the most useful display for any specific application For...

Страница 2: ...t of ABB a world leader in process automation technology we offer customers application expertise service and support worldwide We are committed to teamwork high quality manufacturing advanced technol...

Страница 3: ...Wiring procedure 12 6 4 Grounding 12 1 8 7 Operation 13 7 1 Configuration using the LCD with keypad 13 7 2 Conventional LCD L1 option 13 7 3 LCD menu structure 13 7 3 1 Easy Set up 15 7 3 2 Device Se...

Страница 4: ...ion to the electrical connections to the configuration and to the troubleshooting and maintenance operations 2 2 1 2 Models covered by this manual The present manual can be used for JDF200 Field Indic...

Страница 5: ...ms For safety reasons ABB draws your attention to the fact that only sufficiently insulated tools conforming to DIN EN 60900 may be used Since the field indicator may form part of a safety chain we re...

Страница 6: ...to the WEEE Directive 2012 19 EU or corresponding national laws Starting from August 15th 2018 electrical and electronic equipment marked with the crossed out wheeled bin symbol may not be disposed as...

Страница 7: ...00 EN Rev E 7 3 Transmitter overview 4 3 Field indicator overview 4 1 3 1 Field indicator components overview Figure 1 Field Indicator components 1 2 1 LCD display with keypad L1 option 2 Terminal blo...

Страница 8: ...r Ex ia Ex d ITS 16 ATEX 10166X for Ex nA A 5 2 4 2 Optional wired on SST plate I1 The 266 transmitter can be supplied with the optional Wired On Stainless Steel plate figure 4 which is permanently la...

Страница 9: ...rations The field indicator can be installed in hazardous area only if certified The certification plate is permanently fixed on the field indicator housing JDF200 can have the following certification...

Страница 10: ...l U bolt for pipe fixing The U bolt and nuts supplied are necessary for the installation on pipe In case of panel or wall installation the U bolt and the U bolt nuts and washers will not have to be us...

Страница 11: ...f explosion proof protection see relevant warning Depending on the design supplied the electrical connection is established via a cable entry M20 x 1 5 or 1 2 14 NPT thread The screw terminals are sui...

Страница 12: ...ngs can be fitted to these threads to comply with plant wiring conduit standards Remove the housing cover In an Explosion Proof Flame Proof installation do not remove the field indicator cover when po...

Страница 13: ...h of the keys 1 and 4 can have various functions The meaning of these buttons is displayed below in the LCD display above the respective button You can browse through the menu or select a number withi...

Страница 14: ...ast Moreover it is possible to choose in details what you want to see on the display one or two lines with bargraph Display scaling high and low trimming can be performed accessing a dedicated section...

Страница 15: ...2600T Series OI JDF200 EN Rev E 15 7 Operation 8 3 1 7 3 1 Easy...

Страница 16: ...16 OI JDF200 EN Rev E 2600T Series 7 Operation...

Страница 17: ...2600T Series OI JDF200 EN Rev E 17 7 Operation...

Страница 18: ...18 OI JDF200 EN Rev E 2600T Series 7 Operation 8 3 2 7 3 2 Device...

Страница 19: ...2600T Series OI JDF200 EN Rev E 19 7 Operation 8 3 3 7 3 3 Process...

Страница 20: ...20 OI JDF200 EN Rev E 2600T Series 7 Operation 8 3 4 7 3 4 8 3 5 7 3 5 Device 8 3 6 7 3 6...

Страница 21: ...tor scale output range default value is 5 Square root transfer funtion is finally applied 8 4 3 7 4 3 Square root to the 3rd power Using this function the relation between the indicator scale output v...

Страница 22: ...ible cause Suggested action F255 004 Electronic Memory Failure Electronic NV memory corrupted The electronic must be replaced F250 003 Output ReadBack Failure Voltage reference failure Power off and o...

Страница 23: ...cleaning inspection repairs and replacement of damaged components 10 1 9 1 Returns and removal Defective field indicator sent to the repairs department must wherever possible be accompanied by your o...

Страница 24: ...0 JDF200 Category 1G Ex ia Zone 20 JDF200 Category 1D IP6x Ex ia not Gas with a dust layer up to 50 mm depth Certificate IECEx Ex ia IIC Tx Ga and Ex ia IIIC Tx Da IP67 ATEX certificate number ITS 16...

Страница 25: ...ator can be connected to either ib or ia supply associated apparatus certified Ex ia Application with Gas Application with Dust Note the protection is mainly assured by the IP degree associated to the...

Страница 26: ...on of the inside electronics against ingress of solid foreign objects including dusts The assigned 6 means an enclosure dust tight no ingress of dust The second characteristic numeral indicates the pr...

Страница 27: ...2 Entities for Ex D and Ex nA Zone 2 JDF200 Category 3G Ex nA Note the protection is mainly assured by the IP degree associated to the low power from supply Important Note for field indicator with co...

Страница 28: ...Vdc 50 C Ta 40 C V 30 Vdc Ex db IIC Tx Gb II 2D Ex tb IIIC Tx Db IP67 50 C Ta 75 C V 42Vdc N A 50 C Ta 75 C V 42Vdc 50 C Ta 75 C V 42Vdc Ex nA IIC Tx Gc Ex tc IIIC Tx Dc IP67 50 C Ta 75 C V 42Vdc 50 C...

Страница 29: ...o temporary overvoltages occurring on the mains supply Pollution degree 2 Maximum relative humidity 80 for temperatures up to 31 C decreasing linearly to 50 relative humidity at 40 C Transient overvol...

Страница 30: ...type of protection NonIncendive for Class I Division 2 Groups A B C and D in accordance with Nonincendive field wiring requirements for hazardous classified locations as Ex ic type of protection Intri...

Страница 31: ...endive for Class I Division 2 Groups A B C and D in accordance with Nonincendive field wiring requirements for hazardous classified locations as Ex ic type of protection Intrinsically Safe for use in...

Страница 32: ...0Vdc Ii Imax 58 mA 50 C Ta 40 C Ui Vmax 30Vdc Ii Imax 28 mA Canada Ex ta IIIC Tx Da IP67 US CL I Div 2 GP ABCD T6 T4 CL II Div 2 GP FG T6 T4 CL I Zone 1 AEx d IIC T6 T4 Gb 40 C Ta 75 C Ui Vmax 42Vdc I...

Страница 33: ...2600T Series OI JDF200 EN Rev E 33...

Страница 34: ...without any special precautions Material s which have been in contact with this equipment C If A or B are not applicable full instructions for the safe handling of this equipment for disposal must be...

Страница 35: ...transmitters 13 6 ABB s portfolio of device management Fieldbus and wireless solutions Scalable asset device management Asset vision software Mobility handhelds 13 7 Customer Support We provide a comp...
Страница 36: ...ubject matter and illustrations contained therein Any reproduction disclosure to third parties or utilization of its contents in whole or in parts is forbidden without prior written consent of ABB ABB...

Отзывы: