


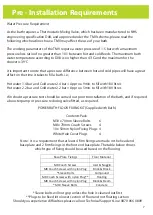
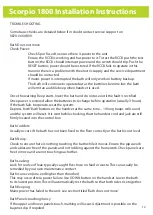


Floating Floors
The definition covers a multitude of floor finishes. Typical examples below.
It is imperative that before any work is carried out that an understanding of the floor
composition is carried out.
1. Floating floor fixed to wood
supports over concrete joists.
2. Floating floor fixed to wood.
3. Floating floor on cushion material.
Dependent upon the sub-structure a decision can be made as to whether it is feasible to install a
powered bath with chair. If the bath is a platform bath this is not an issue as there is little or no
lateral load. The issue arises when it is necessary to support the cantilever effect of the chair
and patient.
Read below to address the floating floor that affects your installation:
1. It is feasible to tackle this type of floor in two ways.
a) Remove a section of the surface floor and ‘build up’ from the concrete sub-floor. This can be
done by creating a ‘tray’ and fill this using a concrete mix. Alternatively timber joists can be anchor
bolted to the concrete sub-floor to provide the needed support. The finish should come level
with the surface floor.
b) If the void is small it is acceptable to drive through with Raw/Coach bolts. This may require a
small section of the surface floor being removed and material such as sheet wood inserted to
fill the area.
2. This type of void requires the surface floor removing and noggins introduced to brace between
the joists Particular attention should be made on the area where the foot plate of the bath is to
be sited.
3. Dependent upon the void size it is usually acceptable to remove the material
(Often 100mm/4” polystyrene) and back filling with concrete.
Under No Circumstances should fixings be made to the surface floor alone.
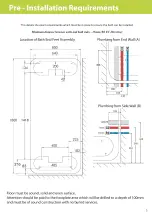
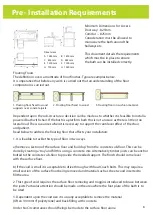
Pre - Installation Requirements
Minimum Dimensions for Access:
Doorway: - 825mm.
Corridor : - 825mm
Consideration must be allowed to
manoeuvre the bath around the
hallways etc.
This document details the requirements
which must be in place to ensure
the bath can be installed correctly.
8
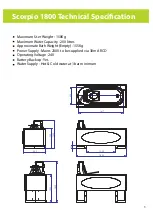
Dimensions
A
1385mm
B
1800mm
C
800mm
D
485mm
E
1300mm
F
1000mm
G
700mm
H
1020mm
B


