background image

39

About Menu

How to view P8 “About” information

• 

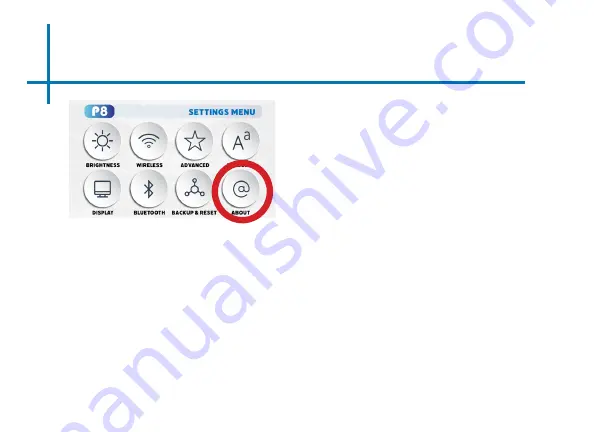
In the Settings Menu, go to the About Menu by selecting the about icon

• 

In the About menu, you can Update System, check Device Name, Re-

start,  Check Status & Legal Information, check Model Name & Android 

Version, check Android Security Patch Level, Kernel version and Build, 

Содержание P8

Страница 1: ...aaxa TECHNOLOGIES User Guide P8 Smart Mini Projector Wifi Bluetooth ...

Страница 2: ...iving DO NOT expose to water or wet surfaces Electric shock may occur DO NOT expose the projected LED image to your eyes or the eyes of others DO NOT block or restrict airflow from ventilation holes as this may cause the projector to overheat Keep the projector battery or charger away from any heat sources ...

Страница 3: ...eens Main Menu Brightness Menu Wifi Menu Mirroring Menu Streaming Services Menu Office Menu Files Menu Browser Menu Apps Menu FAQ Slideshow Zoom Connecting to Digital Input Chapter 4 Settings Menu Advanced Settings Language Settings Display Settings Keystone Projection Direction Bluetooth Menu Backup Reset Chapter 5 Technical Details Troubleshooting Specifications Notes 1 2 3 4 5 6 7 11 12 13 14 1...

Страница 4: ...P8 at a Glance 1 Chapter 1 Digital AV HDMI Compatible Main Unit Focus Adjustment Micro SD TF Card Headphone Out 12V D C Power Power Button USB C Mirroring Type C Mirroring Standard USB 2 0 Compatible ...

Страница 5: ...keypad and remote can be used to navigate through the menus The Main Menu Navigation on the remote functions exactly the same as the directional pad on the P8 unit Main Menu Navigation Media Player Menu Navigation Volume Up Volume Down Remote Keystone Adjustment Keystone Adjustment ...

Страница 6: ...ies 3 Under various circumstances the actual accessories may be different from those shown in the pictures above Additional accessories are available for purchase at www aaxatech com Power Adapter Remote Tripod ...

Страница 7: ...n Off button at the back of the P8 for about 3 seconds wait shortly and the projector should automatically boot up and turn on 4 Powering ON the projector Chapter 2 Powering OFF the projector 1 To turn off the projector press the On Off button This will fully turn off the projector 2 Unplug and disconnect the P8 from the power source ...

Страница 8: ...ow Distance Units Inches 20 30 40 50 60 70 80 90 Diagonal Size Units Inches 19 29 38 48 57 67 76 86 Spin the focus wheel up or down until the image becomes clear Focus Adjustment Throw Distance Chart Throw Ratio 1 20 Projection Angle 100 Offset minimum throw distance 16 inches ...

Страница 9: ...r speakers headphones to the projector s audio port Step 1 Step 2 CAUTION Prolonged use of headphones at a high volume may impair hearing Ensure that the projector and or the headphones are powered on Step 3 Place the headphones on and enjoy 6 ...

Страница 10: ...7 Loading External Content The P8 can read files directly from both a TF Card and USB Drive Supported file types include MP3 WMA OGG WAV AVI MP4 JPG GIF PDF DOC XLS PPT up to 64 GB up to 64 GB ...

Страница 11: ...ding External Content Cont How to insert your TF Card Slide in your TF card into the TF card slot on the side of the P8 as shown in picture Gently slide the TF card until it clicks into place 8 up to 64 GB ...

Страница 12: ...Loading External Content Cont How to insert your USB Drive Slide your USB Drive into the USB port Gently slide the drive until it cannot go in any further 9 up to 64 GB ...

Страница 13: ... inserted into the projector the TF Card or USB Drive Storage will be loaded automatically and the content can be found through the Files icon on the Main Menu See Page 21 for File Viewer Sub menu To load Text documents select the Office icon See Page 19 to learn more ...

Страница 14: ...rectly from your connected devices Press the left and right directional buttons to choose an icon from the main menu To select a menu option press the OK button in the middle of the navigation pad To go back to the previous screen press the Back button To Jump back to the submenu press the Menu button once To return to the main menu press the Return button twice Menu Exit Back ...

Страница 15: ...ghtness Fig 3 2 Select the brightness you wish Fig 3 3 Eco Mode Standard Mode Boost Mode 12 Fig 3 1 Fig 3 2 Fig 3 3 Boost mode should only be used in low temperature low altitude environments with adequate clearance of exhaust intake vents A tripod is highly recommended DO NOT block vents while operating in Boost mode ...

Страница 16: ...o Wifi 13 How To Screen Mirror Smartphone In the Main Menu choose the Wifi Setup icon Fig 3 4 In the Wifi Menu toggle the Wifi icon to On and select the Wifi network you desire Enter password and connect Fig 3 5 Fig 3 4 Fig 3 5 ...

Страница 17: ...ecting the P8 to wifi in the Main Menu choose Mirroring icon Fig 3 6 In the Mirroring Menu choose Android or iOS Fig 3 7 Use built in AirPlay AirPinCast AirPinPCSender to screen mirror from your iOS devices Android portable devices or Windows PC Fig 3 6 Fig 3 7 ...

Страница 18: ... To screen mirror your devices and the P8 have to be connected to the same Wifi network DMCA copyright content cannot be wirelessly mirrored This includes content from streaming services such as Netflix Hulu Disney etc ...

Страница 19: ...oid device after connecting the P8 and your device to the same WiFi network please use Smart View To screen mirror iOS device after connecting the P8 and your device to the same WiFi network please select AAXA P8 in the Screen Mirroring menu ...

Страница 20: ...ct the Streaming Services icon in the Main Menu Select the streaming service you wish to open Streaming Services require subscription including paid subscription Users are responsible for their own subscriptions Not all streaming apps are compatible in all regions ...

Страница 21: ...Office Menu 18 In the Main Menu select the Office icon to access the N Docs app ...

Страница 22: ...19 FAQ How to load a file in Office Load your external content to the P8 by using a USB stick or a Micro SD TF Card ...

Страница 23: ...The office documents Word Excel PowerPoint or Templates should show in Office Microsoft Select Microsoft and choose the file you wish to open Use the keypad on the top of the P8 or the remote control to nagivate FAQ How to load a file in Office ...

Страница 24: ...rd drive Use the navigation buttons to select folders or files Opening A File Select the Files icon in the Main Menu Fig 3 8 In the Files Menu select the external content device USB Micro SD TF Card that contains the file you wish to open Fig 3 9 Fig 3 8 Fig 3 9 Files Menu ...

Страница 25: ...r Menu How to open an internet browser in the P8 In the Main Menu select the Browser icon Once the Chrome browser opens press the button on the navigation pad or the remote control to search or type web address ...

Страница 26: ... apps in the P8 In the Main Menu select the Apps icon Fig 3 10 In the Apps Menu select the app you wish to open Fig 3 11 Apps Menu Fig 3 10 Fig 3 11 Note It is not recommended that users load their own apps onto the P8 ...

Страница 27: ...y a slideshow 1 Connect the USB or Micro SD Card to the P8 2 In the Main Menu select the Apps icon 3 In the Apps Menu select the Gallery icon Fig 3 12 4 In the Gallery app your photos and videos will be available to view as slideshows Select the files you wish to open 24 Fig 3 12 Fig 3 13 ...

Страница 28: ...p Use the up and down button on the remote control to adjust the size of the image To zoom in an image press the down button on the remote control To zoom out an image press the up button on the remote control FAQ How to zoom in and zoom out an image Zoom out Remote Zoom in ...

Страница 29: ...image Open the image in the Gallery App Use the up and down button on the remote control to adjust the brightness level of the image To make the image brighter press the up button on the remote control To make the image dimmer press the down button on the remote control Decrease Brightness Remote Increase Brightness ...

Страница 30: ...o game consoles and other peripherals with ease The P8 s digital input is compatible with HDMI inter face The connection type is full sized Some smartphones require video out capabilities to be displayed with the P8 Check with your phone manufacturer In the Main Menu Select the Inputs Icon Then select the Digital Video Icon First a digital input cable is required from your P8 to your other device ...

Страница 31: ...tep 3 In the Main Menu select the Digital Video Icon Your P8 should now be mirroring the content from your device Connect the other end of the Digital Input Cable to your P8 s Digital Input port If you re connecting to a computer or laptop and the projector does not automatically mirror it read onto the next page for more information Note ...

Страница 32: ...uctions for a Windows 10 computer not all systems are the same Press Windows P to toggle through display settings Select either Duplicate or Extend de pending on your viewing option NOTE Different operating sys tems may differ Step 5 1 Right click on computer desktop and select Screen Resolution 2 Display Properties window will pop up and select the Advance Display Settings 3 Please make sure the ...

Страница 33: ...Bluetooth Accounts Sign In Device Preference Language Display Keystone Projection Direction Mode image Color Temperature Bluetooth Backup Reset Reset Update Android Update CPU About Within the settings menu there are eight more submenus that allow you to customize your P8 to the settings you want Brightness Eco Standard Boost Chapter 4 ...

Страница 34: ...u can set up Network Internet Bluetooth Accounts Sign in Apps Device Preferences About Date Time Language Keyboard Autofill Mouse Mode Display Inputs Sound Storage Screen saver Developer Options Location Security restrictions Accessibility and Rest 31 ...

Страница 35: ...Language 32 In the Advanced setting menu you can select your preferred language ...

Страница 36: ...eystone Down Projection Direction Front Vertical Rear Vertical Rear Inverted Front Inverted Mode Image Auto Mode 4 3 16 9 Color Temperature Medium Cool Warm In the Advanced setting menu you can set up Keystone Projection Direction Mode Image Color Temperature ...

Страница 37: ...Projection Direction Keystone reset Reset keystone in the P8 Keystone up Add Keystone Up to the projection Keystone down Add Keystone Down to the projection Front Vertical Rear Vertical Rear Inverted Front Inverted ...

Страница 38: ...the remote control until the keystone effect corrects and the the picture turns into a square projection What is keystone Keystoning occurs when a projector is aligned non perpendicularly to a screen or when the projection screen has an angled surface The image that results from one of these misalignments will look trapezoidal rather than square Keystone Adjustments FAQ ...

Страница 39: ...ge mode to 4 3 16 9 Set the image mode to 16 9 Medium Medium Set the color temperature to Medium Set the color temperature to Medium Cool Cool Set the color temperature to Cool Set the color temperature to Cool Warm Warm Set the color temperature to Warm Set the color temperature to Warm ...

Страница 40: ...ing the blue tooth icon In the Bluetooth submenu toggle the On Off switch beneath the blue tooth icon to On Select the desired bluetooth device Make sure that your device is not connected to any other devices and it is placed near the P8 Note Bluetooth is for audio output only does not accept audio input or video streaming ...

Страница 41: ...ckup Reset Menu How to reset the P8 In the Settings Menu go to the Backup Reset menu by selecting the Backup Reset icon In the Backup Reset menu you can choose to Reset the P8 or Update Android or Update CPU ...

Страница 42: ... Settings Menu go to the About Menu by selecting the about icon In the About menu you can Update System check Device Name Re start Check Status Legal Information check Model Name Android Version check Android Security Patch Level Kernel version and Build ...

Страница 43: ...rror Netflix Amazon Prime Disney Plus etc Possible Causes Solution For wireless connection DMCA content including Netflix Amazon Prime Disney Plus content is not sharable wirelessly Please use the built in apps to stream DMCA Content or connect your devices to the P8 using the proper cables converters AIRPLAY DOES NOT WORK Be sure to connect your iOS device and the P8 Projector to the same WiFi ne...

Страница 44: ...rojector so that it is both 180 degrees and on an evern plane with the screen or adjust the keystone through the remote keypad or Set tings Menu NO SYNC NO SIGNAL Troubleshooting Be sure to setup the computer to enable a video signal output On some laptops this is done by pressing and holding Function F5 key If using the P8 as an external monitor on Windows based systems this can be done by select...

Страница 45: ...k of the projector Next if the projector is not powered on press the Power button on the remote control NO PICTURE FILE NOT SUPPORTED Possible Causes Solution The video source is not properly connected or selected Check the video source signal to ensure that it is properly connected Select the current input source by choosing the input desired from the main menu Incorrect file extension Video is e...

Страница 46: ...us 16 200 inches RGB LEDs with Vibrant Color Technology Life 30 000hrs HDMI Compatible 1080P Type C Compatible USB Memory Stick reader up to 64GB Micro SD TF Card Reader up to 64GB 2W High Low Frequency Speaker 3 5mm Stereo Headphone Jack 5V 1A 5 watts Android 10 0 5 Pin USB 2 0 Full Size 34 Watts 34 Watts 3 9 x 3 4 x 1 4 8 8 oz MP3 WMA OGG WAV AVI MP4 JPG GIF PDF DOC XLS PPT Supports iOS Android ...

Страница 47: ...44 Notes ...

Страница 48: ...Please direct all customer service inquiries to AAXA Technologies Inc 17781 Sky Park Circle Suite F Irvine CA 92614 714 957 1999 info aaxatech com ...

Отзывы: