AAXA Technologies M7 Скачать руководство пользователя страница 16

13

Video Player Menu

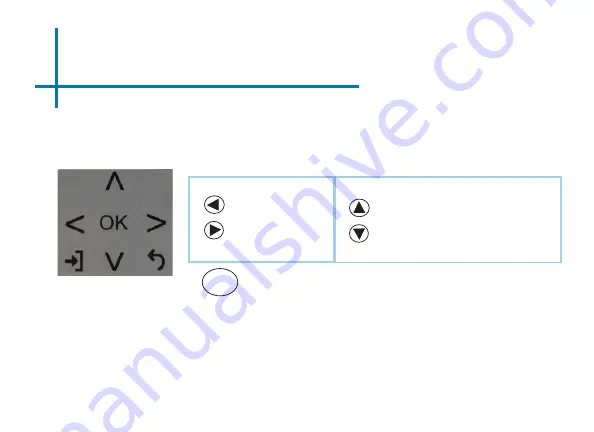
While Playing Videos

While playing videos, the volume is adjustable.  Further controls are available in 

the video player submenu - which is accessed through the “OK” button. 

*Review Specification section of this manual for supported video formats.

Volume Down

Volume Up

OK


Enter Video Player Submenu

• 

To open/hide the video playback menu, use the “OK” or 

“Down” Buttons on the projector or remote

Positive Keystone Adjustment

Negative Keystone Adjustment

On the remote, the “Up” and “Down” arrow buttons also control the keystone ad

-

justment. The volume control on the remote is done through the “Volume Up” and 

“Volume Down” buttons only. 

Содержание M7

Страница 1: ...aaxa TECHNOLOGIES User Guide ...

Страница 2: ...w from ventilation holes as this may cause the projector to overheat Keep the projector battery or charger away from any heat sources Caution for Battery Use Do not pierce or puncture the battery with sharp objects Do not heat the product or expose it to high temperature Do not wet it or place it in any liquid Caution for Headphone Use Prolonged use at high volume may impair your hearing High volu...

Страница 3: ...pter 3 Menu Screens Main Menu Brightness Menu Video Player Menu Photo Menu Connecting to Device via Digital AV Connecting to Device via USBC Connecting to Composite Video Music Player Menu Ebook Viewer Chapter 4 Settings Menu Picture Settings Sound Settings Option Settings Chapter 5 Technical Details Powerbank Mode Keystone Adjustment Troubleshooting Specifications Notes 1 2 3 4 5 6 7 10 11 12 16 ...

Страница 4: ...e 1 Chapter 1 Composite AV Port Main Unit Front Back Dual Speakers Digital AV Port Headphone Out DC Port Cooling Fan Power Switch Powerbank Mode TF Card USB Port Focus Adjustment USB C Compatible Port Control Keypad ...

Страница 5: ... off Both the keypad and remote can be used to navigate through the menus The Main Menu Navigation on the remote functions exactly the same as the directional pad on the M7 unit Power On Off Media Player Menu Navigation Volume Down Remote Back Return Main Menu Navigation KeyStone Adjustment Volume Up Electric Focus Mute Inputs Menu Main Menu Navigation Exit Back Inputs Menu ...

Страница 6: ... circumstances the actual accessories may be different from those shown in the pictures above Additional accessories are available for purchase at www aaxatech com Remote Power Adapter A V Cable Ceiling Mount Kit Sold Separately ...

Страница 7: ...ote to start the projector 4 Powering ON the projector Chapter 2 Powering OFF the projector Standby Mode 1 To transition to STANDBY mode press the power button on the remote control 2 The optical engine should power off and the fan should stop spinning A red LED light is on indicating that the projector is in Standby Mode The projector is now in STANDBY mode and can be turned on using the remote c...

Страница 8: ... 40 50 60 70 80 90 Diagonal Size Units Inches 19 29 38 48 57 67 76 86 To adjust focus of the projector press the or buttons on the remote or use the focus buttons on the side of the projector Focus Adjustment Throw Distance Chart Throw Ratio 1 20 Projection Angle 100 Offset minimum throw distance 6 inches ...

Страница 9: ...our speakers headphones to the projector s audio port Step 1 Step 2 CAUTION Prolonged use of headphones at a high volume may impair hearing Ensure that the projector and or the headphones are powered on Step 3 Place the headphones on and enjoy ...

Страница 10: ...7 Loading External Content The M7 can read files directly from both a TF Card and USB Drive Supported file types include MP3 WMA OGG WAV AVI JPG GIF BMP up to 64 GB up to 64 GB ...

Страница 11: ...de in your TF card into the TF card slot on the side of the M7 as shown in picture Gently slide the TF card until it clicks into place How to insert your USB Drive Slide your USB Drive into the USB port Gently slide the drive until it cannot go in any further up to 64 GB 8 ...

Страница 12: ...or the TF Card or USB Drive Storage will be loaded automatically and the content can be found through the Photos Videos and Music icons located on the Main Menu depend ing on the file type you wish to play Loaded content can also be found through the Text icon located within the Settings Menu ...

Страница 13: ...s music files and text directly from your connected devices Press the left and right directional buttons to choose an icon from the main menu To select a menu option press the OK button in the middle of the navigation pad To go back to the previous screen press the Back button To return to the main menu press the Return button twice Inputs Menu Exit Back ...

Страница 14: ...e the brightness on your M7 Select the Brightness icon Fig 3 1 Select the brightness you wish Fig 3 2 Choose among Eco Standard and Boost NOTE Only Eco and Standard Mode are available when using off battery Fig 3 1 Fig 3 2 11 ...

Страница 15: ...all folders and supported videos files you have on your USB or TF drive Opening a file Select the Video icon Fig 3 1 From the submenu Fig 3 2 select the storage media with the stored files Choose which file you wish to play Fig 3 3 Fig 3 4 ...

Страница 16: ...of this manual for supported video formats Volume Down Volume Up OK Enter Video Player Submenu To open hide the video playback menu use the OK or Down Buttons on the projector or remote Positive Keystone Adjustment Negative Keystone Adjustment On the remote the Up and Down arrow buttons also control the keystone ad justment The volume control on the remote is done through the Volume Up and Volume ...

Страница 17: ... Back button To navigate the Playback Menu use the directional buttons on the navigation pad or remote to highlight the option you wish to choose see fig 3 5 To open hide the video playback menu use the OK and Back buttons on the projector Move selection left Move selection right Fig 3 5 Pause FB FF Prev Next Stop Aspect 00 00 59 00 04 20 Confirm selection OK ...

Страница 18: ...for playback 2 Navigate the folders until you reach the file you wish to play 3 Highlight the file you want to play then confirm the selection 4 Move selection on video player menu to Repeat 1 and confirm the selection 5 The video will now loop after playback is finished 15 ...

Страница 19: ...olders and supported image files you have on your USB or TF Card drive Opening A File Select the Photo icon Fig 3 4 From the submenu Fig 3 5 select the storage media with the stored files Choose which file you wish to play Fig 3 4 Fig 3 5 ...

Страница 20: ...the Photo Submenu which is accessed through the OK button Keystone adjustment is also available Previous Picture Next Picture OK Enter Photo Player Submenu To open hide the Photo Playback menu use the OK and Back Buttons on the projector Positive Keystone Adjustment Negative Keystone Adjustment ...

Страница 21: ...u press the Back button or wait 5 seconds To navigate the playback menu use the directional buttons on the navigation pad or remote to highlight the option you wish to choose Fig 3 6 Review Specification section of this manual for supported picture formats Fig 3 8 00 00 59 00 04 20 Move selection left Move selection right Confirm selection OK ...

Страница 22: ...loop slideshow How do I manually control the slideshow 1 After selecting the photo you wish to be displayed you can press play to start the slideshow as outlined in the previous FAQ 2 To manually control the slideshow you must stop the slideshow with the pause button 3 You may use either the controls on your remote or on top of the projector itself to flip through the pictures in the current playl...

Страница 23: ... iPhones iPads DVD players smart phones cameras video game consoles and other peripherals with ease Some smartphones devices require video out capabilities and adapters to be displayed with the M7 Check with your phone manufacturer In the Main Menu The M7 has a Digital AV port for ultimate connectivity flexibility A digital AV cable is required to connect your M7 to your other device ...

Страница 24: ...p 3 In the Main Menu select the Digital AV Icon Your M7 should now be mirroring the content from your device Connect the other end of the Digital AV Cable to your M7 s Digital AV port If you re connecting to a computer or laptop and the projector does not automatically mirror it read onto the next page for more information Note ...

Страница 25: ... 10 computer not all systems are the same Press Windows P to toggle through display settings Select either Duplicate or Extend depending on your viewing option NOTE different operating systems may differ Step 5 1 Right click on computer desktop and select Screen Resolution 2 Display Properties window will pop up 3 If a secondary monitor is grayed out click on it and se lect Extend these displays i...

Страница 26: ...any media devices including computers laptops iPads and smart phones Device requires video out capabilities through USBC to be displayed with the M7 Check with the manufacturer In the Main Menu The M7 has a USBC compatible Display Port for easy mirroring of devices with a USBC Video Output The USBC Video Cable is required to connect your M7 to your other device ...

Страница 27: ... should now be mirroring the content from your device Connect the other end of the USBC Cable to your M7 s USBC compatible Display Port NOTE When connected via USBC you may experience shorter battery runtime due to the projector outputting more power in order to charge your device Connecting to a Device via USBC Compatible Display Port Cont ...

Страница 28: ...Connecting to Composite Video 25 Connect the 3 5mm Composite AV Cable to the back of the M7 Connect the composite end of the AV Cable Red White Yellow to your device Step 1 Step 2 ...

Страница 29: ...imedia devices The M7 can connect to many media devices including VHS players DVD players Blu Ray players cameras video game consoles and other peripherals with ease 26 In the Main Menu Turn on your multimedia device Select INPUT icon Select RCA Step 3 Step 4 ...

Страница 30: ...io files you have on your USB or TF Card drive Use the navigation buttons to select folders or files Opening A File Select the Music icon Fig 3 7 From the Submenu Fig 3 8 select the storage media with the stored files Choose which file you wish to play Fig 3 7 Fig 3 8 ...

Страница 31: ...e directional buttons on the navigation pad or remote to highlight the option you wish to choose Review Specification section of this manual for supported audio formats To open hide the music playerback menu use the OK and Back button on the projector Once the music playback menu is hidden the left and right buttons will control the volume Decrease Volume Increase Volume Confirm selection OK Fig 3...

Страница 32: ... song playlist 1 Insert your media device either TF card or USB into computer 2 Make a new folder on media device folder name will be the name of the playlist 3 Transfer songs from computer to the new folder name accordingly 4 Remove media device from computer and insert into projector 5 Navigate to Audio section then choose appropriate media device 6 Navigate to your playlist folder 7 Start at fi...

Страница 33: ...ctional pad or remote to flip through the pages you have in the present folder The M7 will show all folders and supported text files you have on your USB or TF Drives Opening A File The E Book Viewer is located in the Setting s Menu Select the Settings Icon Select the Text Viewer icon Fig 3 10 Choose the file you wish to play Fig 3 10 Microsoft Office and PDF file formats are not supported To view...

Страница 34: ...olor Temperature Aspect Ratio Noise Reduction Screen Projection Direction Sound Sound Mode Auto Volume Option OSD Language Restore Factory Default Keystone Slideshow Time Software Version Within the settings menu there are four more submenus that allow you to customize your M7 to the settings you want Chapter 4 ...

Страница 35: ... picture mode to different settings depending on your usage Color Temperature Adjusts the color temperature from warm to cool red to blue Aspect Ratio Changes the aspect ratio of the picture Auto 4 3 16 9 etc Noise Reduction Cleans up MPEG noise without compromising picture resolution Projection Direction Flips the projected image Caution Some pictures may be cut off when aspect ratio is set incor...

Страница 36: ...Sound Settings 33 Sound Mode Changes the sound mode depend ing on what is currently playing Auto Volume With the Auto Volume On the video can be opened with volume automatically ...

Страница 37: ...nglish Spanish Chinese German French Restore Factory Default Restores the projector to factory settings Keystone Allows the user to adjust key stone vertically Slideshow Time Changes the time each slide dis plays when playing a slideshow Software Version Current software version in use ...

Страница 38: ...Powerbank Mode 35 Powerbank Mode The M7 Projector can be used as a power bank to charge your electronic devices including smart phone tablet and so on Chapter 5 Technical Details ...

Страница 39: ...nk Mode 36 How to use the Powerbank Mode Connect your device to the M7 projector through the USB port Find the Charge Off On switch at the back of the M7 projector and toggle the switch to the Charge position ...

Страница 40: ...n screen has an angled surface The image that results from one of these misalignments will look trapezoidal rather than square Digital Keystone Adjustments By adding a special selectable algorithm to the scaling some new projectors are able to alter the image before it reaches the projection lens The result is a squared image even at an angle ...

Страница 41: ... or the up button on the remote control until the keystone effect corrects and the picture turns into a square projection If the image looks trapezoidal with the top larger as pictured right press the bottom button on the directional pad on the top of the M7 or the down button on the remote control until the key stone effect corrects and the picture turns into a square projection ...

Страница 42: ...degrees and on an evern plane with the screen or adjust the keystone through the remote keypad or Set tings Menu NO SYNC NO SIGNAL Troubleshooting 1 Be sure to setup the computer to enable a video signal output On some lap tops this is done by pressing and holding Function F5 key If using the M7 as an external monitor on Windows based systems this can be done by selecting extend my desktop to this...

Страница 43: ...Power Switch on the side of the unit to ON Next if the projector is not powered on press the Power but ton on the remote control NO PICTURE FILE NOT SUPPORTED Possible Causes Solution The video source is not properly connected or selected Check the video source signal to ensure that it is properly connected Select the current input source by choosing the input desired from the main menu Incorrect ...

Страница 44: ... the ON Position or the Charge Position The projector is in low battery Connect the power cord to the M7 Connect the other end of the power cord into the wall power source Toggle the Charge On Off switch to the OFF Position When the projector is fully charged the LED light on the side of the projector will turn green Allow approximately 3 4 hours to fully charge the the projector Troubleshooting 4...

Страница 45: ...ll outlet as well as the projector The projector is not set to the OFF Mode Connect the power cord to the M7 Connect the other end of the power cord into the wall power source Toggle the Charge On Off switch to the OFF Position When the projector is fully charged the LED light on the side of the projector will turn green Allow approximately 4 5 hours to fully charge the the projector Troubleshooti...

Страница 46: ...Eco Battery Runtime Standard 1200 LED Lumens 600 LED Lumens 1920x1080 1080P 3840x2160 4K 30 FPS 2000 1 16 9 Vertical Electric Focus 16 200 inches Osram 30 000 Hour LEDs Quad Cast LEDs Black Gray Composite A V 3 5 mm jack Digital AV Compatible with Full Size HDMI 4K 30 FPS 4W High Low Frequency Speaker 3 5 mm Audio Jack 1 2 1 TF Card Slot 64GB maximum USB 2 0 Full Size 64GB maximum Type C Compatibl...

Страница 47: ...44 Notes ...

Страница 48: ...Please direct all customer service inquiries to AAXA Technologies Inc 17781 Sky Park Cir Suite F Irvine CA 92614 714 957 1999 info aaxatech com ...

Отзывы: