background image


TA7102i Hardware Installation 


© 2014 Aastra Sweden | 153_1531 ANF 901 14| A | 2014-01-24 A 

15 


  IP addresses of the central server used for configuration upload and download 


Power Source


If you suspect that your AC power is not reliable, for example if room lights flicker often or there 
is machinery with large motors nearby, have a qualified professional test the power. Install a 
power conditioner if necessary. 


3.2 

Safety Recommendations 

The following are safety recommendations and best practices to follow when working with the 
TA7102i. 
 

Maintaining Safety with Electricity


Warning: 

Do not work on the TA7102i, connect or disconnect cables during periods of lightning 

activity. 
 

Warning: 

Disconnect all power before servicing the TA7102i. 


Warning: 

Hazardous network voltages might be present in WAN, LAN, and telephone networks 

connectors regardless of whether power to the device is OFF or ON. Use caution when working 
near these connectors to avoid electric shock. When detaching cables, detach the end away 
from the TA7102i 
first. 

General Safety Practices


Follow these guidelines to ensure personal safety and protect the equipment: 

  Keep the TA7102i clear and dust-free during and after installation. 

  Locate the emergency power-off switch for the room in which you are working. Then, if an 

electrical accident occurs, you can act quickly to turn off the power. 

  Disconnect all power before installing the TA7102i. 

  Do not work alone if potentially hazardous conditions exist. 

  Never assume that power is disconnected from a circuit. Always check. 

  Do not perform any action that creates a potential hazard to people or makes equipment 

unsafe. 


Warning: 

This equipment must be installed and maintained by service personnel. Incorrectly 

connecting this equipment to a general-purpose outlet could be hazardous. The 
telecommunications lines must be 
disconnected before unplugging the main power connector. 


Содержание TA7102i

Страница 1: ...TA7102i Hardware Installation Guide...

Страница 2: ...uration 22 4 2 Indicators LEDs 26 4 3 RESET DEFAULT Button 29 4 4 Management Choices 33 5 Appendix A Standard Compliance and Safety Information 34 5 1 Disclaimers 34 5 2 Translated Warning Definition...

Страница 3: ...TA7102i Hardware Installation 2014 Aastra Sweden 153_1531 ANF 90114 A 2014 01 24 A 2 9 Appendix E List of Acronyms 50...

Страница 4: ...cation may be subject to alteration modification or commercial use Aastra will not be liable for any damages arising from use of an illegal modified or altered publication Trademark Aastra is a regist...

Страница 5: ...evice Hardware installation instructions Installation scenarios examples LED indications Cabling and pin out data Please refer to the Dgw v2 0 Software Configuration Guide for software configuration i...

Страница 6: ...the TA7102i Chapter 2 Installation Contains instructions for installing the TA7102i and connecting the cables Chapter 3 Powering on the TA7102i Leads you through the basic steps to start the TA7102i...

Страница 7: ...f the safety warning listed in the previous section Other Conventions The following are other conventions you will encounter in this manual Caution Indicates a potentially hazardous situation which if...

Страница 8: ...uest for Comments Internet Drafts or other standards The TA7102i s implementations are based on the standards so it s possible that some behavior differs from the official standards For more informati...

Страница 9: ...net connectors switches enabling to establish two connections between conventional analog telephones or Group 3 fax machines and either a WAN a LAN or a personal computer It can be used to provide con...

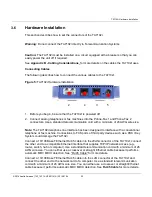
Страница 10: ...nnectors See Indicators LEDs for a description of the LED patterns the TA7102i may have and the states they represent Figure 1 shows the four visual indicators located on the front of the TA7102i Figu...

Страница 11: ...Hardware Installation 2014 Aastra Sweden 153_1531 ANF 90114 A 2014 01 24 A 10 3 ETH Provides the state of the network connected to the WAN and LAN connectors 4 Power When lit power is applied to the...

Страница 12: ...pecification section 9 Figure 2 TA7102i Rear Panel Connectors 1 2 3 4 5 Table 3 describes the rear panel connections from left to right Table 3 Rear Connections of the TA7102i Connect ion Description...

Страница 13: ...2014 01 24 A 12 Reset Default switch Resets configuration parameters of the TA7102i to default known values It can be used to reconfigure the unit Warning Read Section RESET DEFAULT Button before atte...

Страница 14: ...e needed to configure the TA7102i see section Network Information Installation Checklist The installation checklist lists the tasks for installing the TA7102i Print a copy of this checklist and mark t...

Страница 15: ...g to record ongoing maintenance and expansion history Update the site log to reflect the following Configuration changes Maintenance schedules requirements and procedures performed Comments notes and...

Страница 16: ...of whether power to the device is OFF or ON Use caution when working near these connectors to avoid electric shock When detaching cables detach the end away from the TA7102i first General Safety Pract...

Страница 17: ...ice Carefully remove it from the package and packing material The TA7102i package contains the following items 1 x TA7102i unit 1 x power cord for the country in which you are using the TA7102i 1 x un...

Страница 18: ...of the TA7102i The airflow is not restricted around the TA7102i or through the vents of the unit The unit requires a minimum of 25 mm 1 in clearance The operating temperature is between 0 C and 40 C...

Страница 19: ...02i against the wall or plywood as illustrated in Figure 4 Figure 4 Bottom View Wall Mounting Screw Holes Rear Screw holes Front You can position the TA7102i any way you want 4 Mark the position of th...

Страница 20: ...t that might be harmful to the unit If this occurs allow the unit to acclimatize for an hour before powering it on Cleaning To clean the TA7102i wipe with a soft dry cloth Do not use volatile liquids...

Страница 21: ...6 AWG wire size Note The TA7102i telephone line interface has been designed to interface with a conventional telephone or fax machine Connections to FXS ports of third party devices such as a PBX Key...

Страница 22: ...nstallation 2014 Aastra Sweden 153_1531 ANF 90114 A 2014 01 24 21 Connect the power cord to the TA7102i Do not yet connect the other end of the power cord to an electrical outlet You are now ready to...

Страница 23: ...P address in the same subnet via a DHCP server or PPP peer you will not be able to contact the unit via the WAN You must be careful that a dynamic IP address does not overlap a static IP subnet that i...

Страница 24: ...ion Guide for more details Initial Provisioning Sequence When starting the TA7102i for the first time it needs to be configured before it can support calls This process is known as provisioning This s...

Страница 25: ...uses the default IP address 192 168 0 1 24 Refer to Partial Reset for details on the partial reset procedure The corresponding link local IPv6 address is also available and printed on the sticker unde...

Страница 26: ...mber by executing the ipconfig command in a command prompt Note the number at the end of the IPv6 default Gateway for the interface used to contact the unit On Linux the scope identifier may be the li...

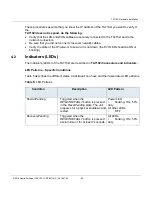
Страница 27: ...ED should be ON or blinking 4 2 Indicators LEDs The indicators LEDs of the TA7102i are described in TA7102i Connectors and Indicators LED Patterns Specific Conditions Table 5 describes the different s...

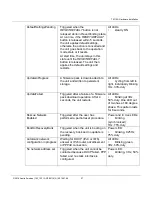
Страница 28: ...to right individually blinking 1Hz 33 duty UpdateFailed Triggered after a failure of a firmware pack download operation After 4 seconds the unit restarts All LEDs blinking at 3Hz 50 duty One LED out...

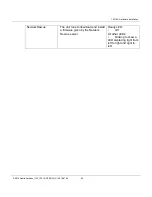
Страница 29: ...eden 153_1531 ANF 90114 A 2014 01 24 28 NetworkRescue The unit tries to download and install a firmware given by the Network Rescue server Ready LED Off All other LEDs blinking to show a LED displacin...

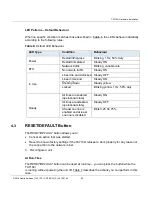
Страница 30: ...eady ON Shutting Down Steady yellow Locked Blinking yellow 1 Hz 50 duty Ready All lines are enabled operational state Steady ON All lines are disabled operational state Steady OFF At least one line is...

Страница 31: ...ned values All LEDs blinking 1Hz 50 duty 12 to 16 seconds Restarts the TA7102i in Factory Reset Deletes the persistent configuration creates a new configuration file with the default factory values an...

Страница 32: ...word SNMP service Resets the enableSnmpV1 enableSnmpV2 enableSnmpV3 and snmpPort values to their default values 5 WEB service Resets the serverPort to its default value 6 To trigger the Partial Reset...

Страница 33: ...ding The firmware pack download configuration files The SNMP configuration including the SNMPv3 passwords and users The PPPoE configuration including the PPP user names and passwords The Factory reset...

Страница 34: ...tory reset alters any persistent configuration data of the TA7102i 4 4 Management Choices Congratulations for properly installing the TA7102i You can now configure the software parameters of the unit...

Страница 35: ...accordance with the instructions may cause harmful interference to radio communications However there is no guarantee that interference will not occur in a particular installation If this equipment d...

Страница 36: ...finden sich in einer Situation die zu einer K rperverletzung f hren k nnte Bevor Sie mit der Arbeit an irgendeinem Ger t beginnen seien Sie sich der mit elektrischen Stromkreisen verbundenen Gefahren...

Страница 37: ...nductors all current carrying conductors TN Power Warning Warning The device is designed to work with TN power systems Product Disposal Warning Warning Ultimate disposal of this product should be hand...

Страница 38: ...dations To insure general safety follow these guidelines Do not open or disassemble this product Do not get this product wet or pour liquids into it Do not perform any action that creates a potential...

Страница 39: ...d with a minimum of 26 AWG wire size It is possible to use either a crossover or straight Ethernet cable to connect in the Ethernet connectors These connectors perform automatic MDI MDIX detection mea...

Страница 40: ...lue stripe 6 Receive Orange with white stripe or solid orange Green with white stripe or solid green 7 N A White with brown stripe or solid brown White with brown stripe or solid brown 8 N A Brown wit...

Страница 41: ...8 not connected Crossover Cable A RJ 45 crossover cable is used when only two systems are to be connected to each other peer to peer at the Ethernet Cards by crossing over reversing their respective...

Страница 42: ...pair must be attached to the RJ 11 connectors in a specific orientation The following figure illustrates how the pins on the RJ 11 connector are numbered Be sure to hold the connectors in the same ori...

Страница 43: ...hose that will eventually be implemented at a later date Because of this specific design characteristic the TA7102i can be integrated with existing telephone fax and data equipment such as PCs and rou...

Страница 44: ...ny vocoders DSP based DTMF detection and generation DSP based fax data relay Embedded operating system with 32 bit real time multitasking Kernel Embedded IPv4 TCP IP stack with configurable QoS implem...

Страница 45: ...Immediate signalization Ring Source 50 VRMS max 20 up to 50 Hz selectable sine signal Nominal Impedance BellCore compliant 600 900 ohms default setting Ring Drive Capacity Up to 4 ringer equivalents 4...

Страница 46: ...ration 40 ms Interdigit Timing Detects like digits with a 40 ms interdigit delay 7 8 DTMF Tone Generation Table 17 DTMF Tone Generation Parameter Description Per Frequency Nominal 6 dBm to 4 dBm Frequ...

Страница 47: ...een defined using RelCalc v5 0 Bellcore method LimitedStress Method I Case 3 Desktop unit excluding the power adaptor 7 11 Operating Environment Table 19 Operating Environment Parameter Description Op...

Страница 48: ...l or the being reserved for special purposes Dynamic Host Configuration Protocol DHCP TCP IP protocol that enables PCs and workstations to get temporary or permanent IP addresses out of a pool from ce...

Страница 49: ...systems Typically defines how to implement a group of services in one or two layers of the OSI reference model Protocols can describe low level details of machine to machine interfaces or high level...

Страница 50: ...uage or protocol of the Internet It can also be used as a communications protocol in a private network either an intranet or an extranet Voice Over IP VoIP The technology used to transmit voice conver...

Страница 51: ...k Force IP Internet Protocol LAN Local Area Network ma milliampere MAC Media Access Control MDI Media Dependent Interface MDIX Media Dependent Interface Crossover PBX Private Branch eXchange PSTN Publ...

Страница 52: ...em or translated into another language without the prior written consent of Aastra Technologies Limited Concord Ontario Canada NOTICE The information in this document is subject to change without noti...

Отзывы: