background image

10

Model 6751i RP Phone Installation Guide

Installation and Setup

Inline Power Not Provided

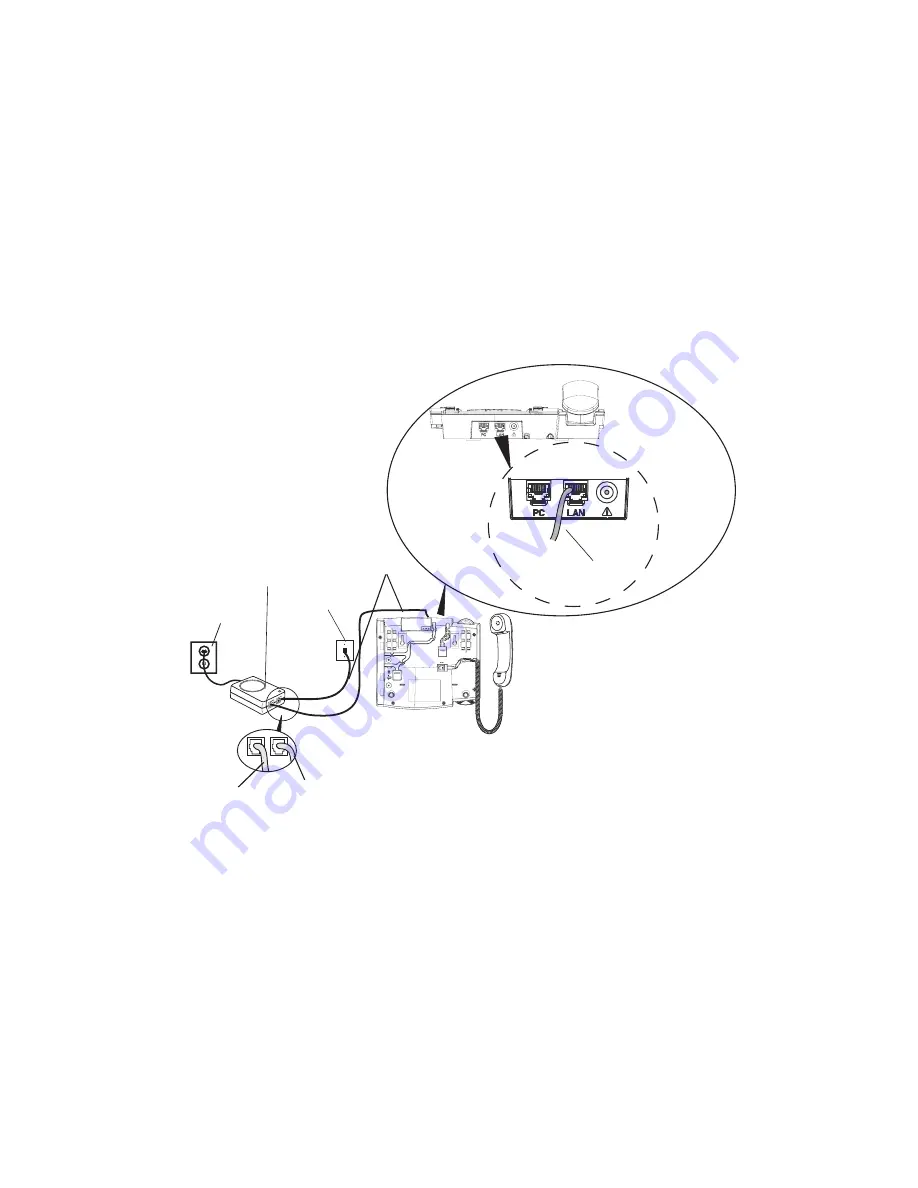
If your network does not provide 802.3af compliant in-line power, you have to 
install the power adapter or the PoE inline power supply (optional accessory). 
1. On the top of your phone, connect the Ethernet cable (provided with 

your phone) into the network port marked with 

LAN

2. On the PoE power injector, plug the other end of the Ethernet cable into 

the network jack marked as indicated in the following illustration.

3. On the PoE power injector, connect an additional Ethernet cable into the 

network port as indicated in the following illustration.

4. Plug the other end of the Ethernet cable into the network jack on the 

wall.

5. Plug the PoE power injector into a power outlet. 

Note: You should connect the power supply to a surge protector or power bar. All 

Ethernet cables used must be minimum category 5/5e straight-through 
cables, such as the cable provided with your phone.

PoE

 Power injector

(if Inline power or the

power adapter are

not provided)

Power Outlet

To Network

Jack

To Phone

Ethernet
  Cables


Network Jack

To PoE

Содержание 6751i RP

Страница 1: ...6751i RP Phone Installation Guide 41 001211 15 Rev 00 Goodbye Services Hold Redial Delete Save Speaker Mute ...

Страница 2: ......

Страница 3: ... distribute transcribe translate or reduce to electronic medium or machine readable form or language derive source code with out the express written consent of the Seller and its Suppliers or dissemi nate or otherwise disclose the Software to third parties All Software furnished hereunder whether or not part of firmware including all copies thereof are and shall remain the property of Seller and i...

Страница 4: ......

Страница 5: ...ct or Shared Network Connection 7 Connecting to the Network and to Power 9 Power Adapter 9 Connecting a Handset 11 Desk or Wall Installation 12 Customizing Your Phone 14 Response Point Assistant 14 Aastra Web User Interface 16 Phone User Interface 17 Other Phone Features 20 Adjusting the Volume 20 Status Lights LEDs 20 Call Timer 20 Creating a Speeddial Key 21 Troubleshooting Solutions 22 Limited ...

Страница 6: ......

Страница 7: ...D screen 1 call appearance line Supports 1 call line with transfer capabilities Full duplex speakerphone for handsfree calls Built in two port 10 100 Ethernet ports lets you share a connection with your computer Inline power support based on 802 3af standard which eliminates the need for power adapters Voice activated dialing options powered by Microsoft Response Point AC power adapter sold separa...

Страница 8: ...t features and services are available to you on your system This guide complements the AastraLink RP Administrator Guide and the Aastra 6751i RP User Guide AastraLink RP Administrator Guide is designed for network system administrators who need information on installing and maintaining this product Aastra 6751i RP User Guide explains the most commonly used IP telephone features for an end user The...

Страница 9: ... inline power injector to power other devices Wall Mount Drilling Template asdassa asdadsda G oo d b y e S e r vi c es H old R edial S a v e D ele t e S w ap S p ea k er M u t e 6751i RP Phone Installation Guide 41 001211 15 Rev 00 Go odb ye Ser vice s Ho ld Red ial De let e Save Speaker Mu te Telephone Handset Handset Ethernet 6751i RP Installation Guide Telephone Base Desk Quick Reference Card W...

Страница 10: ...ervices Hold Redial Save Delete Speaker Mute Goodbye key Services key Hold key Redial Key Volume control High quality speakerphone HAC handset Navigational keys 3 line LCD screen Message waiting lamp Keypad Save and Delete Keys Response Point Key Speakerphone Key Mute Keys ...

Страница 11: ...the volume for the handset ringer and handsfree speaker See Adjusting the Volume on page 20 for more information Save key Saves names and numbers to the Directory List Also saves names and numbers from the Callers List to the Directory List Delete key Deletes individual or all entries from the Directory List and Callers List Deletes all entries from the Redial List You can also use this key to bac...

Страница 12: ...e is more than 1 line of status text messages These buttons also let you scroll through menu selections such as the Options List Pressing the LEFT and RIGHT arrow keys lets you view the line call appearance While in the Options List the navigation keys allow you to exit or enter the current option When you are editing entries on the display pressing the LEFT arrow key erases the character on the l...

Страница 13: ...ntact your System Administrator for further information Direct or Shared Network Connection The phone can be set up as a direct network connection to the Ethernet wall jack or as a shared network connection as a pass through if connecting the phone to a computer or another network device Direct Network Connection Located at the top of the phone are two fully switched 10 100 Mbps Ethernet cable por...

Страница 14: ...nto the network port on the top of the phone marked with PC Plug the other end of the Ethernet cable into the network jack on the network device you are sharing the network connection with Ethernet Cables Other Network Devices Network Jack if Inline power provided do not install the power adapter Power Adapter optional To Network To Other Network Device Power Adapter Connection ...

Страница 15: ... the top of your phone connect the Ethernet cable provided with your phone into the network port marked with LAN 2 Plug the other end of the Ethernet cable directly into the network jack on the wall Note The PC jack on the 6751i RP does not supply inline power onto other network devices All Ethernet cables used must be minimum category 5 5e straight through cables such as the cable provided with y...

Страница 16: ...k marked as indicated in the following illustration 3 On the PoE power injector connect an additional Ethernet cable into the network port as indicated in the following illustration 4 Plug the other end of the Ethernet cable into the network jack on the wall 5 Plug the PoE power injector into a power outlet Note You should connect the power supply to a surge protector or power bar All Ethernet cab...

Страница 17: ...et Handset Turn the phone over and locate the handset jack marked j Insert one end of handset cord into the jack until it clicks into place Then route the handset cord through the groove as shown in the illustration below Attach the handset to the other end of the handset cord Handset ...

Страница 18: ...re are three pair of leg slots on each corner of the phone each leg uses two pairs 1 2 or 2 3 giving two leg positions designating different viewing angles Furthermore the legs can be reversed which offer two additional viewing angles For a higher viewing angle use the second and third slots from the top For a lower viewing angle use the first and second slots from the top Then push the stand towa...

Страница 19: ... anchors Both the screws and wall anchors are included with your phone Place the wall mount holes on the phone over the screw heads on the wall and pull down to lock the phone in Note You may wish to purchase a short Ethernet cable from a local supplier for a wall installation Also if 802 3af compliant in line power is not provided on your network and you are installing the 6751i RP on a wall usin...

Страница 20: ... also Response Point Assistant In order to use the Response Point Assistant you must first install the program on our computer Once you have the Response Point program installed you can use the program to change your phone options at any time Installing the Response Point Assistant 1 Insert the Response Point CD The Microsoft Response Point Setup wizard opens 2 Select Install Microsoft Response Po...

Страница 21: ...tant opens 2 In the Extension number box type your extension number 3 In the Password box type your password The default is 9999 4 If necessary select a base unit from the list 5 Click Log On Click Help for assistance on the options available to you within Response Point Assistant Contact your system administrator or refer to the Aastra 6751i RP User Guide for additional information on the Respons...

Страница 22: ...he address field If the browser is using HTTP the following redirect screen displays fol lowed by the Security Alert window This process redirects HTTP to use HTTPS for a more secure connection 2 Click YES to accept the certificate 3 At the prompt enter your username and password and click The Network Status window displays for the IP phone you are access ing Note For a user the default user name ...

Страница 23: ...rvices key on the phone 2 Select Options from the Services menu 3 To select an option use and to scroll through the list or press the number corresponding to the option 4 Press the Show softkey the button or press the number corre sponding to the selection 5 Use the softkeys to change a selected option 6 Press the Done softkey at any time to exit the option and save the change 7 Press the Cancel s...

Страница 24: ...itiates a call to that number Press the Change softkey to turn ON or OFF the dial pad mode Availability of feature dependant on your phone system or service provider Language This option allows you to select a language that you would like your phone to use for displaying prompts and menus Note Supported languages may vary depending on configuration Contact your Network Administrator for list of av...

Страница 25: ...one from unauthorized users When the phone is locked users are unable to dial from the phone unless it has been unlocked To unlock the phone press the button and enter either the user or administrator password Note While the phone is locked only emergency number dialing is permitted The default permissible emergency numbers are 911 999 112 and 110 this is con figurable via the Web User Interface o...

Страница 26: ...e speaker is activated activate the speaker by pressing ensure handsfree speakerphone audio mode is set The speaker will remain at this volume until it is adjusted again Status Lights LEDs The speaker LED beside the key and the Message Waiting Indicator MWI LED on the top right of your phone provide visual indications of your phone s status Speaker LED Message Waiting Indicator MWI Call Timer When...

Страница 27: ...rompt Enter number 2 Enter a phone number or extension to assign to that speeddial key The following example illustrates the screen display After entering the number the prompt Use Save to end displays on the screen 3 Press to save the number as a speeddial key By default the phone automatically assigns the speeddial key to line 1 if available You can use the and to change the speeddial informa ti...

Страница 28: ...ou can obtain an additional accessory the a PoE inline power injector to provide power over Ethernet locally to your phone See the section Connecting to the Network and to Power on page 9 for details Why can I only see 1 option when the installer or user guide says there are more The telephone screen will only show 1option at a time To see more press the down arrow button Why does the telephone wo...

Страница 29: ...tal or consequential damages including but not limited to loss damage or expense directly or indirectly arising from the customers use of or inability to use this telephone either separately or in combination with other equipment This paragraph however shall not apply to consequential damages for injury to the person in the case of telephones used or bought for use primarily for personal family or...

Страница 30: ......

Страница 31: ...or light 20 inline power 9 10 installation and setup 7 desk stand 12 wall 13 introduction 1 K key descriptions 5 key panel 4 L language 18 LEDs MWI 20 speaker 20 status 20 lock phone 19 M mute key 5 MWI message waiting indicator 20 N navigation keys 6 network connection direct 7 shared 8 network status 18 O optional accessories 3 P phone features 1 firmware version 18 lock 19 network status 18 par...

Страница 32: ...hone Installation Guide S save key 5 services key 5 speaker key 5 speeddial key creating 21 T tones ring tone 18 tone set 18 U user password 18 V volume adjusting 20 control keys 5 W wall installation 13 warranty 23 web user interface 16 ...

Страница 33: ......

Страница 34: ......

Страница 35: ......

Страница 36: ...Troubleshooting section and still have problems please visit our Web site at www aastratelecom com or call 1 800 574 1611 for technical assistance Microsoft Response Point is a trademark of Microsoft Corporation Aastra Telecom Inc 2008 41 001211 15 Rev 00 ...

Отзывы: