51
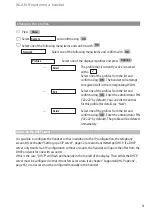
Changing the profiles
E
Press
.
F
Select
and confirm using
.
F
Select one of the following menu items and confirm with
.
Select one of the following menu items and confirm with
.
Select one of the displayed profiles and press
.
…
The profile that is currently active is marked
with a
.
Select one of the profiles from the list and
confirm using
. The handset will attempt
to register itself in the corresponding WLAN.
…
Select one of the profiles from the list and
confirm using
. Enter the administrator PIN
(“22222” by default). You can edit the entries
for this profile (for details see “New”).
…
Select one of the profiles from the list and
confirm using
. Enter the administrator PIN
(“22222” by default). The profile will be deleted
immediately.
Advice on the DHCP server
It is possible to configure the handset so that in addition to the IP configuration, the telephony
accounts (see chapter “Setting up a SIP server”, page 52) are also transmitted per DHCP. If a DHCP
server only transfers an IP configuration without accounts, the handset will ignore the offer from the
DHCP and wait for one with accounts.
If this is the case, “DHCP” will flash permanently in the top left of the display. Then either the DHCP
server must be configured so that it transfers access data (see chapter “Supported DHCP options”,
page 65), or an access must be configured manually in the handset.
OK
Delete
OK
Edit
OK
✓
Select
Options
Profiles
OK
Network
OK
OK
System
Menu
WLAN: Registering a handset
Содержание 312w
Страница 1: ...Aastra 312w User Guide ...
Страница 83: ...77 ...
Страница 84: ...www aastra com As off 04 2008 Version 4 The right for technical modifications is reserved Aastra 312w ...


