Aarrow Arley Скачать руководство пользователя страница 12

ENSURE THAT YOU HAVE READ &
UNDERSTOOD THESE INSTRUCTIONS
BEFORE LIGHTING THE FIRE.

ALWAYS WEAR SUITABLE  PROTECTIVE
FIRE GLOVES WHEN REFUELLING YOUR
STOVE.

SOLID FUEL BURNING

•Set the grate to ‘coal’ position.
•Ensure that the ash pan is in position and the fire    

doors are closed.

•Set the air wash to one quarter open position.
•Set the primary inlet to the fully open position
•Light in the normal manner with paper and

kindling, or use a fire lighter.

•If using a gas poker be sure to remove it

immediately the fire is alight.

•When the fire is well alight regulate the burning

rate by adjusting the setting on the primary air
inlet control.

•The air wash can be opened sufficiently to keep

the door glass clean

BURNING WOOD

•Set air wash to fully open position.
•Proceed as for solid fuel but note the fire will burn 

up and become established more quickly.

MIXED FUELS

•As per coal but allow additional secondary air.
•The  primary air inlet can be closed and burning

regulated by means of the air wash above the door.

ANTHRACITE

Anthracite is more difficult to keep in for long
periods, consequently more care in setting the
controls and some familiarisation is necessary
when burning anthracite. 
Use the smallest size fuel (Stovesse or Small Nuts).
Proceed as for manufactured smokeless fuel. Leave
the air inlet control open about a quarter or less.

Note: The high temperature paint acquires
durability by being "cured" during the initial
firings of the appliance will give off fumes which
are non-toxic, but which certain persons may find
have an unpleasant or irritant effect.  Ensure that
the area is well ventilated during this time.  

EXTENDED BURNING

The appliance will burn for an extended period
provided:

•Sufficient fuel is placed in the firebox.
•The controls are set correctly.
•Excess draught is not present in the chimney.
•Close the door.
•If the fire goes out with unburnt fuel left in the 

firebox increase the air opening slightly, and vice 

versa.

In the morning

Open the air control fully until embers begin to
glow brightly and place pieces of fuel on the fire
until it is well established.

WARNING:

When wood is burnt slowly in a

closed appliance it produces moisture and tar,
which will create condensation and deposits in the
chimney. This effect can be minimised by burning
hard for a short period, about 20 minutes, twice a day.
It is usually convenient to do this morning and night.

Note: To avoid chimney problems your fire should
not be burnt slowly for longer than 12 hours
without a period of fast burning.

WARNING: Properly installed, with a suitable
flue and chimney and operated and maintained
this appliance will not emit fumes into the
dwelling. Occasional fumes from the de-ashing
and re-fuelling may occur. However, persistent
fume emission is potentially dangerous and must
be investigated by a Hetas registered installer.

Stop using the appliance if you smell fumes or
see smoke escaping.

If fume emission does persist, the following
immediate actions should be taken.
• Open doors and windows to ventilate room.
• Let the fire die or extinguish and safely dispose of 

fuel from the appliance.

• Check for flue or chimney blockage, and clean if 

required.

Seek expert advice from your HETAS registered
installer. Do not attempt to re-light the fire until the
cause of the fume emission has been identified and
corrected.

12

Arley Wood & Multifuel Stoves

OPERATING INSTRUCTIONS

Содержание Arley

Страница 1: ...Arley Wood Multifuel Stoves Operating Installation Manual PLEASE RETAIN THESE INSTRUCTIONS FOR FUTURE REFERENCE Arley 5 Flat Multifuel Stove Rev 1 June 2004...

Страница 2: ...we are so confident in the reliability of our product that we offer a 3 year Warranty Should you have any questions about our Arley Stoves that are not covered in this manual please contact the Aarro...

Страница 3: ...Firing 13 Ash Removal 13 SERVICING Cleaning Annual Maintenance 13 14 Accessories 15 INSTALLATION Page General Precautions 16 Handling 16 Hearth 16 Combustible Materials 16 Firebox Liner Panels 17 Thro...

Страница 4: ...E BURNED IN THIS APPLIANCE TO USE THESE FUELS WILL INVALIDATE THE APPLIANCE GUARANTEE IF IN DOUBT CONTACT THE SOLID FUEL ASSOCIATION TELEPHONE NUMBER 0800 600 000 www solidfuel co uk THE USE OF SPARE...

Страница 5: ...erly installed and operated a house fire may result installation must comply with the Building Regulations and conform to all relevant fire safety standards Arada Ltd produce a variety of appliances r...

Страница 6: ...Hotplate 7 Operating tool 1 8 Rear liner 1 9 Side liners 2 10 Feet and fixings 4 N A Arley 7 Wood 2 1 1 5 1 2 2 4 Arley 7 Multifuel N A Arley 5 Wood 1 4 1 1 2 4 7 2 1 1 5 1 2 2 4 Arley 11 Wood N A 2...

Страница 7: ...to Centre of Flue mm 105 Flue Diameter 102 4 Weight Packed Kg 50 1 7 Arley 7 Flat 8 4 8 2 2 510 486 365 399 121 127 5 56 Wood 59 MF Arley 7 Low 1 5 Arley 5 Wood 0 3 2 497 405 358 400 105 102 4 47 1 7...

Страница 8: ...rovides over draught and The primary air inlet providing under draught to the base of the fire chamber through the controls on the doors of the fires PRIMARY AIR FOR ARLEY STOVES On the Arley primary...

Страница 9: ...e hinges so that the below operations can be carried out on a workbench or similar level surface Fig 5 Fig 5 Removal of the Arley 5 door Unscrew the two nuts on the inside of the door securing the ret...

Страница 10: ...bove steps Fig 9 Adjusting the Arley hinges FUEL RETAINER BARS Fuel retainer bars are supplied with the fire Slide and lift the bar until it is clear of the guides at each side and remove through the...

Страница 11: ...reheat Blazebrite Taybrite Sunbrite Doubles Singles Anthracite Large Nuts and Welsh Dry Steam Coal Large Small Nuts Approval does not cover the use of other fuels either alone or mixed with the suitab...

Страница 12: ...is well ventilated during this time EXTENDED BURNING The appliance will burn for an extended period provided Sufficient fuel is placed in the firebox The controls are set correctly Excess draught is...

Страница 13: ...nd remove from the ash chamber WARNING The ash can be very hot Empty only to a metal container Even if the ash appears cold red hot pieces of ash may be concealed and could easily start a fire or caus...

Страница 14: ...d shut down period DOOR GLASS The door glass should remain clear during normal daytimeburning Howeverundercertainconditions such as burning at a low rate with damp wood or overnight burning the glass...

Страница 15: ...l in your Arley wood stove See Fig 10b ADD IN BOILERS See page 24 for further instructions on add in boilers PAINT Matching aerosol paint to tone in any connecting flues pipes or surrounding metalwork...

Страница 16: ...HEARTH The fire should be installed to stand on a constructional hearth of non combustible materials not less than 125mm 5 thick conforming to Building Regulations Dimensions of the hearth should pro...

Страница 17: ...side liners The long centre tab on the back edge rests on the rear liners The shorter turn down tabs against the vertical face Replace the front fuel retainer bars or multifuel grate Note Neither the...

Страница 18: ...ng end marked L onto the low section of the comb The upper bar is fitted in a similar manner but with the end marked L inserted in the rear channel and the end marked H seated on the high section of t...

Страница 19: ...tallation and are interchangeable These are fitted as follows To fit the interchangeable canopy Fig 10c Remove the front clamps Tilt the canopy as shown in stage 1 Engage the rear clips and pull fully...

Страница 20: ...umes from the stove outlet to the outside air To ensure a good updraught it is important that the flue gases are kept warm and that the flue size suits the stove The termination of the outlet at the t...

Страница 21: ...ocument J of the Building Regulations for England and Wales is available from The Stationery Bookshops and can also be viewed at the ODPM website at www safety odpm gov uk bregs brads htm Details on t...

Страница 22: ...22 Arley Wood Multifuel Stoves INSTALLATION...

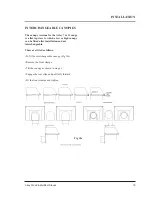
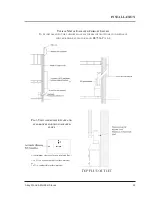
Страница 23: ...ATED FLUES TYPICAL METAL INSULATED CHIMNEY SYSTEM TO BE INSTALLED TO THE CHIMNEY MANUFACTURERS INSTRUCTIONS IN COMPLIANCE WITH BUILDING REGULATIONS AND BS7566 PTS 1 4 A is minimum clearance for non in...

Страница 24: ...and calculations for individual heating systems should be carried out by a qualified heating engineer In many cases your supplier will be able to offer advice and assistance Direct Systems Stainless s...

Страница 25: ...e from the expansion tank should be 28mm diameter copper Pipes in unheated spaces must be lagged FINAL CHECK Before handing over the installation to the customer it is strongly recommended that the ap...

Страница 26: ...appliances only c If clay or concrete flue liners used confirm that they are correctly jointed with socket end uppermost and state jointing materials used d If an existing chimney has been refurbished...

Страница 27: ...S009A AFS009A AFS010 2 Throat Plate 3 Grate Bar Set 4 Hot Plate 5 Operating Tool 6 Ashpan 7 Flue Spigot Part Description Visual Aid not to scale Arley 5 Wood Arley 5 Multifuel Arley 7 Wood AFS1012 AFS...

Страница 28: ...it Complete with Gasket 12 Glass Clips 13 Hinge kit Comprises 2 Hinges 4 Fixings Per Set 14 Airwash Curved Part Description Visual Aid not to scale Arley 5 Wood Arley 5 Multifuel Arley 7 Wood AFS1156...

Страница 29: ...Assembly Complete with Handle Glass Gaskets Clips and Seal 19 Fire Door Locking Assembly 21 Aarrow Fires Gauntlet Gloves 22 Wood Burning Tray 23 Multifuel Upgrade Kit Part Description Visual Aid not...

Страница 30: ...eer The Manufacturers decision shall be final If your appliance proves to be defective as a result of faulty materials or workmanship during guarantee we will repair or replace it FREE OF CHARGE as lo...

Страница 31: ...is manual please contact your Aarrow retailer Please keep all repair receipts safely Please ensure you have this manual available when an engineer visits as they will complete the service record chart...

Страница 32: ...l No I ve checked it and it s O K Assembled by Checked by Date of Purchase Name and address of supplier Please ensure installer completes INSTALLATION CHECK LIST details on page 26 of this manual If a...

Отзывы: