

FX
i
-
08 / GXM-08 / GXL-08
FX
i
-
08 / GXM-08 / GXL-08
Ethernet Interface
1WMPD4001351E
When this Ethernet interface (Below, this product) is installed into the A&D balances, the balances can communicate
with a computer through the LAN port and the weighing data can be managed with the software "
WinCT-Plus
".
Target models
FX
i
-08
FX / FZ
、
FX-
i
/ FZ-
i
、
HR-A / HR-AZ
、
GX-A / GF-A Series
GXM-08
GX-M / GF-M Series
GXL-08
GX-L / GF-L Series
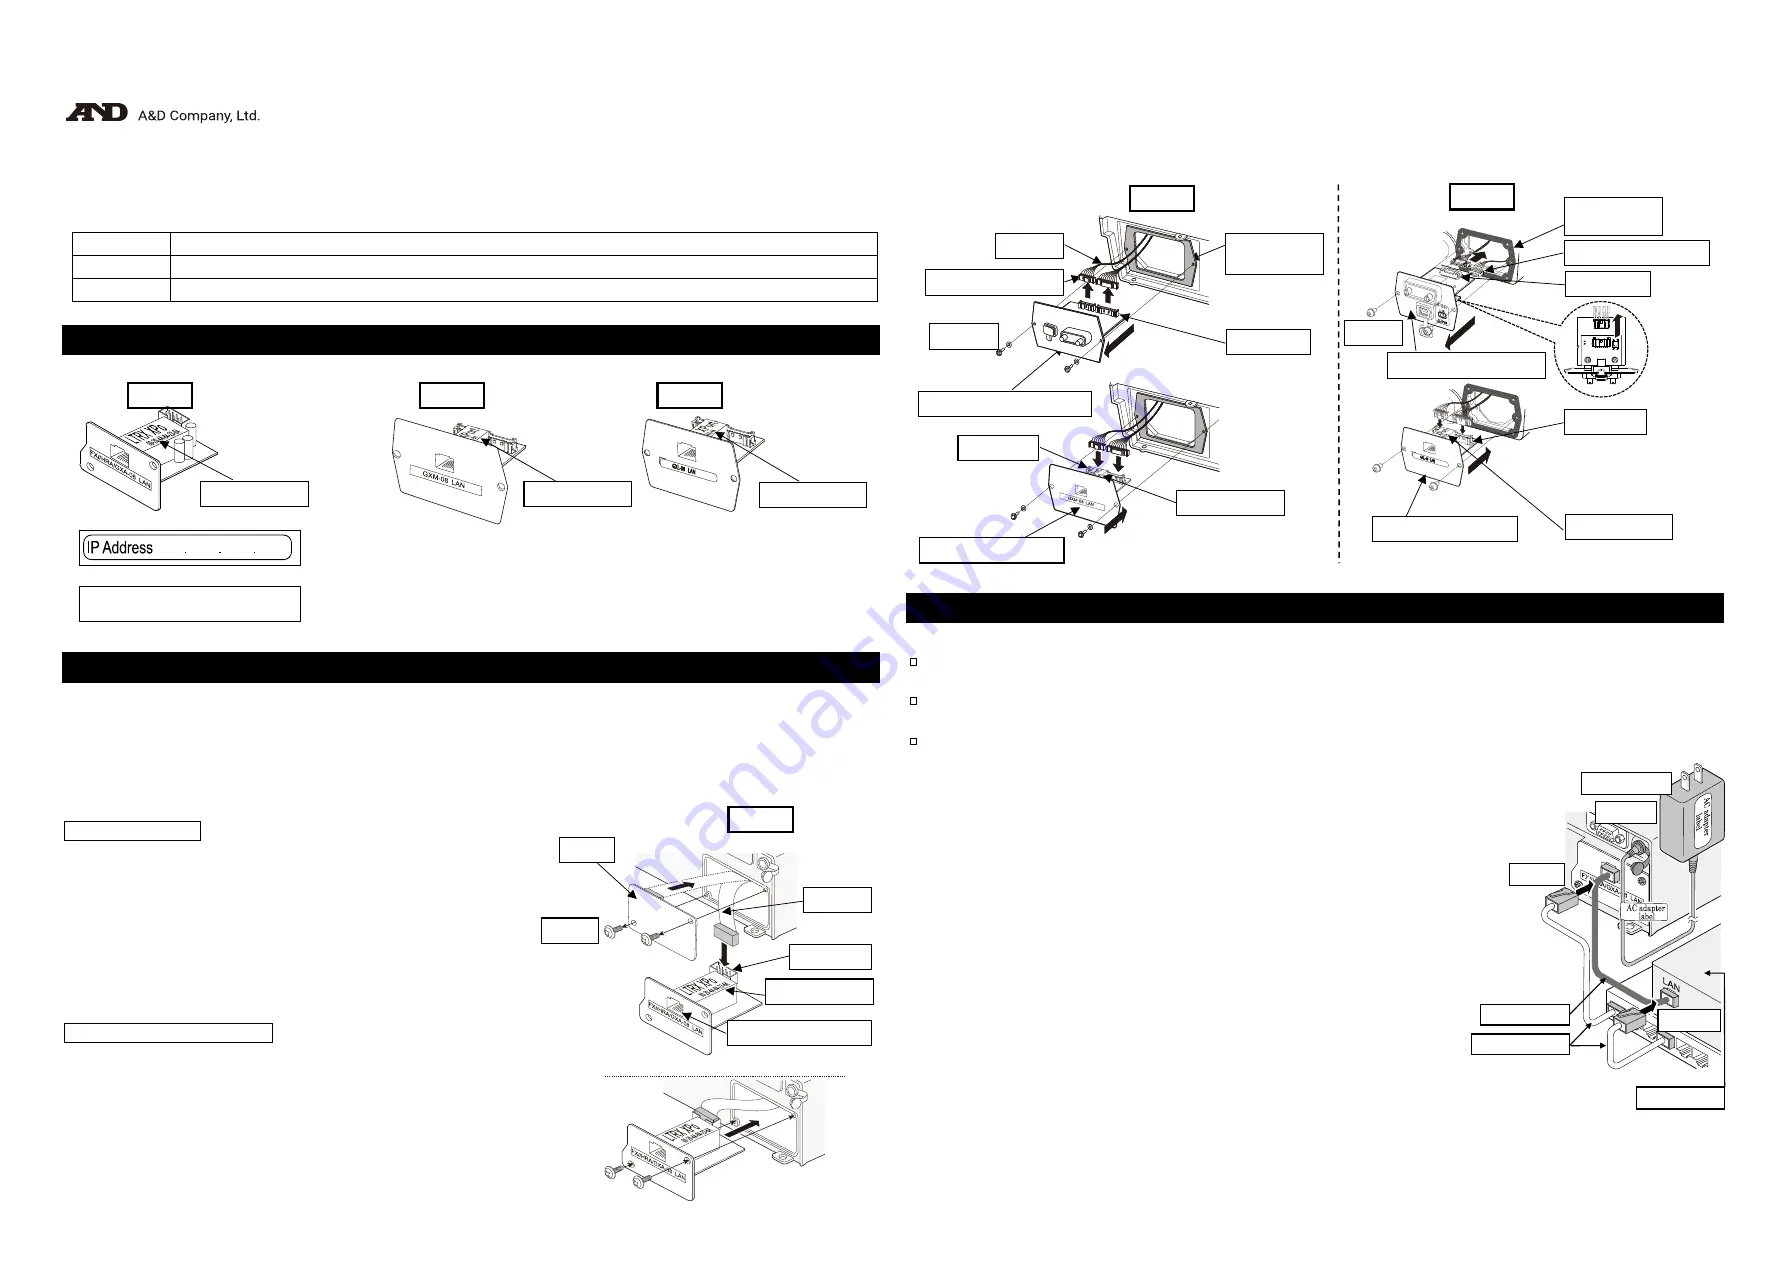
Unpacking the Ethernet Board
Ethernet Interface board
Installing the Ethernet Board
When setting the IP address, you may need the MAC address
*
(hardware address) to identify the product
individually, so make a note of the stated MAC address.
*
Example: 00
-
20
-
4A
-
84
-
23
-
6A
Caution:
Remove the AC adapter from the balance before doing the following work.
In case of
FX
i
-08
Step 1 Remove the two screws from the rear of the balance and
remove the panel. Peel the connector off that is attached on
the panel with double-side adhesive tape.
Step 2 Connect the connector to the this product.
Step 3 Insert this product into the balance and screw the panel.
In case of
GXM-08
/
GXL-08
Step 1 Remove the two screws from the panel and remove the
RS-232C / USB board from the balance.
Step 2 Pull gently and remove the two cables from the RS-232C / USB board.
Step 3 Insert the two connectors into the product.
Step 4 Insert the rubber packing and plug the this product into the balance.
Screw the panel of this product.
Caution
When inserting the this product, pay attention to the top and bottom orientation of the board.
The rubber packing has a deep groove on the balance side.
Connecting the Ethernet Board to a Computer
Caution
Contact the network manager before connecting the
this product
to a network.
A network error may occur due to the
this product
. A&D and dealers assume no responsibility for errors.
Preset the
IP
address and subnet mask into the
this product
one by one. The
IP
address, 172.16.100.2, is set
for all
this product
at the factory. Do not duplicate
IP
addresses.
The
IP
address cannot be restored to factory setting.
We recommend that you write the
IP
address on the supplied label.
Preparation
Please download each software from A&D website
https://www.aandd.jp/products/software/software.html
for below.
(1)
Setting procedure “WinCT-Plus” instruction manual
(2)
IP address setting software “Device Installer”
(3)
Data acquisition software “WinCT-Plus”
Step 1 Connect the Ethernet board and the computer using a hub and straight
cables. (When connecting directly without using a hub, use a cross
cable)
Step 2 Reconnect the AC adapter to the balance.
Step 3 Preset the IP addresses and subnet mask of the this product and the
computer. For the setting procedure, refer to the “WinCT-Plus” instruction
manual.
A communication error may occur with the wrong operation.
Step 4 Write the
IP
address on "
IP
address label" and affix it where you can
see the address easily.
Step 5 Install the data acquisition software to refer to the “WinCT-Plus”
instruction manual.
IP
address label (5 labels)
Write the IP address on a label and use it for identification.
IP
address protective cover (5 covers)
Affix a protective cover over the IP address label.
AC adapter
Step 2
Hub
Step 1
Computer
Step 1
Straight cable
Cross cable
Rear of the
balance
GXL-08
Rubber
packing
Connector
Connector with lock
Screw
RS-232C/USB board
Connector
MAC address
Ethernet board
Step 1
Step 2
Step 3
Step 4
Back side
Step 2
GXM-08
Step 2
Step 1
Cable
Connector with lock
Screw
Rubber
packing
Connector
RS-232C/USB board
Connector
Step 3
MAC address
Step 4
Ethernet board
FX
i
-08
GXM
-
08
GXL-08
MAC address
MAC address
MAC address
( Connection example with
FX
i
-08
)
Cable
Screws
FX
i
-08
Panel
Step 1
Connector
Step 2
MAC address
Ethernet board
Step 3


