background image

 18 

To store 

To store 

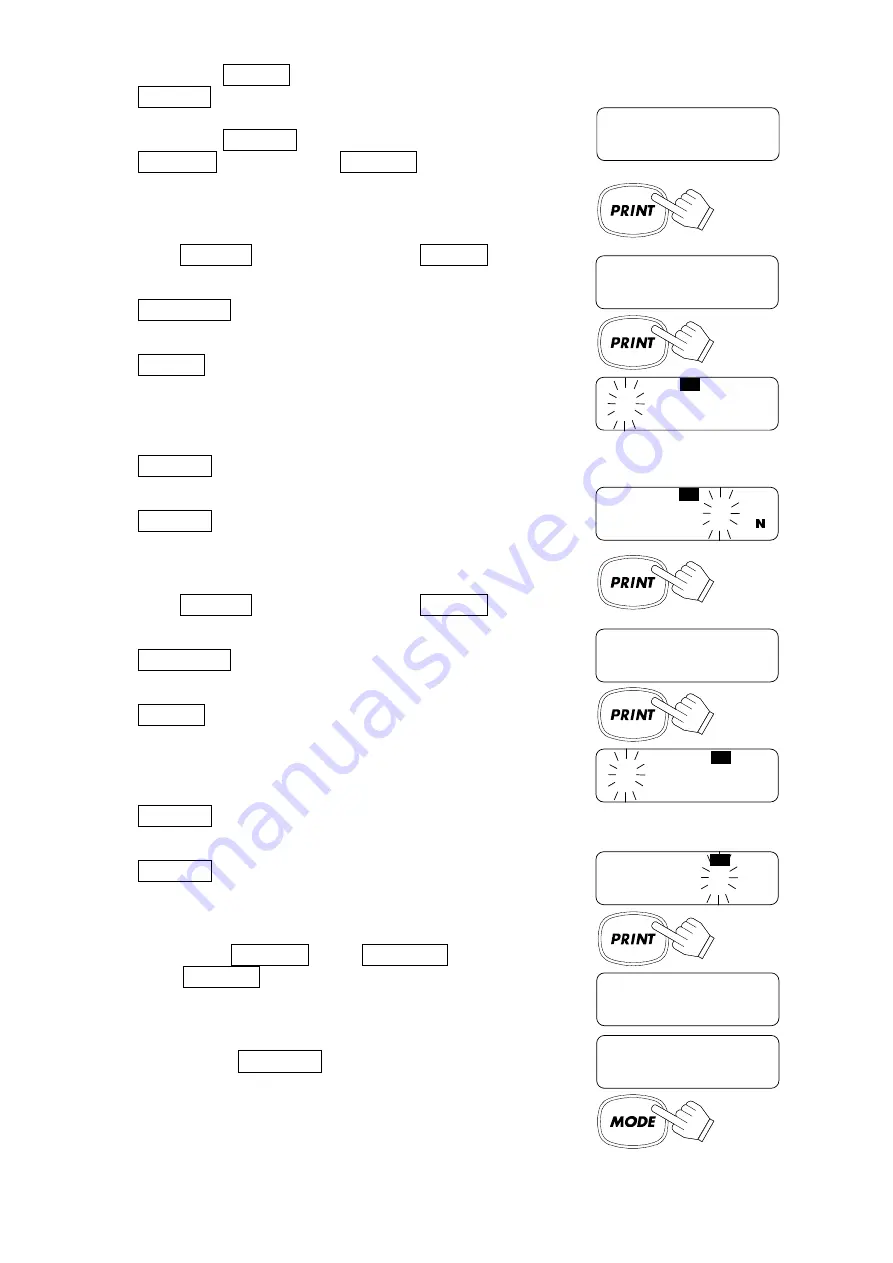
4. Press the    TARE    key several times to display 

 Cp   3

 . 

 
5. Press the    PRINT    key to store the setting. 

 Cp Hi  

 appears after  

end  

  . 


Entering the upper and lower limit values   


6. With  

Cp Hi  

 displayed, press the  PRINT  key. 

Enter the upper limit value using the following keys. 


  SAMPLE    key 

To select the digit to change 
the value (blinking). 


 TARE   key 

To change the value of the 
blinking digit. Hold down the 
key to switch the polarity. 

 (“

N

” means negative.) 


 PRINT  key 

To store the value and 
proceed to the next step. 


  MODE    key 

To cancel the operation and 
proceed to the next step. 


7. With  

Cp lo  

 displayed, press the  PRINT  key. 

Enter the lower limit value using the following keys. 


  SAMPLE    key 

To select the digit to change 
the value (blinking). 


 TARE   key 

To change the value of the 
blinking digit. Hold down the 
key to switch the polarity. 

 (“

N

” means negative.) 


 PRINT  key 

To store the value and 
proceed to the next step. 


  MODE    key 

To cancel the operation and 
proceed to the next step. 


8. Press the  PRINT  key. 

 Unit   

 appears 

after  

end  

  . 


9. Press the  MODE  key to return to the 

weighing mode. 


Returns to   
the weighing mode 

Set using the 
relevant keys 

 Cp lo 

 end 

 Unit 

 001230 

LO 

 000000 

LO 

 Cp Hi 

 000000 

HI 

 001234 

HI 

To store 

Set using the 
relevant keys 

 Cp   3 

Содержание EK-AEP Series

Страница 1: ...1WMPD4003520A 2019 03 27...

Страница 2: ...d into another language without the prior written consent of A D Company Limited Product specifications are subject to change without any obligation on the part of the manufacturer Compliance with FCC...

Страница 3: ...x 8 5 2 ATEX 8 5 3 FM FMc Zone 8 5 4 FM FMc Division 8 6 PART NAMES AND FUNCTIONS 10 7 OPERATION 11 7 1 Turn the Power ON and OFF 11 7 2 LCD Backlight 11 7 3 Units 12 7 4 Selecting a Weighing Unit 13...

Страница 4: ...mple 31 12 3 Calibration Test Using a Weight 32 13 OPTION 34 14 MAINTENANCE 35 14 1 Notes on Maintenance 35 14 2 Error Codes 35 15 SPECIFICATIONS 37 15 1 Specifications 37 15 2 Option 37 15 3 External...

Страница 5: ...s having a display resolution of 1 12 000 or 1 30 000 The balance has a counting function a percent function and a comparator function The LCD backlight will help with use in a dimly lighted place As...

Страница 6: ...lace the batteries in non hazardous areas As a power source only the four AA LR6 or AM3 alkaline 1 5 V batteries listed below can be used DURACELL MN1500 ENERGIZER E91 Panasonic LR6 XJ All four batter...

Страница 7: ...electrodes Install new batteries with terminals aligned correctly Do not mix old and new batteries battery types or batteries of other manufacturers It may cause the batteries to leak or burst or caus...

Страница 8: ...s installed for the first time or the balance has been moved carry out calibration as described in 9 CALIBRATION 4 2 Installing Replacing the Batteries As a power source only the four AA LR6 or AM3 al...

Страница 9: ...replace all four batteries with new ones 4 3 When Weighing Objects that are Prone to Static Electricity When the ambient humidity is low insulating materials such as plastics are prone to static elect...

Страница 10: ...ure Class Ga Equipment Protection Level 5 3 FM FMc Zone Class Zone 0 AEx Ex ia op is B T3 Tamb 25 C to 40 C FM17US0317X FM17CA0162X Class Permitted Class Zone Permitted Zone Ex Ex Component AEx Americ...

Страница 11: ...manual 1G Ex ia op is B T3 Ga FM17ATEX0096X Ex ia op is B T3 Ga IECEx FMG 17 0033X 1WMPD4003520A 1 243 Asahi Kitamoto shi Saitama Japan Tamb 25 to 40 2809 JAPAN Tamb 25 to 40 Refer to the instruction...

Страница 12: ...to zero MODE key Switches the weighing units PRINT key Sets a unit weight 100 weight or other setting values Outputs the weight value to a printer SAMPLE key Held down to enter the function setting m...

Страница 13: ...int to the maximum weighing capacity When tared weighing can be performed up to the weighing capacity minus the tare value 2 Press and hold the ZERO ON OFF key to turn the power OFF Auto power off fun...

Страница 14: ...ts available is the same as above Note It is possible to store only the units that will be actually used from the units available It is also possible to specify the unit that will appear first when th...

Страница 15: ...positive value corresponding to the weighing capacity In this case the NET and ZERO indicators turn on The weighing range is from the zero point to the maximum weighing capacity When tared weighing ca...

Страница 16: ...PLE key to enter the sample unit weight storing mode 3 To select the number of samples press the 1SAMPLE key It may be set to 5 10 25 50 or 100 When zero 0 is not displayed to the right side of the nu...

Страница 17: ...tion ACAITM Automatic Counting Accuracy Improvement is a function that improves the accuracy of the unit weight by increasing the number of samples as the counting process proceeds 8 If a few more sam...

Страница 18: ...an and press the TARE key to display 100 0 4 Place the sample to be set as the 100 reference weight on the pan 5 Press the PRINT key to store the 100 reference weight Remove the sample If the balance...

Страница 19: ...ion e g d for the EK 300AEP is 0 01 g Therefore 5d is 0 05 g The readability for the counting mode is 1 piece for the percent mode 0 1 The upper limit and lower limit values are common to each of the...

Страница 20: ...MODE key To cancel the operation and proceed to the next step 7 With Cp lo displayed press the PRINT key Enter the lower limit value using the following keys SAMPLE key To select the digit to change t...

Страница 21: ...and hold the calibration CAL switch until Cal appears and release the switch 3 The balance displays Cal 0 To change the calibration weight value proceed to step 4 To use the calibration weight value...

Страница 22: ...on Do not touch the pan during span calibration 7 end appears Remove the weight from the pan Press the CAL switch or MODE key to return to the weighing mode Note The value set in step 4 is stored in m...

Страница 23: ...bration CAL switch until Cal appears and release the switch 2 The balance displays Cal 0 3 Press the TARE key The balance displays the gravity acceleration value stored in the balance Use the followin...

Страница 24: ...t class Parameter key Selects a parameter Cancel key Cancels the operation and proceeds to the next class or returns to the weighing mode 10 2 Entering the Function Setting Mode In the weighing mode p...

Страница 25: ...TARE key to display poff 0 4 Press the SAMPLE key several times to display aCai 1 5 Press the TARE key to select aCai 0 6 Press the PRINT key to store the parameter Cp Hi appears after end 7 Press the...

Страница 26: ...to select a weighing unit 5 Press the TARE key to confirm the weighing unit 6 Repeat steps 4 and 5 to confirm all the weighing units to be used 7 Press the PRINT key to store the confirmed weighing u...

Страница 27: ...ompares stable plus data 4d 5 Compares data 4d or 4d Cp Comparator mode 6 Compares stable data 4d or 4d Conditions to compare d the readability scale interval or division 0 Stream mode 1 PRINT key 2 P...

Страница 28: ...3 Turns off after 30 seconds 4 Turns off after 60 seconds func ltUp LCD Backlight control 5 Always on To control how the LCD backlight turns off Weight change or key operation will turn the backlight...

Страница 29: ...the AD 1611 Optical fiber cable options AX KS5450 010 10 m AX KS5450 030 30 m AX KS5450 060 60 m D Sub 9 pin cable straight option AX KO2466 200 2 m The RS 232C output has the following three modes St...

Страница 30: ...ghing data carat mom Weighing data momme d w t Weighing data penny weight GN Weighing data grain t l Weighing data tael t Weighing data tola The terminator is always CRLF Example of output data Weighi...

Страница 31: ...to prt 2 The balance transmits the weight data when the display is stable the STABLE indicator is on and the data is greater than 4d The next output can be obtained after the display returns below 4d...

Страница 32: ...1 Setting the ID Number 1 Press and hold the SAMPLE key to display func 2 Press the SAMPLE key several times to display id 3 Press the PRINT key Enter the ID number using the following keys SAMPLE key...

Страница 33: ...0Dh LF Line feed ASCII 04Ah A D MODEL EK 300AEP S N 1234567 ID ABCDEF DATE 09 03 21 03 15 40 PM CALIBRATED EXT ACTUAL 0 00 g 299 99 g TARGET 300 00 g SIGNATURE A D CRLF MODEL EK 300AEP CRLF S N 123456...

Страница 34: ...ion test is to confirm the weighing accuracy using a weight target weight and output the results as a GLP report Set the function to info 1 or info 2 to perform the calibration test Calibration test d...

Страница 35: ...ress the PRINT key The zero point is weighed and the weight value is displayed for a few seconds 5 Place the target weight with the same value as displayed on the pan Press the PRINT key to weigh it T...

Страница 36: ...s available for carrying the balance by hand Please note that the balances are precision equipment and they even placed in the case will not be able to withstand excessive shock such as being dropped...

Страница 37: ...eighing pan There is a possibility that the weighing sensor itself may have a failure Unit weight error The sample weight is too light to be used as the unit weight in the counting mode or 100 referen...

Страница 38: ...error The weight value is not stable and the balance cannot perform the operation when keys such as ZERO ON OFF or TARE are pressed Prevent vibration and drafts from influencing the balance Press the...

Страница 39: ...bility 0 1 Minimum 100 weight 1 g 10 g 100 g Display 7 segment LCD with backlight Character height 16 mm Display update Approx 10 times per second Operating temperature and humidity range 0 C to 40 C...

Страница 40: ...ghing capacity 199 33 1993 3 7716 dwt Readability 0 01 0 1 1 Weighing capacity 4784 0 47840 GN Readability 0 2 2 Weighing capacity 26 578 265 78 1028 8 tola Readability 0 001 0 01 0 1 Weighing capacit...

Страница 41: ...m s2 Cape Town 9 796 m s2 Rio de Janeiro 9 788 m s2 Chicago 9 803 m s2 Rome 9 803 m s2 Copenhagen 9 815 m s2 San Francisco 9 800 m s2 Cyprus 9 797 m s2 Singapore 9 781 m s2 Djakarta 9 781 m s2 Stockho...

Страница 42: ...40 World Map...

Страница 43: ......

Страница 44: ...44 1235 550485 A D AUSTRALASIA PTY LTD 32 Dew Street Thebarton South Australia 5031 AUSTRALIA Telephone 61 8 8301 8100 Fax 61 8 8352 7409 A D KOREA Limited 6 33 817 07331 817 Manhattan Bldg 33 Gukjege...

Отзывы: