A4Tech RFW-25 Скачать руководство пользователя страница 3

 2 —

Introduction

Congratulations on your purchase! Your new RF-Mouse is easy to install and offers you a host of useful features. The
Radio receiver can be conveniently placed to give you the freedom you need while working.  The vertical wheel
allows you to scroll, or zoom in and out in a document. You can program the mouse buttons to launch the NetJump
or LuckyJump for a quick start to programs you run frequently. And, your RF-Mouse has a unique ID code, so other
RF (Radio Frequency) pointing devices won’t affect your system.

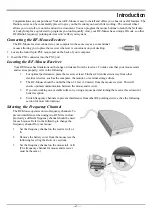
Connecting the RF-Mouse Receiver

The RF-Mouse receiver connects to your computer in the same way as a conventional
mouse allowing you to place the receiver wherever is convenient on your desktop.

1.


Locate the round 6-pin PS/2 mouse port on the back of your computer.

2.


Insert the PS/2 connector into the PS/2 port.

Locating the RF-Mouse Receiver

Your RF-Mouse has limitations on the range or distance from the receiver. To make sure that your mouse sends
and receives properly, refer to the following:

1.


For optimal performance, place the receiver at least 8 inches (20 centimeters) away from other
electrical devices, such as the computer, the monitor, or external storage drives.

2.


The RF-Mouse should be no farther than 3.3 feet (1.0 meter) from the mouse receiver. This will
ensure optimal communication between the mouse and receiver.

3.


If you are working on a metallic surface, try using a mouse pad and turning the receiver face down for
better reception.

4.


Switch frequency channels to prevent interference from other RF pointing devices. (See the following
section for more information.)

Selecting the Frequency Channel

The RF-Mouse operates on two frequency channels. To
prevent interference when using two RF Mice in close
proximity a different frequency channel should be used
for each mouse. Refer to the following to change the
frequency channel for your mouse:

1.


Set the frequency channel on the receiver to 

or

2.

2.


Remove the battery cover from the mouse (see the
following 

Inserting the Batteries

 section).

3.


Set the frequency channel on the mouse to 

or

 2.

(The frequency channel for mouse and receiver
must be the same.)

Содержание RFW-25

Страница 1: ...Radio Wireless Wheel Mouse User s Guide MODEL RFW 25 Trademark Recognition Windows Office 97 and MS IntelliMouse are registered trademarks of Microsoft Corp MN RFW25 NC ...

Страница 2: ...d used in accordance with the instruction may cause harmful interference to radio communication However there is no guarantee that interference will not occur in a particular installation If this equipment does cause harmful interference to radio or television reception which can be determined by turning the equipment off and on the user is encouraged to try to correct the interference by one or m...

Страница 3: ...e sends and receives properly refer to the following 1 For optimal performance place the receiver at least 8 inches 20 centimeters away from other electrical devices such as the computer the monitor or external storage drives 2 The RF Mouse should be no farther than 3 3 feet 1 0 meter from the mouse receiver This will ensure optimal communication between the mouse and receiver 3 If you are working...

Страница 4: ... and follow the instructions on your screen to complete the installation The RF Mouse ID code Each RF Mouse is assigned a unique ID code at manufacture so the receiver only picks up the signal from your mouse and prevents other RF Mouse radio signals from operating on your computer This feature can also be disabled allowing other RF pointing devices to operate your computer Connecting the RF Mouse...

Страница 5: ... be easily clicked by pushing down on the wheel The following pages will tell you how to configure the scroll wheels and buttons to suit your specific needs Cleaning the Mouse Clean the mouse regularly to ensure efficient operation Refer to the following 1 Rotate the housing cover counterclockwise until it unlocks and remove it 2 Remove the tracking ball 3 Wash the tracking ball with warm water an...

Страница 6: ...o scroll through large documents Activate AutoScroll from LuckyJump or NetJump The AutoScroll icon appears over the vertical scrollbar Move the mouse in the direction you want to scroll The farther you move the AutoScroll icon from the starting point the faster the scrolling To stop AutoScroll press any mouse button Zoom Lets you zoom in or out when using applications that support zoom function In...

Страница 7: ... purchased may differ somewhat from the illustration shown in the Buttons tab The third button on some models is positioned under the vertical scroll wheel instead of at the side as shown here Pointers Tab The Pointers tab lets you change the way the cursor appears Click the down arrow under Scheme and choose the setting you want The available pointers for each scheme are shown in the pane below Y...

Страница 8: ...ist and click on the icon in the grid that you want to change LuckyJump bottom grid The LuckyJump grid groups all purpose commands To change a command select a new one from the Command List and click on the icon in the grid that you want to change User defined Command Menu Here you can create your own command menu to suit your specific needs Click on New Update and follow the onscreen instructions...

Страница 9: ...ed click Add New Command See Choosing Commands from the Command Type Menu on page 8 for more information 6 In the Application Document window type the path or browse to the application you want to add and click OK The command will be added to the Test Command Menu pane 7 Repeat steps 6 and 7 to add more commands Click Insert Separator to group command families as shown below Select commands or sep...

Страница 10: ...mands to enter commonly used phrases in all your text editing applications Shortcut commands can be used in all applications just as you use conventional keyboard shortcuts Adding a Keyboard Sequence Text Command The Keyboard Sequence command is very useful when working in text editing applications or when sending e mail You can assign any number of commonly used phrases and then just enter them w...

Страница 11: ... T TE ES ST T R RU UN N For this Test Run the LuckyJump grid will be customized to demonstrate how much easier working with the mouse can be Refer to the following to customize either the LuckyJump or NetJump grid 1 Double click the mouse icon in the system tray In the Mouse Properties window select the Settings tab 2 You will see the default settings for LuckyJump Scroll to Help in the Command Li...

Страница 12: ... assign a shortcut in LuckyJump for instant online access Test Command Menu Choose Test Command Menu from the LuckyJump grid The Command Menu list that you previously learned to create appears see Creating Your Own Command Menu on page 8 Now you re just one click away from all your Office applications games and keyboard shortcuts ØTip If you use these applications very often you can bring them all...

Отзывы: