background image

A10 Thunder Series 6430(S) ADC/CGN
Overview

page 30

FIGURE 23 Example of AC Power Supply 

FIGURE 24 Example of DC Power Supply 

Содержание Thunder Series

Страница 1: ...A10 Thunder Series 6430 S ADC CGN 29 March 2019...

Страница 2: ...ovided later in this document or available separately Customer shall not 1 Reverse engineer reverse compile reverse de assemble or otherwise translate the Software by any means 2 Sub license rent or l...

Страница 3: ...2 Insert the Chassis Into the Rack 13 Sliding Rail Kit Installation 15 Getting Started 15 Rail Kit Contents 15 Required Tools 17 Sliding Rail Kit Installation 18 Attach the Front Brackets to the Chass...

Страница 4: ...uration Examples 40 Configuring Port Splitting in ACOS 2 7 x Releases 40 Enabling Port Splitting 40 Enabling Port Splitting When Restoring System Files 42 Configuring Port Splitting in ACOS 3 x and 4...

Страница 5: ...terface CLI and how to configure the Lights Out Management LOM interface for remote access to specific sys tem level commands FIGURE 1 Thunder 6430 Front Panel View FIGURE 2 Thunder 6430 Rear Panel Vi...

Страница 6: ...able Hardware ear mounting brackets and sliding rail kit Table 2 provides details about these kits including part numbers Rack mount kit installation instructions are available in Rack Mount Kit Insta...

Страница 7: ...terfaces are located on the device and their corresponding numbers FIGURE 3 A10 Thunder Series 6430 S Interfaces and Numbers To begin using these interfaces connect the appropriate cables 1 Connect th...

Страница 8: ...Post BIOS Green Flash System under access Off No power access DISK Amber On SSD under access Off No Data access 40 Gb Ethernet Ports Fiber LNK Green Off Link down On Link up ACT Green Off Port is not...

Страница 9: ...m mand in the CLI If you made any changes to the device configuration you will be prompted to save your configuration information before the device powers down Force Power OFF If the system stops work...

Страница 10: ...ge 8 This ACOS device also features a separate Lights Out Management LOM interface The LOM interface allows you to power the device on or off over the network For more information see the Quick Start...

Страница 11: ...ted This section describes how to use the rack mount kit to install the A10 Thunder Series 6430 S into an equipment rack Rack Mount Contents The rack mount kit contains the following items Verify that...

Страница 12: ...parate the End Brackets from the Inner Rails 2 Attach the Inner Rails to the Chassis 3 Attach the End Brackets to the Rack 4 Insert the Chassis Into the Rack The following sections provides detailed s...

Страница 13: ...er rails to the chassis 1 Align either one of the inner rails over the 10 screw holes in the side of the device chassis as shown in the figure below 2 Use the 2 Phillips head screwdriver to remove the...

Страница 14: ...to the Rack To attach the end brackets to the rack use two pan head screws to attach each end bracket to the rack NOTE Do not tighten the screws yet You will need to be able to adjust them when insert...

Страница 15: ...4 end brackets Make sure each inner rail is inserted into both of its end rails CAUTION Lifting the Thunder 6430 S chassis and placing it in the rails is a two person job If needed use an appropriate...

Страница 16: ...A10 Thunder Series 6430 S ADC CGN Rack Mount Installation page 14...

Страница 17: ...at all parts are included and are not damaged 2 front adjustable rail assemblies Use 4 x screws each Figure 7 2 back adjustable rail assemblies Use 6 x screws each 20 pan head screws for attaching inn...

Страница 18: ...A10 Thunder Series 6430 S ADC CGN Getting Started page 16 FIGURE 7 Rail Assemblies FIGURE 8 Bracket Front FIGURE 9 Bracket Back...

Страница 19: ...the ear brackets closeup Either set of ear brackets can be used depending on preference and rack used The examples in this guide show the wide ear brackets FIGURE 11 Wide FIGURE 12 Narrow Required To...

Страница 20: ...to the Chassis 3 Attach the Rail Assemblies to the Rack 4 Slide the Chassis Into the Rack The following sections provide detailed steps for each task Attach the Front Brackets to the Chassis Perform...

Страница 21: ...ets instead the orientation applies 2 Use 2 of the flat head screws to attach the additional bracket to the chassis Attach the Inner Rails to the Chassis Perform the following steps for each inner rai...

Страница 22: ...ach the Rail Assemblies to the Rack Make sure to attach the rail assemblies front side forward as shown below Perform the following steps for each rail assembly 1 Align the 3 screw holes at the front...

Страница 23: ...der Series 6430 S ADC CGN Sliding Rail Kit Installation 3 Extend the outer rail until it reaches the rear of the rack 4 Insert 2 screws and partially tighten them 5 Tighten all screws FIGURE 15 Front...

Страница 24: ...16 Back of rail assembly FIGURE 17 Front of rail assembly aligned with rack Slide the Chassis Into the Rack To slide the chassis into the rack CAUTION Lifting the A10 Thunder 6430 S chassis and placin...

Страница 25: ...facing you lift the chassis and carefully insert the inner rails attached to the chassis into the rail 2 Gently push the chassis into the rack until the finger tab locks into place FIGURE 18 Finger ta...

Страница 26: ...A10 Thunder Series 6430 S ADC CGN Sliding Rail Kit Installation page 24...

Страница 27: ...Fan Module Location and Fan Numbers Removing a Fan Module Inserting a Fan Module Fan Module Location and Fan Numbers The location and numbering of the fans is shown in Figure 20 FIGURE 20 Thunder 643...

Страница 28: ...he screws on either end of the Fan module the needs replacing Figure 21 2 Holding the two loose screws pull the fan module away from the chassis Figure 22 FIGURE 21 Removing a Fan Module Step 1 FIGURE...

Страница 29: ...page 27 A10 Thunder Series 6430 S ADC CGN Inserting a Fan Module 2 Tighten the screws on each end...

Страница 30: ...A10 Thunder Series 6430 S ADC CGN Inserting a Fan Module page 28...

Страница 31: ...example in the United States of America the National Electrical Code For devices with multiple power supplies it is recommended that all power supplies be plugged in Overview AC or DC power connectio...

Страница 32: ...A10 Thunder Series 6430 S ADC CGN Overview page 30 FIGURE 23 Example of AC Power Supply FIGURE 24 Example of DC Power Supply...

Страница 33: ...ble Inserted DC Power Supply Installation Refer to the following instructions and figures for this procedure Also see figures on previous page 1 Attach Green wire to ground 2 Attach BLACK 48 volt wire...

Страница 34: ...A10 Thunder Series 6430 S ADC CGN DC Power Supply Installation page 32 FIGURE 26 Connecting the DC Power Supply Cable...

Страница 35: ...Series 6430 S ADC CGN Power Supply Hot Swap FIGURE 27 DC Power Supply Cables Power Supply Hot Swap Follow the directions in the following sections to remove and insert a power supply unit FIGURE 28 Po...

Страница 36: ...old the panel and pull out the power supply Inserting a Power Supply Before inserting the new power supply on any A10 Thunder Series device be sure to remove the power supply bottom gasket see Figure...

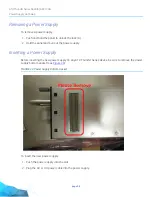
Страница 37: ...page 35 A10 Thunder Series 6430 S ADC CGN Power Supply Hot Swap...

Страница 38: ...A10 Thunder Series 6430 S ADC CGN Power Supply Hot Swap page 36...

Страница 39: ...cable for all QSFP ports The split 40G ports supports the following configuration Each port will have its own port number Each port will work as an individual port All ports will provide the same fun...

Страница 40: ...A10 Thunder Series 6430 S ADC CGN Overview of 40G Port Splitting page 38 A10 Thunder Series 6430 S A10 Thunder Series 5430 11 S A10 Thunder Series 4430 S...

Страница 41: ...that are numbered as port 19 port 23 port 27 and port 31 Port 20 will have four 10G ports that are numbered as port 20 port 24 port 28 and port 32 FIGURE 30 Splitting the 40GPorts on a Thunder 6430 A...

Страница 42: ...to take effect Enabling Port Splitting Below is a configuration example ACOS config 4x10g mode enable This command will modify your system to enable 4x10g mode support Any configurations on the affect...

Страница 43: ...01f a006 4022 0 0 0 0 0 0 2 Disb None None None 1 001f a006 4023 0 0 0 0 0 0 3 Disb None None None 1 001f a006 4024 0 0 0 0 0 0 4 Disb None None None 1 001f a006 4025 0 0 0 0 0 0 5 Disb None None None...

Страница 44: ...ing configured for example you replace an older device with a new one you can use the procedure described in this section to load an existing configuration with port splitting configured onto that new...

Страница 45: ...nfiguration to profile splitter_enabled ACOS reboot Proceed with reboot yes no yes Enabling Port Splitting When Restoring System Files In situations where you have a device without port splitting conf...

Страница 46: ...ng from the next reboot Please confirm to proceed Do you want to proceed with the 4x10g mode command now N Y y This command will require you to save the running configuration to startup configuration...

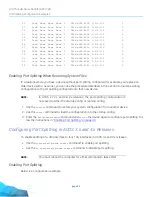
Страница 47: ...page 45 A10 Thunder Series 6430 S ADC CGN Port Splitting Configuration Examples...

Страница 48: ...A10 Thunder Series 6430 S ADC CGN Port Splitting Configuration Examples page 46...

Страница 49: ...power supply specifications 1100W DC Power Supply Specifications Table 4 contains the 1100W DC power supply specifications TABLE 3 1100W AC Power Supply Product Specification Item Specifications Part...

Страница 50: ...A10 Thunder Series 6430 S ADC CGN 1100W DC Power Supply Specifications page 48...

Страница 51: ...page 49 A10 Thunder Series 6430 S ADC CGN...

Страница 52: ...A10 THUNDER SERIES 6430 S ADC CGN 29 MARCH 2019 CONTACT US a10networks com contact...

Отзывы: