background image

2

I

nstallatIon


of


new


mIxer

:

Installation and securing:

The mixer must be mounted with rubber feet, which neu-
tralize both shaking and rusting. Spacers can be inserted 

under the mixer’s feet, if the floor is not completely even.
The mixer is placed directly on the floor. Foundation bolts 

in the floor are only necessary under special conditions, 

e.g. on ships. 

Connection to power:

Before the mixer is connected to power, it should be 
checked that the voltage and frequency printed on the 
machine label is correct in relation to the place of instal-
lation. The machine label is placed at the top right side 
of the mixer.

Checking of the direction of rotation of the planetary 

head:

Lift up the bowl arms to normal working position 
and start the mixer without bowl and tools. Check 
the direction of rotation of the planetary head: the 
planetary head must rotate in the direction as 
stated by the arrow above the planetary head. If 
the direction of rotation is wrong, 2 of the phase 
wires of the connecting cable must be inverted.

G

eneral

:

In case of complaints, please contact your supplier.

The guarantee does not cover faults resulting from faulty 
operation, overloading and lacking observance of direc-
tions of maintenance.

It should be checked that all loose parts are delivered 
with the mixer such as bowl, tools, grease gun and rub-
ber feet

If the mixer has an attachment drive only equipment pro-
duced by 

A/S WODSCHOW & CO.

 must be connected.

s

afety

:

The constant noise  level of the workplace of the operator 
is lower then 70 dB (A).

The mixer is designed for manufacture of pro-
ducts which do not during processing cause 
reactions or emit substances which may be det-
rimental to the user.

Putting your fingers in the bowl while the mixer 

is running may cause injuries.

C

ontents

:

 OBS:

The mixer is to be connected to power via a plug. The plug 
must be dimensioned for min. 16 A, 230/400V~, IP44

When connecting;

1 phase with 0 + earth, use 3 pole plug 
2 earth, use 3 pole plug 
3 earth, use 4 pole plug 
3 phases with 0 + earth, use 5 pole plug

G

eneral

 ....................................................................................................................................................................................... 2

s

afety

 ....................................................................................................................................................................................... 2

I

nstallatIon


of


new


mIxer

: .................................................................................................................................................................... 2

C

onstruCtIon


of


the


mIxer

: .................................................................................................................................................................. 3

t

he


mIxers


Control


panel

: ................................................................................................................................................................... 3

t

he


maxImum


CapaCIty


of


the


mIxer

: ...................................................................................................................................................... 4

r

eCommended


maxImum


speeds

: ............................................................................................................................................................. 4

o

peratIon


of


the


mIxer

:  ...................................................................................................................................................................... 5

B

owl


lIftInG


and


speed


Control

: .......................................................................................................................................................... 5

t

Imer


funCtIon

: .................................................................................................................................................................................... 6

a

utomatIC


lowerInG


of


the


Bowl

:: ....................................................................................................................................................... 6

p

ause


funCtIon

: ................................................................................................................................................................................... 6

t

he


mIxer

s


start


speed


after


stop

: ..................................................................................................................................................... 6

s

tart

-

up


after


stop


at


hIGh


speed

: ...................................................................................................................................................... 6

o

verload

:   ....................................................................................................................................................................................... 6

s

oftware


versIon


of


the


Control


panel

: .............................................................................................................................................. 6

C

orreCt


use


of


tools

: ......................................................................................................................................................................... 7

C

leanInG

:   ....................................................................................................................................................................................... 7

m

aIntenanCe


and


luBrICatIon

: .............................................................................................................................................................. 7

G

rease


types

: ...................................................................................................................................................................................... 7

l

Ist


of


errors


and

 p

ossIBle


solutIon

: ................................................................................................................................................. 8

  a

djustment


of


speCIal


v

-

Belt

: ........................................................................................................................................................ 8

  a

djustment


of


Bowl


fIxInG

: ............................................................................................................................................................ 9

  a

djustment


of


Bowl


CenterInG

: ...................................................................................................................................................... 9

  m

easurInG


of


Bowl


heIGht

: ............................................................................................................................................................. 9

  a

djustment


of


Bowl


heIGht

: ........................................................................................................................................................... 9

  a

djustments


of


speed

 (

low


and


hIGh


speed


Cam


dIsks

): ................................................................................................................. 11

e

leCtrICal


dIaGrams

: ......................................................................................................................................................................... 12

Содержание AR30

Страница 1: ...jerg Søpark 6 DK 2605 Brøndby Phone 45 43 44 22 88 info wodschow dk www bearvarimixer dk Denmark AR30 AR40 AR40P AR60 AR60P VL 1S 102017 ORDER NO 00253 VL 1S GB Translation of the original user manual OPERATING INSTRUCTIONS ...

Страница 2: ...owl tools grease gun and rub ber feet If the mixer has an attachment drive only equipment pro duced by A S WODSCHOW CO must be connected Safety The constant noise level of the workplace of the operator is lower then 70 dB A The mixer is designed for manufacture of pro ducts which do not during processing cause reactions or emit substances which may be det rimental to the user Putting your fingers ...

Страница 3: ...eed indicator The mixers control panel Bowl down Speed down Timer Display Features of the VL 1S control panel Timer Emergency stop Pause Start Stop Buttons with changing functions Bowl up Speed up Bowl down Speed down The speed is reduced to a minimum when the mixer is stopped Automatic lowering of the bowl When a time is set on the timer and the mixer is running briefly press The green LED by wil...

Страница 4: ...ce water absorption volume and baking characteristics etc Scraper recommended Low speed operation is recommended Capacities per mix Tool AR30 AR40 AR40P AR60 AR60P Egg white Whip 3 5 L 6 L 6 L 9 L 9 L Whipped cream Whip 7 5 L 10 L 10 L 15 L 15 L Mayonnaise Whip 24 L 32 L 32 L 48 L 48 L Herb butter Beater 17 kg 25 kg 25 kg 45 kg 45 kg Mashed potatoes Beater Whip 18 kg 23 kg 23 kg 36 kg 36 kg Bread ...

Страница 5: ...the safety guard If you start the mixer again using all the settings will be unchanged If you start the mixer using the settings will be reset See also Pause function on page 6 H When the mixing process is completed the mixer is stopped by pressing or by the timer going into stop position In both cases the tool s speed is automatically reduced to a minimum and it will then stop completely I When t...

Страница 6: ... control panel software version can be read on the mixer s display It first displays how many times power has been con nected to the mixer It then displays Then it displays the software version Timer function The mixer has an optional timer function If no time is set on the timer the display will instead show the time the mixer has run for The timer can be set to a maximum of 60 minutes and can be...

Страница 7: ...er wires should be used alternatively use the beater and the whip Cleaning The mixer should be cleaned daily or after use The mixer should be cleaned with a soft cloth and clean water Sulphonated soaps should be used with caution as they destroy the mixer s lubricants Never use high pressure cleaning for the mixer Parts made of aluminum should not be used to strongly acidic highly alkaline or high...

Страница 8: ...lier Prior to a possible repair or adjustment switch off the mixer by disconnecting the power cable Adjustment of special v belt The distance X is only indicative as it depends on the tolerance of the special V belt 1 Start by tightening the v belts 2 Tighten the special V belt A by moving one or two washers from V to T 3 Start the mixer and leave it running while the nut U is tightened Do not tig...

Страница 9: ...distance X is measured from the bottom side of the bayonet hole to the surface on the bowl arms on which the bowl rests fig 6 The bowl arms must be lifted to normal working position Adjustment of bowl height The upper and lower position of the bowl is determined by micro switch 1 and 2 fig 6a The two mechanical stops consisting of the bolts 3 and 4 are adjusted so that they will be hit approx 1 mm...

Страница 10: ...10 2 3 mm 1 mm K M N H B C A D L E F G I J fig 8 Bad position for the servo motor fig 7a Position of the the V belt at minimum speed fig 7b Position of the the V belt at maximum speed ...

Страница 11: ...cam disk for minimum speed K until it is activating the micro switch Tighten the screw Release the emergency stop and start the mixer Turn the handle for manual adjusting of speed to maximum speed until the distance from the v belt to the edge of the motor pulley is approximately 3 mm see fig 7b Stop the mixer by pressing emergency stop Turn the cam disk for maximum speed L until it is activating ...

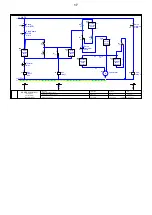
Страница 12: ...P 200 PE VL1S 3 x 200 240V AC PE 20111025 VL1S 3P 200 PE 3 x 200 240V AC PE Power supply Max 16A Customer supplied Main Motor Thermal Relay Motor protection Contactor Emergency stop Fuse Operator Panel Hold Thermal Relay 230VAC 50Hz Supply Contactor Main Motor L 0 Volt Transformer Control Voltage 230 24VAC Fuse Aux relay 2 Reset Bowl bottom micro Bowl top micro Lift Controller Unit Motor protectio...

Страница 13: ...rd safety micro Thermal relay Start Start Operator panel Aux relay 3 box Aux relay 1 Servo maximum micro Stop Stop Speed up 1 Speed up 1 Servo Motor Aux relay 2 Speed down 1 Speed down 1 Speed down 2 Speed down 2 Speed up 2 Speed up 2 Servo minimum micro Operator panel Operator panel Operator panel Operator panel Operator panel F1 K1 R2 R1 R1 R1 V1 PCB PCB PCB K2 M M3 R2 PCB PE R2 R1 V2 R2 PCB PCB...

Страница 14: ... 200 240V AC N PE or 2 x 230V AC PE 20111025 VL1S 1P N PE OR 2P PE 3 x 200 240V AC N PE or 2 x 230V AC PE Power supply Max 16A Customer supplied Main Motor Thermal Relay Motor protection Contactor Emergency stop Fuse Operator Panel Hold Thermal Relay 230VAC 50Hz Supply Contactor Main Motor Transformer Control Voltage 230 24VAC Fuse Aux relay 2 Reset Bowl bottom micro Bowl top micro Lift Controller...

Страница 15: ...afety micro Thermal relay Start Start Operator panel Aux relay 3 box Aux relay 1 Servo maximum micro Stop Stop Speed up 1 Speed up 1 Servo Motor Aux relay 2 Speed down 1 Speed down 1 Speed down 2 Speed down 2 Speed up 2 Speed up 2 Servo minimum micro Operator panel Operator panel Operator panel Operator panel Operator panel F1 K1 R2 R1 R1 R1 V1 PCB PCB PCB K2 M M3 R2 PCB PE R2 R1 V2 R2 PCB PCB CE1...

Страница 16: ...itle File name VL1S 3x380 480V AC N PE 20111025 VL1S 3P N PE 3 x 380 480V AC N PE Power supply Max 16A Customer supplied Main Motor Thermal Relay Motor protection Contactor Emergency stop Fuse Operator Panel Hold Thermal Relay 230VAC 50Hz Supply Contactor Main Motor Transformer Control Voltage 230 24VAC Fuse Aux relay 2 Reset Bowl bottom micro Bowl top micro Lift Controller Unit Motor protection L...

Страница 17: ...rd safety micro Thermal relay Start Start Operator panel Aux relay 3 box Aux relay 1 Servo maximum micro Stop Stop Speed up 1 Speed up 1 Servo Motor Aux relay 2 Speed down 1 Speed down 1 Speed down 2 Speed down 2 Speed up 2 Speed up 2 Servo minimum micro Operator panel Operator panel Operator panel Operator panel Operator panel F1 K1 R2 R1 R1 R1 V1 PCB PCB PCB K2 M M3 R2 PCB PE R2 R1 V2 R2 PCB PCB...

Страница 18: ...L1S 3 x 380 480V AC PE 20111025 VL1S 3P PE 3 x 380 480V AC PE Power supply Max 16A Customer supplied Main Motor Thermal Relay Motor protection Contactor Emergency stop Fuse Operator Panel Hold Thermal Relay 230VAC 50Hz Supply Contactor Main Motor Transformer Control Voltage 230 24VAC Fuse Aux relay 2 Reset Bowl bottom micro Bowl top micro Lift Controller Unit Motor protection Lift Motor Operator P...

Страница 19: ...mal relay Start Start Operator panel Aux relay 3 box Aux relay 1 Servo maximum micro Stop Stop Speed up 1 Speed up 1 Servo Motor Aux relay 2 Speed down 1 Speed down 1 Speed down 2 Speed down 2 Speed up 2 Speed up 2 Servo minimum micro Operator panel Operator panel Operator panel Operator panel Operator panel F1 K1 R2 R1 R1 R1 V1 PCB PCB PCB K2 M M3 R2 PCB PE R2 R1 V2 R2 PCB PCB CE1 G1 L 24VDC 11 3...

Страница 20: ...re que le batteur mélangeur ci dessous Verklaart hiermede dat Menger Declaramos que el producto batidora er i overensstemmelse med relevante bestemmelser i Maskindirektivet Direktiv 2006 42 EC is in conformity with the relevant provisions of the Machinery Directive 2006 42 EC konform ist mit den Bestimmungen der EG Maschinenrichtlinie Direktiv 2006 42 EG Satisfait à l ensemble des dispositions per...

Страница 21: ...la presente si dichiara che questo mixer planetaria Deklareerime käesolevaga et Planetaarmikseri Niniejszym oświadczamy że mikser planetarny vakuuttaa että tämä mikseri tyyppi överensstämmer med tillämpliga bestämmelser i maskindirektivet 2006 42 EG is è conforme alle disposizioni della Direttiva Macchine Direttiva 2006 42 CE vastab kehtivatele masinadirektiivi 2006 42 EÜ nõuetele spełnia wymagani...

Страница 22: ...22 ...

Страница 23: ...23 ...

Страница 24: ...24 A S WODSCHOW CO Kirkebjerg Søpark 6 DK 2605 Brøndby Denmark Phone 43 44 22 88 info wodschow dk www bearvarimixer com ...

Отзывы: