background image

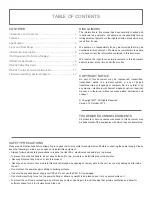
TABLE OF CONTENTS

SAFETY PRECAUTIONS 

Please read all instructions before attempting to unpack, install or operate this equipment and before connecting the power supply. Please 
keep the following in mind as you unpack and install this equipment:
•   Always follow basic safety precautions to reduce the risk of 

fi

 re, electrical shock and injury to persons.

•  To prevent 

fi

 re or shock hazard, do not expose the unit to rain, moisture or install this product near water.

•   Never spill liquid of any kind on or into this product.
•   Never push an object of any kind into this product through any openings or empty slots in the unit, as you may damage parts inside 

the unit.

•  Do not attach the power supply cabling to building surfaces.
•  Use only the supplied power supply unit (PSU). Do not use the PSU if it is damaged.
•  Do not allow anything to rest on the power cabling or allow any weight to be placed upon it or any person walk on it.
•  To protect the unit from overheating, do not block any vents or openings in the unit housing that provide ventilation and allow for  

suf

fi

 cient space for air to circulate around the unit.

CONTENTS 

Introduction and Contents ....................................................1

Features ................................................................................ 2

Speci

fi

 cation ......................................................................... 3

Front and Real Panel ...........................................................4

Video/Audio Description  ........................................................5

OSD Operation (On-Screen-Display) .................................... 7

IR Remote Description ..........................................................9

RS-232 Cable Pins Used ......................................................10

RS-232 Control Command Introduction ...............................11

Firmware Updating / System Diagram..................................13

DISCLAIMERS

The information in this manual has been carefully checked and 
is believed to be accurate. We assume no responsibility for any 
infringements of patents or other rights of third parties which may 
result from its use.

We assume no responsibility for any inaccuracies that may be 
contained in this document. We make no commitment to update 
or to keep current the information contained in this document.

We reserve the right to make improvements to this document 
and/or product at any time and without notice.

COPYRIGHT


NOTICE

No part of this document may be reproduced, transmitted, 
transcribed, stored in a retrieval system, or any of its part 
translated into any language or computer 

fi

 le, in any form or by 

any means—electronic, mechanical, magnetic, optical, chemical, 
manual, or otherwise—without express written permission and 
consent

© Copyright 2011. All Rights Reserved.
Version 1.2 October 2012

TRADEMARK


ACKNOWLEDGMENTS

All products or service names mentioned in this document may 
be trademarks of the companies with which they are associated.

Содержание ANI-MINI601HD

Страница 1: ...ANI MINI601HD Mini Presentation Scaler Switcher INSTRUCTION MANUAL Frisco Texas 75034 317 456 2461...

Страница 2: ...ntroduction and Contents 1 Features 2 Specification 3 Front and Real Panel 4 Video Audio Description 5 OSD Operation On Screen Display 7 IR Remote Description 9 RS 232CablePinsUsed 10 RS 232 Control C...

Страница 3: ...011 Any changes of functions and parameters since then will be informed separately Please refer to the dealers for the latest details This manual is copyright A NeuVideo inc All rights reserved No par...

Страница 4: ...standard including 640x480 800x600 1024x768 1280x1024 1280x768 1360x768 60Hz 1920x1080 supporting the DDC2 B plug and play 6 The two HDMI inputs support the full digital signal supporting Bit Synchron...

Страница 5: ...with High bandwidth Digital Content Protection HDCP with DVI HDMI 1 3 standards Audio Input Audio Output Input 3 Stereo Audio for line audio 2 digital embedded audio Output Stereo audio for line audio...

Страница 6: ...B mode the ENTER button also acts as the confirm function 6 IR sensor It is for IR remote controlling receiving the signal of the included IR remote 7 The direction keys when in the OSD mode the four...

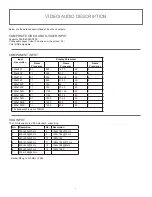
Страница 7: ...0 4 720x576P 1 1 625 31 25 50 4 1280x720P 1 1 750 45 60 1 1280x720P 1 1 750 37 50 50 1 1920x1080I 2 1 1125 28 125 50 1 1920x1080I 2 1 1125 33 75 60 1 1920x1080I 2 1 1250 31 25 50 1 1920x1080P 1 1 1250...

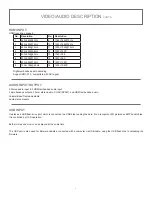
Страница 8: ...patible with DVI signal AUDIO INPUT OUTPUT 3 Stereo audio input 2 HDMI embedded audio input 3 simultaneous outputs 3 5mm stereo audio COAX SPDIF and HDMI embedded audio Volume Bass Treble adjustable A...

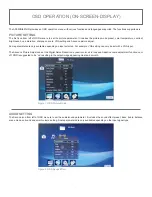
Страница 9: ...le depending on input selected For example VGA setting can only be set with a VGA input The Advance Picture Adjust can set the Digital Noise Reduction dynamic color skin tone and Adaptive Luma adjustm...

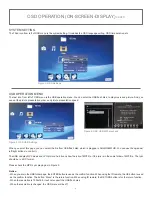
Страница 10: ...rom USB flash disk which is plugged to ANI MINI601HD You can use the up down left right buttons to control it The USB can play MP3 music and JPG picture And it can show the lyric of MP3 file if the ly...

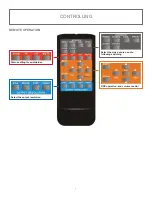
Страница 11: ...CONTROLLING REMOTE OPERATION 9 Status setting for audio video Select the output resolution Select the video source audio following switching OSD operation and volume control...

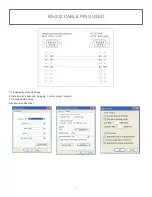
Страница 12: ...RS 232 CABLE PINS USED 1 Transmission Rate 9600 bps 2 Data Format 8 data bits No parity 1 start bit and 1 stop bit 3 Flowing Control None Also known as 9600 8 n 1 10...

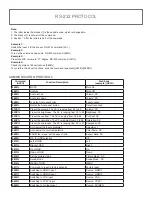
Страница 13: ...t the volume The XX is ranging from 00 to 99 Volume XX 02XX Preset the brightness The XX is ranging from 00 to 99 Brightness XX 03XX Preset the contrast The XX is ranging from 00 to 99 Contrast XX 04X...

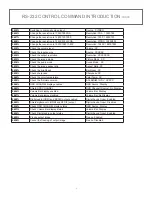
Страница 14: ...Ratio XX 0636 Check the brightness Brightness XX 0639 Check sharpness Sharpness XX 0640 Check the color temperature Color Temp XX 0699 Check the firmware version ANI MINI601HD V XXXXX 0644 OSD CHANNEL...

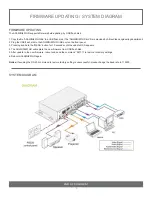
Страница 15: ...the ANI MINI601HD USB port on the front panel 3 Pressing and hold the MENU button for 15 seconds until the update OSD appears 4 The ANI MINI601HD will capture the new firmware from USB flash disk 5 A...

Отзывы: