18
WebGUI Control
WebGUI Control
2. Sink EDID Download:
To save the EDID from one of the connected displays to your local PC, select the appropriate sink from the
dropdown list then press the
“Download”
button. Depending on your browser settings you will either be asked where to save the
downloaded file, or the file will be transferred to the default download location on your PC.
3. EDID Mode:
The EDID Mode section provides controls for how to assign EDID to the unit’s inputs. Selecting
“Appoint”
allows for
different EDID to be assigned to each individual input, selecting
“ALL”
allows for a single EDID to be assigned to all inputs.
4. Set EDID Input Content:
Click on the preferred input(s) to open the EDID Source management window. Multiple inputs can be
selected at once, if desired. Select the new EDID source to use and the change will occur immediately.
NOTE:
In most cases, assigning a new EDID to an input will cause the affected input to briefly blink out while the source adapts to
the new information.
5. Unit’s Default EDIDs:
This unit provides the following (6) default EDIDs:
UNIT’S DEFAULT EDIDS
FHD/2CH
1920x1080p@60Hz (148MHz) & 8-bit color
LPCM 2.0
FHD/MCH
1920x1080p@60Hz (148MHz) & 8-bit color
LPCM 7.1 & Bitstream
UHD/2CH
3840x2160p@30Hz (297MHz) & Deep Color (8/10/12-bit)
LPCM 2.0
UHD/MCH
3840x2160p@30Hz (297MHz) & Deep Color (8/10/12-bit)
LPCM 7.1 & Bitstream
UHD+/2CH
3840x2160p@60Hz (594MHz) & Deep Color (8/10/12-bit)
LPCM 2.0
UHD+/MCH
3840x2160p@60Hz (594MHz) & Deep Color (8/10/12-bit)
LPCM 7.1 & Bitstream
NOTE:
In some rare cases it is possible for custom or external EDIDs to cause compatibility issues with certain sources. If this
happens, it is recommended to switch to one of the (6) default EDIDs for maximum compatibility.
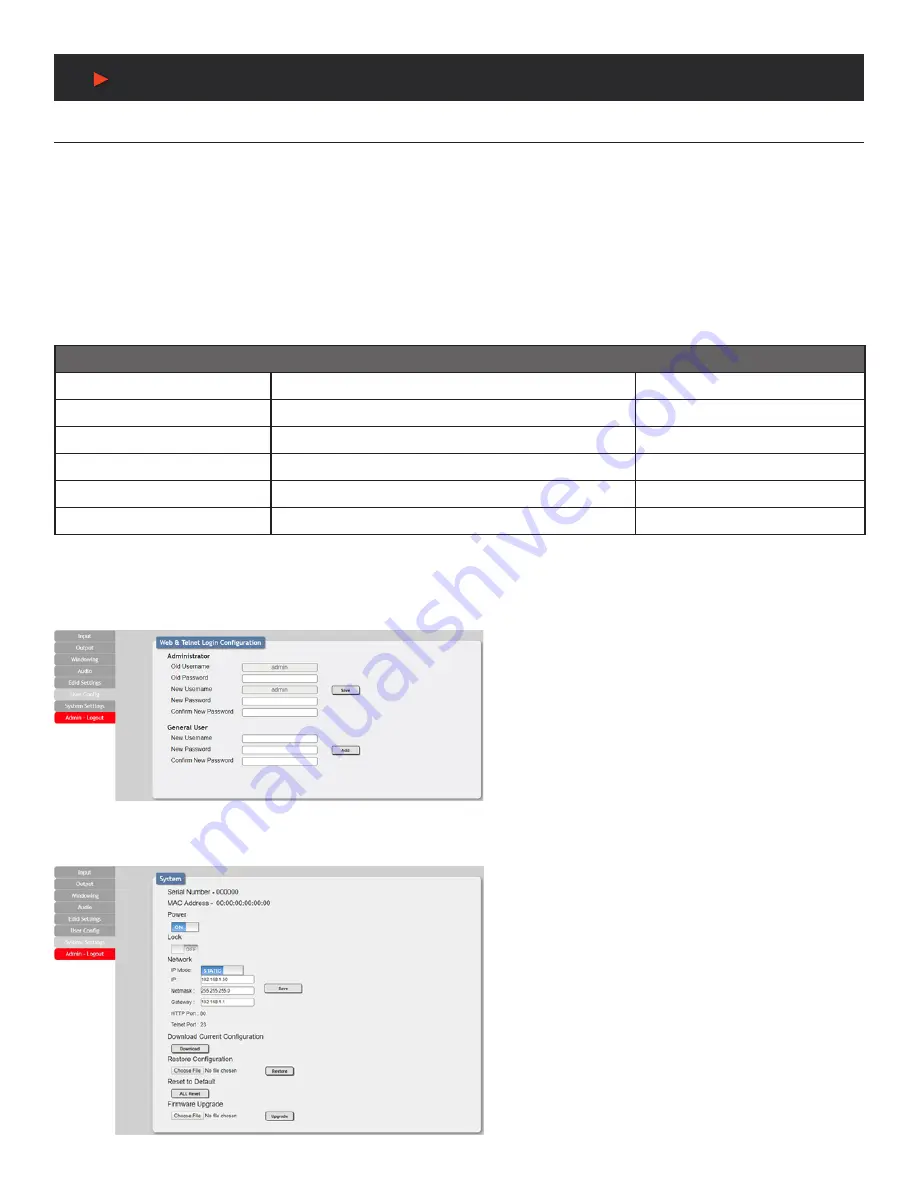
USER CONFIGURATION:
This tab provides User Configuration options including
changing the password for the Administrator account, and both
the user name and password for the General User account.
NOTE:
The General User account has limited access to the
WebGUI and only has access to the Input, Output, Windowing,
and Audio tabs.
SYSTEM SETTINGS:
This tab provides system information, power control, Ethernet
configuration options, system configuration backup/restore/
reset, and firmware update functions.
1. Power:
Press this switch to toggle the unit’s power between
ON and OFF (standby mode).
NOTE:
While in standby mode the unit’s WebGUI, Telnet and
RS-232 controls are still active.
2. Lock:
Press this switch to enable or disable the front panel
button lock function. When enabled, pressing the physical
buttons on the front of the unit will have no effect.
3. Network:
IP mode may be switched between Static IP
or DHCP. In Static IP mode the IP, netmask and gateway
addresses may be manually set.
A
NEU
VIDEO