background image

HARDWARE DESCRIPTION 

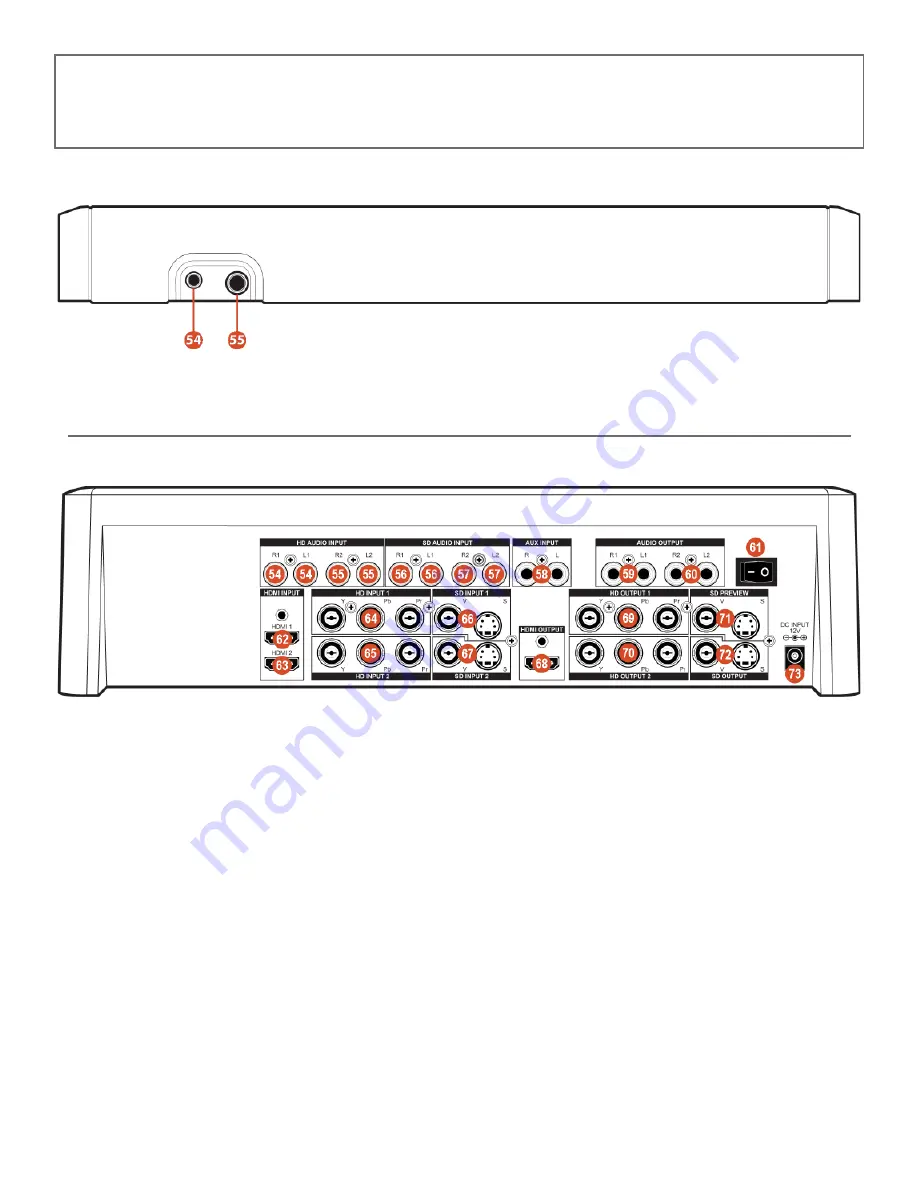
FRONT PANEL



 PHONES: Connect ear phone to listen the audio signal.



 MIC: Connect the MIC to insert audio.

REAR PANEL




Source 3 HD stereo audio input 1.




Source 4 HD stereo audio input 2.




Source 5 SD stereo audio input 1.




Source 6 SD stereo audio input 2.




Auxiliary Audio input Jack.




Program audio out 1 Audio output Jack.




Program audio out 2 Audio output Jack.



 Power ON/OFF Switch.




Source 1 HDMI input 1.




Source 2 HDMI input 2.




Source 3 HD Component Video input 1.




Source 4 HD Component Video input 2.




Source 5 SD Composite Video or YC input 1.




Source 6 SD Composite Video or YC input 2.




HDMI program video output.




Program out 1 HD YPBPR Video output jack.




Program out 2 HD YPBPR Video output jack.




SD PREVIEW out(OSD) Video and YC output jack.




SD Recording out Video and YC output jack.




DC INPUT 12V 3A.

4

Содержание ANI-PS112

Страница 1: ...ANI PS112 HD SD Digital Multi Format Live Video Production Switcher INSTRUCTION MANUAL www A NeuVideo com Frisco Texas 75034 317 456 2461 V 1 1 ...

Страница 2: ...ion 12 This unit should be installed in a cool dry place away from sources of excessive heat vibration dust moisture and cold Do not use the unit near stoves heat registers radiators or other heat producing devices 13 Do not block fan intake or exhaust ports Do not operate equipment on a surface or in an environment which may impede the normal flow of air around the unit such as a bed rug carpet o...

Страница 3: ...ct 10 Audio VideoMixer 11 Audio Level 12 Rear Panel 13 Operation 14 Basic Operation 14 Input Signal Selection and Background color Selection 14 Video Mix 14 Video Wipe 15 WIPE PATTERN Selection 15 Multiple Pattern Selection 17 ONE WAY WIPE 17 REVERSE WIPE 17 Picture In Picture 18 KEY 19 AUTO FADE WIPE Selection 20 DIGITAL EFFECT 20 AUDIO MIXER 20 OSD ADJUST 21 DISCLAIMERS The information in this m...

Страница 4: ... Composite S Video source inputs 1x HDMI recording output 2x Component YPbPr recording outputs 1x Composite and S Video recording outputs 1x Composite and S Video preview outputs with On screen Display Auxiliary audio input Microphone input and headphone output Picture in Picture control 3 window sizes Each A B BUS can adjust the Contrast Brightness Color Hue Detail and Aspect Ratio Supports Lip S...

Страница 5: ...1x 1 0 Vp p 75Ω composite signal Pin Jack NTSC NTSC 4 43 PAL PAL M PAL N SECAM Audio Output 2x 6 dBs 20 kΩ Pin Jack L R PREVIEW OUTPUT OSD Y C Output 1x Y Signal 1 0 Vp p 75Ω Mini Din 4 pin connector C Signal 0 3 Vp p 75Ω Mini Din 4 pin connector Video Output 1x 1 0 Vp p 75Ω composite signal Pin Jack NTSC NTSC 4 43 PAL PAL M PAL N SECAM HEADPHONE OUTPUT Headphone 1x 20 dBv 80 dBv 8Ω unbalanced pho...

Страница 6: ... audio out 1 Audio output Jack Program audio out 2 Audio output Jack Power ON OFF Switch Source 1 HDMI input 1 Source 2 HDMI input 2 Source 3 HD Component Video input 1 Source 4 HD Component Video input 2 Source 5 SD Composite Video or YC input 1 Source 6 SD Composite Video or YC input 2 HDMI program video output Program out 1 HD YPBPR Video output jack Program out 2 HD YPBPR Video output jack SD ...

Страница 7: ...system resolution or a short cut is to press two keys for 1 second simultaneously The combinations below button button 480p60 button button 576p60 button button 720p50 button button 720p60 button button 1080i50 button button 1080i60 button button NTSC button button NTSC 43 button button PAL button button PAL M button button PAL N button button SECAM50 5 ...

Страница 8: ...pe functions Joystick Control This joystick control has two functions control the position of the square wipe pattern and P IN P picture FUNCTIONS One way wipe button Reverse wipe button Multiple wipe button Straight wipe button Split wipe button Corner wipe button Diagonal wipe button Triangle wipe button Square wipe button 6 ...

Страница 9: ...n be selected by pressing this button Mix Fade button Press this button to select the fade In Out mode KEY button This button allows you to tune in a best performance point for the blue key and luma key effects EDGE button Used to select sharp edge soft edge or color edge COLOR button Used to select eight different frame colors ...

Страница 10: ...button ADJUST Adjust button When LED switched off the SDP review output side will show AB bus output source and output format When LED illuminate the user can press and buttons to adjust the values DEMO button When LED illuminate the auto DEMO will switch to ON and the system will auto sequence Demo 96 wipe patterns press the TIME button to adjust the auto sequence SCAN button Press and hold SCAN ...

Страница 11: ...on is set to ON START button Automatic MIX and WIPE operation can be performed by pressing the START button Transition time can be adjusted via TIME When transition time lapsed the LED goes off VIDEO slide Wipe PIP and Key effects can be controlled by this Video slide which moves A B bus outputs horizontally or vertically AUDIO MIXER INPUT A Controls the audio level of input A INPUT B Controls the...

Страница 12: ...e the time S Video will be the first priority source to be display Used to select Source5 SD input 2 When connecting both S Video and Video at the same the time S Video will be the first priority source to be display A bus background color select can select one out of eight colors B bus background color select can select one out of eight colors AUDIO LEVEL Audio level indicator Audio level This in...

Страница 13: ...Source thru Source and Background color button You will see the corresponding picture on the screen Press a Background color button to select the background color you need Any of the 8 Background colors Blue Red Magenta Green Cyan Yellow White Black can be selected by repeatedly pressing the Background color selection button The same procedures applies to the B bus When the selected input source i...

Страница 14: ...IPE Reset the operation panel to initial mode Press the WIPE button Press one of the A bus selection button Press one of the B bus selection button WIPE effect will be controlled by video slide which moves A B bus outputs horizontally or vertically Press EDGE button to select frame sharp edge soft edge color edge When frame color is color edge press COLOR button to select one of eight colors to di...

Страница 15: ...able Top right to bottom left bottom right to top left bottom left to top right and top left to bottom right Press the triangle wipe button repeatedly to toggle through the available wipe patterns Four are available Left to right Bottom to top top and bottom simultaneously and left and right simultaneously Press the split wipe button repeatedly to toggle through the available wipe patterns Four ar...

Страница 16: ...o place the unit in WIPE mode Select a wipe pattern e g straight wipe by pressing button Press the ONE WAY 3 button Press one of the A bus selection buttons to select a source Press one of the B bus selection buttons to select a source Operate the video slide to control the wipe pattern REVERSE WIPE Press the WIPE button to place the unit in WIPE mode Select a wipe pattern e g straight wipe by pre...

Страница 17: ... picture box at 1 3 size without the frame edge Shows the picture in picture box at 1 4 size without the frame edge Shows the picture in picture box at 1 2 size with the frame edge Shows the picture in picture box at 1 3 size with the frame edge Shows the picture in picture box at 1 4 size with the frame edge Other PIP features 3 PIP sizes selectable for sub picture PIP channel The color of the ed...

Страница 18: ...the LUMA KEY level Press button or to change the source that is being keyed Press the LUMA KEY again to reverse the LUMA KEY effect How to use the BLUE KEY effect Press the KEY button to place the unit in KEY mode Press one of the A bus selection buttons to select a source Press one of the B bus selection buttons to select a source Press the BLUE KEY button The blue areas of the picture will becom...

Страница 19: ...vailable in the picture in picture frame in PIP mode A bus B bus digital effect ON button STILL button creates a still frame PAINT button creates a paint effect Repeatedly pressing the PAINT button will cycle through 3 levels of the effect NEGATIVE button creates a negative image MOSAIC button creates a pixillated effect Repeatedly pressing the MOSAIC button will cycle through 3 levels of the effe...

Страница 20: ...3 ASPECT FULL AUTO FULL 16 9 4 3 CONTRAST 58 0 63 BRIGHT 31 0 63 MENU 2 B PICTURE COLOR 31 0 63 HUE 31 0 63 DETAIL 10 0 63 ASPECT FULL AUTO FULL 16 9 4 3 A AUDIO AUTO AUTO CH1 CH2 CH3 CH4 CH5 CH6 B AUDIO AUTO AUTO CH1 CH2 CH3 CH4 CH5 CH6 3 SETUP VOLUME 127 0 127 LIP SYNC 33MS 0 170 OUTPUT NTSC NTSC NTSC 43 PAL PAL M PAL N DEFAULT SECAM 480p60 576p50 720p50 720p60 1080i50 1080i60 When in MENU mode ...

Страница 21: ...the State of Texas United States of America A NeuVideo makes no representation that materials pertaining to the Product are appropriate or available for use in other locations other than the shipping address you provided with respect thereto You are advised that the Product may be subject to U S export controls Disclaimers and Limitation of Liability A NeuVideo may change or modify the Product at ...

Отзывы: