41-03286/1 100107
©2010 4M Industrial Development Limited. All rights reserved.
A. SAFETY WARNINGS
1. Adult supervision and assistance are required at all times.
2. This kit is intended for children aged 8 years or older.
3. This kit and its finished product contain small parts which may cause choking if misused. Keep away from
children under 3 years old.
4. Do not attempt to take the solar panel apart.
Also required, but not included in this kit: small crosshead screwdriver, 1 x empty soda can
Place your Solar Rover outdoors on a sunny day and watch it zip along. No batteries are required —the
Solar Rover’s solar panel turns sunlight into the electricity that runs the motor. Recycle a soda can to make
your Solar Rover unique. It’s a science project that’s green as well as fun!
C. ASSEMBLY
ASSEMBLING THE CHASSIS
1. Look at the chassis. The end with the motor housing and the pre-installed axle is the rear of the Solar Rover.
Carefully insert the motor into the motor housing. The worm gear on the motor's spindle must interlock with the
gear wheel on the rear axle. Lubricate the gears with some cooking oil/lotion from home.
2. Place the motor cover over the motor with the cut-outs in the cover facing to the rear. The wires from the motor
should come out through one of the cut-outs. Secure the cover with two short screws.
3. Push the axle through the slot in the front of the chassis and push a wheel onto each end of the axle.
4. Push a wheel onto each end of the rear axle.
5. Make the solar panel support arm: the support arm is made of the base joint, a short arm section, a long arm
section and a top joint. Push the base joint onto one end of the short arm section. Push the other end of the short
arm section onto one end of the long arm. Push the top joint onto the spare end of the long arm.
6. Attach the reflective stickers on the reflector panels. Clip the two reflectors onto the sides of the solar panel
holder. Then clip the holder onto the top joint of the supporting arm.
7. Attach the solar panel to its holder plate using the strips of double-sided tape.
8. After the whole solar panel support unit is assembled, attach the base joint to the slot on top of the motor cover.
The solar panel unit should now stand on top of the motor cover.
9. Push the black wire from the solar panel and the black wire from the motor into one of the terminals. Push in a
terminal cap to trap and connect the wires. Repeat with the two red wires in the other terminal.
To Parents: Read all instructions
before providing guidance to your children.
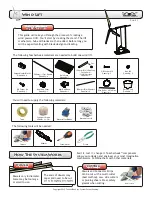
B. CONTENTS
1 x chassis with rear axle in place
1 x axle
4 x wheels
1 x motor with wires
and worm gear
1 x motor cover
1 set solar panel support arm components (1 X base joint,
1 X short arm section, 1 X long arm section and 1 X top joint)
1 X solar panel holder
2 X reflector panels
1 X transparent chassis body
2 X terminal caps
1 X adhesive foam
1 x long screw
1 X medium screw
2 x short screws
11. There is also a transparent plastic body sheet provided in this kit that you can use to make a body
shell. Fold the plastic sheet along the edges as diagram.
12. Fit one side of the plastic cover onto the pins on one side of the chassis. Bend the cover over and fit
the other side onto the pins on the opposite side of the chassis. Why not stick some your favorite stickers
on the body to make your Solar Rover look cool.
Congratulations! Your Solar Rover is ready to go.
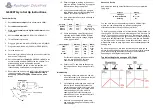
D. OPERATION
Put your Solar Rover in the sunshine. Twist and tilt the solar panel so that the panel faces the Sun. This
allows the panel to collect as much sunlight as possible. Adjust the reflectors so that they reflect
sunshine onto the solar panel. The motor should start running, making the Solar Rover move forwards.
When you are not using your Solar Rover, keep it out of the sunshine so that the motor doesn't operate.
Don't use the Solar Rover outdoors when it is raining as water may damage the solar panel and motor.
You may also use the Solar Rover indoors or at an indoor school
science fair. Ask an adult for a desk lamp with a 60-watt
incandescent light bulb (not a fluorescent energy saving bulb). The
bulb will act as a simulated Sun. Shine the lamp close directly onto
the solar panel from close up. The light should be enough to drive the
Solar Rover. Warning: An adult’s permission and supervision is
required when using a desk lamp.
E. TROUBLESHOOTING
If your solar rover does not move:
• Check that the bare wires from the solar panel and the motor are touching their terminal caps.
• The floor surface may be too rough or uneven. A rough surface will create friction which affects the
performance of your Rover.
• Try giving the Solar Rover a gentle push to get it started.
• The sunlight may not be strong enough. Adjust the angle of the panel so that it faces directly at the Sun.
If it's cloudy you may have to wait until a sunnier day.
• Check that the gears are lubricated. Friction between the gear wheels will affect the performance of the
motor.
If your solar rover runs backwards:
• The wires from the solar panel are in the wrong terminals. Swap them over (but keep the wires from the
motor in the same terminals).
F. HOW YOUR SOLAR ROVER WORKS
The solar panel is made up of solar cells. When sunlight hits the solar cells, the cells create an electric
current. The current makes the motor turn, which turns the wheels. The gears make the wheels turn more
slowly than the motor. This allows the motor to turn the wheels more easily.
G. FUN FACTS
• Energy we get from the Sun is called solar energy. It's a renewable form of energy because the Sun keeps
shining all the time.
• Only about one billionth (a thousandth of a millionth) of the energy the Sun gives out hits the Earth.
• When light hits a solar cell, the solar cell works like a battery. In the Solar Rover, it pushes electricity
through the motor.
• Solar cells are made from a material called silicon. Most silicon used to make them comes from sand.
• We use solar cells to make electricity in all sorts of gadgets, from watches to garden lights.
• Experimental solar vehicles work just like Solar Rover. They have roofs made from solar panels that
provide electricity to work their electric motors.
• In 2007 and 2008 Solartaxi drove right around the world just using its solar panels. It also used it solar
panels to recharge its batteries.
• NASA's robot rovers called Spirit and Opportunity drive across the surface of Mars using electricity from
solar cells.
11
12
We value you as a customer and your satisfaction with this product is important to us. If you have comments or questions,
or you find any part of this kit missing or defective, please do not hesitate to contact our distributor in your country.
You will find the address printed on the package. You are also welcome to contact our Marketing Support Team: Email:
[email protected], Fax (852) 25911566, Tel: (852) 28936241, Web site: WWW.4M-IND.COM
Questions & Comments
Questions & Comments
©2010 4M Industrial Development Limited. All rights reserved.
3
2
8
9
1
4
ASSEMBLING THE BODY
10. We encourage recycling, so use an empty soda can to make the body of your Solar Rover.
Clean the soda can first. Then place the soda can onto the chassis with its hole to the rear,
so that the rim of the can is just below the slot in the motor cover. Secure the can in place
with one long screw at the front of the chassis and one medium screw under the rear.
6
7
Reflective
sticker
5
Adhesvie foam
9
10
2 X reflective stickers
1 X solar panel
Long screw
Medium screw
Solar Rover INS -A_175L 07-01-2010
C
M
Y
K
Solar Rover INS -B_175L 07-01-2010
C
M
Y
K